Complete Guide to Plesk

Plesk Onyx is another of the most widely used control panels in the hosting world. It is known among programmers and web developers for its ease of use in managing domains, email, and databases. As a brief introduction, Plesk allows you to create client accounts with different permission levels:

  • Subscriber Account: An account separate from the client’s hosting account where you can manage your FTP access, email, databases, and backups for one or more domains.
  • Reseller Account: This account has the permissions to create subscribers, granting each hosting account the permissions and resources you choose.
  • Admin Account: This user is the administrator of the entire VPS server. With this account, you’ll have control over all users on the server.

How to Access the Plesk Control Panel

Accessing Plesk is very easy; all you have to do is open your browser and type the server name followed by port 8443, which is the default port set by the tool itself: https://ejemplo.com:8443/

Next, enter your username and password:

Cómo acceder al panel Plesk — captura 1

How to Change the Language in Plesk

If you want to change the language in Plesk, go to “Tools and Settings” (or “Herramientas y Configuración” in Spanish) in the left sidebar.

Cómo cambiar el idioma de Plesk — captura 1

Then, in the “Plesk Appearance” section, select “Languages.”

Cómo cambiar el idioma de Plesk — captura 2

In this example, we’ll set the language to Spanish. Select the line that says: es-ES SPANISH, then click “Make Default” to set it as the default language.

Cómo cambiar el idioma de Plesk — captura 3

Now all that’s left is to log out and log back into Plesk so that the changes take effect in your control panel.

How to Change the Appearance of the Plesk Panel

If you want to change the appearance of your dashboard, select “Tools and Settings” (in Spanish) from the left sidebar.

Cómo modificar la apariencia del panel Plesk — captura 1

Once there, click on “Skins and Color Schemes” under “Plesk Appearance.”

Cómo modificar la apariencia del panel Plesk — captura 2

Once selected, click the “Keep this color scheme” button:

Cómo modificar la apariencia del panel Plesk — captura 3

How to Add a New Domain in Plesk

If your web hosting plan includes more than one domain name (website), you can easily add new domains to the server.

PAUSE:Before performing this step, you need to have this domain registered. You can register a new domain here

To create a new domain, go to the “Websites & Domains” page in the Plesk control panel and click “Add Domain”:

Cómo añadir un nuevo dominio en Plesk — captura 1

Next, fill in the following fields:

  • Domain Name: Enter the domain name you want to add.
  • Website file location: Select the location where you want to add your domain.
  • DNS server settings: Check the “Enable DNS service” option .
  • Hosting type: Check “Website hosting.”
  • Document root: This will be the directory that contains all of our website’s files.
  • Preferred domain: Leave the option set to “None.”
Cómo añadir un nuevo dominio en Plesk — captura 2

Click “OK” and verify that the domain has been created correctly.

How to Add a Subdomain in Plesk

First, go to the "Websites & Domains" page on your Plesk control panel and click "Add New Subdomain":

Cómo añadir un subdominio en Plesk — captura 1

Next, we’ll configure the following fields:

Cómo añadir un subdominio en Plesk — captura 2
  • Subdomain Name: In the first field, enter the name you want for your subdomain; in the second field, select the domain to which you want to add the subdomain you’re creating.
  • Document root: Enter the path where all the subdomain’s files will be hosted (if you leave it as the default, it will be the subdomain’s name).

Now click “OK,” and the new subdomain will be created.

How to Create a Domain Alias in Plesk

A domain alias is a domain name that acts as a mirror of another domain. It will display the same website as the original domain.

Domain aliases allow you to point multiple domain names to the same website. This can be useful, for example, for identification purposes.

Steps to add a new domain alias:

From the main Plesk “Websites & Domains” panel, click “Add Domain Alias”:

Cómo crear un alias de dominio en Plesk — captura 1

Next, fill in the following fields:

  • Domain Alias Name: Enter the name of the domain alias you want to add.
  • For the domain: Select the domain to which the alias redirects.
  • Synchronize the DNS zone with the primary domain: Make sure this box is checked.
  • Email service: This box must be checked.
  • Web service: This box must be checked.
  • Redirect with HTTP 301 status code: This box must be checked.
Cómo crear un alias de dominio en Plesk — captura 2

Click “OK,” and the alias will be created.

File Manager in Plesk

To access the Plesk file manager, simply go to the "Files" section in Plesk, and the file explorer will open.

Administrador de archivos en Plesk — captura 1

How to Change the PHP Version for a Domain in Plesk

If you want to change the PHP version for one or more domains using Plesk, select "Websites & Domains" from the left sidebar. Select the domain you want to change, and then click " PHP Settings."

Cómo cambiar la versión de PHP de un dominio en Plesk — captura 1

Now you can select the PHP version

Now choose the PHP version from the drop-down menu (as shown in the image below) and save:

Cómo cambiar la versión de PHP de un dominio en Plesk — captura 2

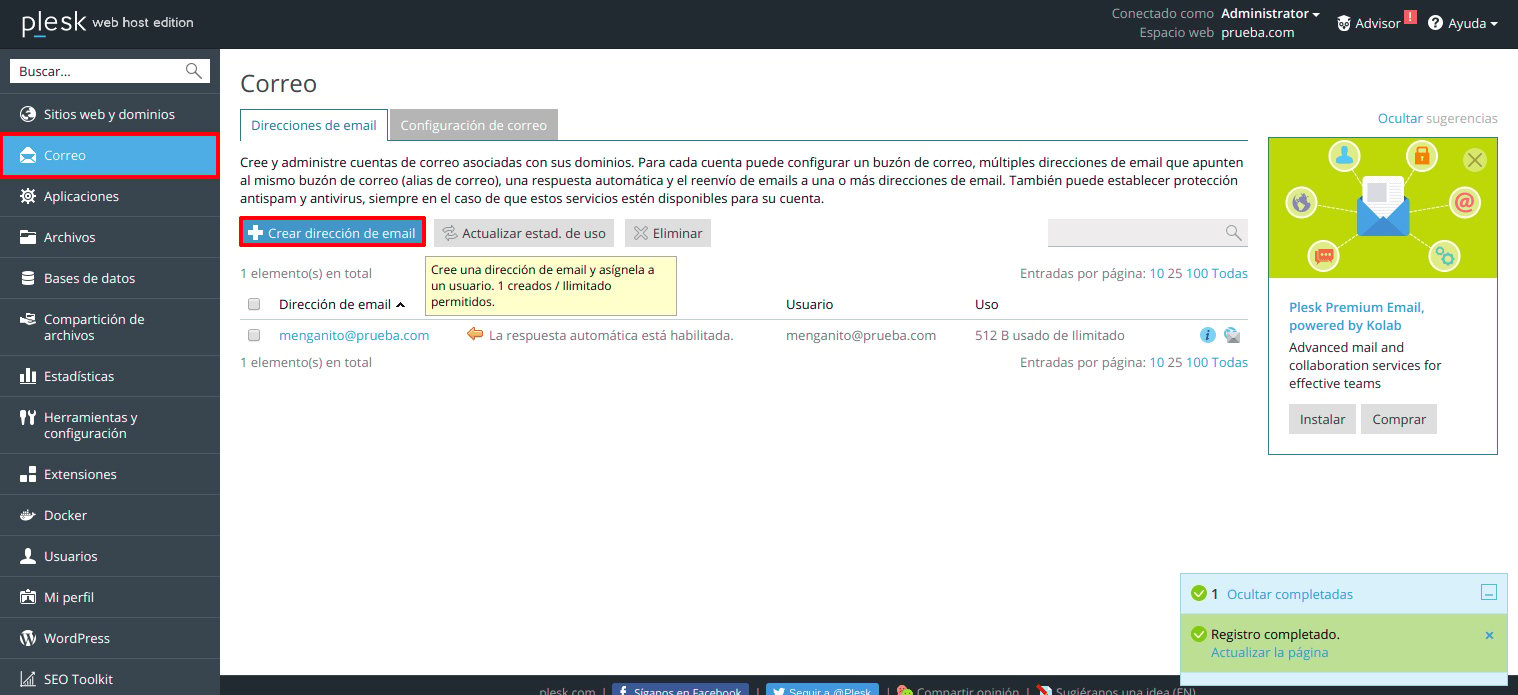
How to Create an Email Account in Plesk

To create an email account in the Plesk control panel, select the "Mail" section, go to the "Email Addresses" tab , and click the "Create Email Address" button .

Cómo crear una cuenta de correo electrónico en Plesk — captura 1

Next, fill in the following fields:

  • Email Address: Enter an address and select the domain to which the email belongs.
  • Control Panel Access: Check this box if you want the email account you’re creating to have access to the control panel.
  • Password.
  • Make sure the “Mailbox” checkbox is selected.
  • You can set the available storage space for emails and the maximum number of outgoing emails.Click “OK”:
Cómo crear una cuenta de correo electrónico en Plesk — captura 2

PAUSE: If you need to set up your email account in Gmail, Thunderbird, or Outlook Hotmail, here’s a link to the guides on our blog

How to Create an Email Alias in Plesk

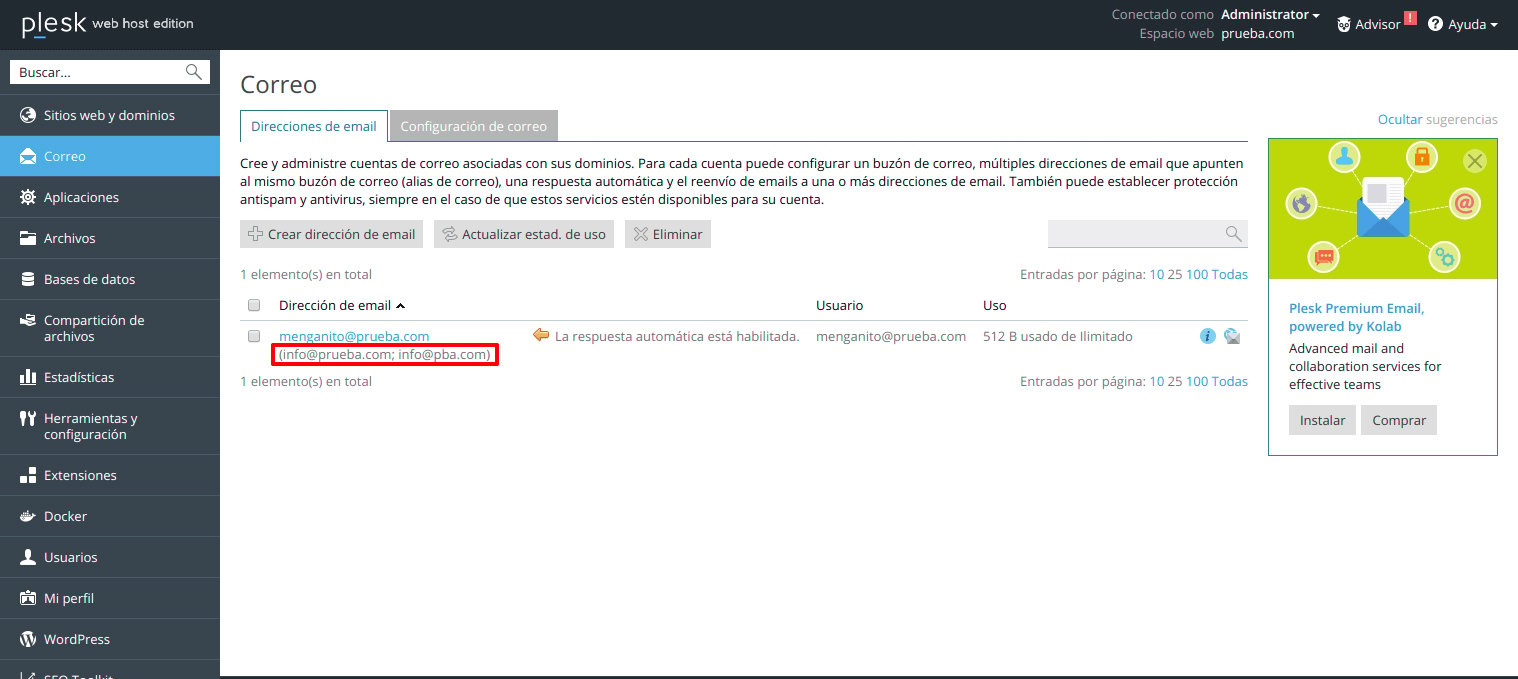
Aliases are secondary email accounts linked to a primary email account; all emails sent to accounts set up as aliases will be delivered to the primary account:

Here are the steps to add an email alias:

In the Mail section of the Plesk control panel, select the email account for which you want to create an alias on the Email Addresses tab

Cómo crear un alias de correo en Plesk — captura 1

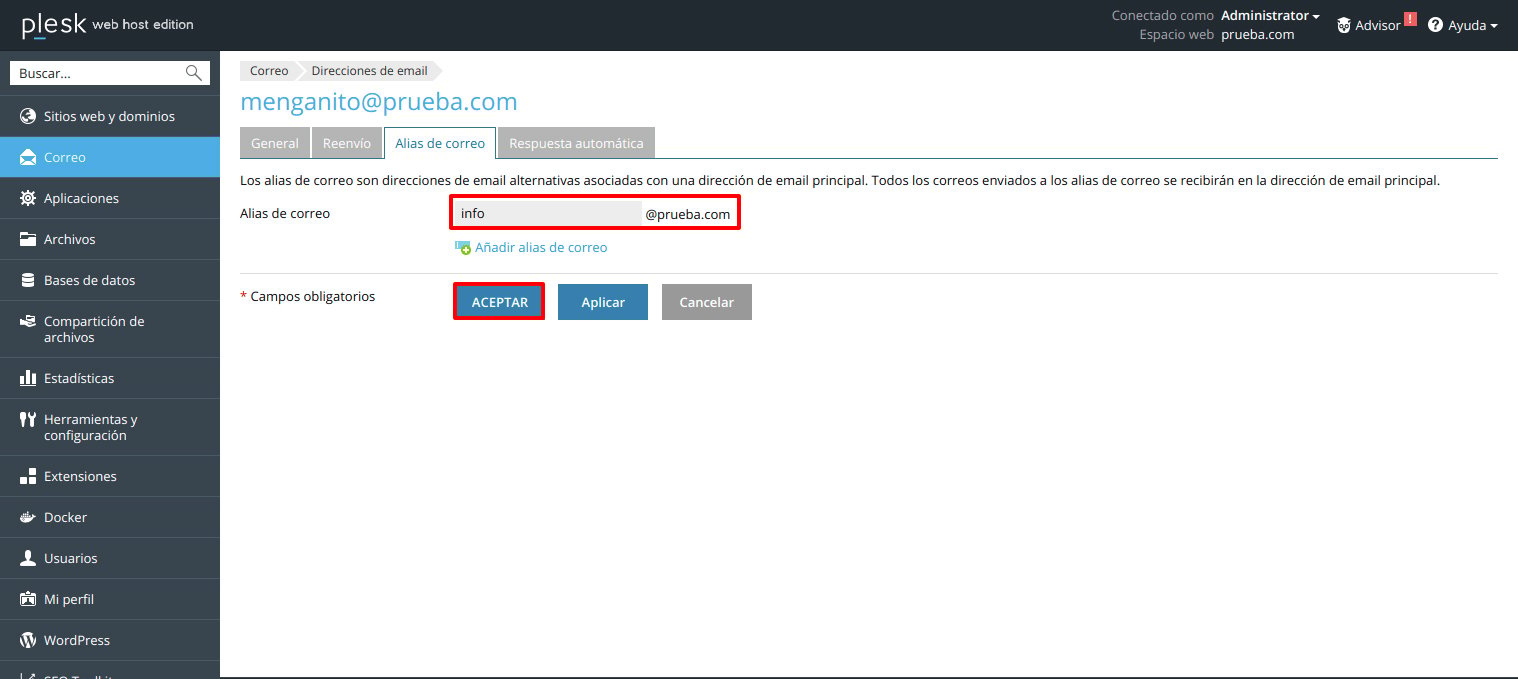
Next, go to the “Email Aliases” tab, add a new alias address, and click the “Apply” button.

Cómo crear un alias de correo en Plesk — captura 2

How to Change the Password for an Email Account in Plesk

If you need to change the password for an email account, here's how:

Select the "Email" tab and click the email address for which you want to change the password

Fill in the “Password” and “Confirm Password” fields, then click “OK.”

Cómo cambiar la contraseña de una cuenta de correo en Plesk — captura 1

How to Create Mailing Lists in Plesk

A mailing list is a group email address to which a number of users are subscribed. Mailing lists are used to send email messages to multiple recipients at once. Emails sent to list subscribers can range from plain text to colorful newsletters and promotions with embedded images and attached multimedia links or presentation materials.

How does it work? You create an email address for a mailing list in Plesk, and users subscribe to it. Then, when a message is sent to the list’s address, all subscribers receive it.

To set up a mailing list and subscribe users to it:

  • If you have access to multiple subscriptions, select the desired subscription from the subscription box at the top of the screen. Alternatively, to view all your subscriptions, select “All Subscriptions.”
  • Go to the “Mail” tab >> “Mailing Lists.”
  • Click “Create Mailing List.”
  • Enter the mailing list address, and if you have multiple websites, select the website where the mailing list will be created. To subscribe users to the mailing list, enter their email addresses, one per line.
  • To notify the mail administrator about the creation of the mailing list, select the “Notify administrator when creating the mailing list” checkbox .
  • Click “OK.”

To subscribe or unsubscribe users:

  • Go to the “Mail” tab >> “Mailing Lists.”
  • Click the list address.

Do one of the following:

  • To subscribe users to the mailing list, enter their email addresses in the subscribers field, one address per line.
  • To unsubscribe users, remove their addresses from the “Subscribers” field .
  • Click “OK.”

To delete a mailing list:

  • Go to the "Mail" tab >> "Mailing Lists."
  • Check the box next to the mailing list you want to delete and click "Remove."
  • To confirm the deletion, click Yes.

To disable the mailing list service and all mailing lists created under the currently selected subscription:

  • Go to the "Mail" tab >> "Mailing Lists."
  • Click “Deactivate Service.”

To enable the mailing list service for the currently selected subscription:

  • Go to the “Mail” tab >> “Mailing Lists.”
  • Click “Enable Service.”

How to Set Up Forwarders in Plesk

First, we need to go to the “Mail” section .

Cómo configurar reenviadores en Plesk — captura 1

Once there, select one of the email addresses you’ve created:

Cómo configurar reenviadores en Plesk — captura 2

A window will open. Select the “Forwarding” section and click “Enable Email Forwarding.” You can also specify the email address to which you want all forwarded emails to be sent. See below:

Cómo configurar reenviadores en Plesk — captura 3

How to View Website Statistics in Plesk

To view statistics for your Plesk account—such as used hard drive space or data transfer—simply go to the “Statistics” section and a window will open on the right where you can view basic statistics such as “Disk Space” or “Traffic.”

Cómo ver las estadísticas de la web en Plesk — captura 1

Additionally, if you select the “Data Transfer Statistics” option, you can view more detailed monthly reports on the traffic being used.

Cómo ver las estadísticas de la web en Plesk — captura 2

How to Set Up Autoresponders in Plesk

From the Plesk dashboard homepage, click the “Mail” tab .

  1. Select the email account for which you want to set up an auto-reply:Cómo configurar autorespondedores en Plesk — captura 1.
  2. Click the “Autoresponse” tabCómo configurar autorespondedores en Plesk — captura 2.
  • Check the “Enable Auto-Reply” box .
  • Subject of the auto-reply message: Here you can enter the subject for the auto-reply.
  • Message format: Plain text.
  • Encoding: Leave it set to UTF-8.
  • Autoresponse message text: Enter the text of the message.
  • Forward to: If you want to forward incoming messages to another email address, enter it here.
  • Send an Auto-Reply: The default value is “1 time per day,” which means that if multiple messages are received from the same email address in a single day, Plesk will send an auto-reply only for the first message. If the value is “2,” Plesk will send an auto-reply for the first and second messages, and so on.
Cómo configurar autorespondedores en Plesk — captura 3

You can also attach a file to the automatic reply message. Once you’ve filled in all the fields, click “OK.”

How to Set Up Email Forwarding to Another Account in Plesk

To enable email forwarding from one account to another, go to the "Mail" tab in the Plesk control panel and click the account for which you want to enable forwarding:

Now go to the “Redirects” tab and check the “Enable email forwarding” box :

Cómo configurar el reenvío de correo a otra cuenta en Plesk — captura 1

Next, enter the email account to which you want to forward messages. You can enter more than one email account, then click the “Apply” button :

Cómo configurar el reenvío de correo a otra cuenta en Plesk — captura 2

If you want this email account (administrador@creardominio.es) to not save any emails that are being forwarded, go to the “General” tab , uncheck the “Inbox” box, and click “OK.”

And now you can see that automatic replies are enabled for that account:

Cómo configurar el reenvío de correo a otra cuenta en Plesk — captura 3

How to Limit Email Sending in Plesk

Your hosting provider may set limits on the number of outgoing emails per hour, usually to help prevent spam. Each subscription, domain, and mailbox has its own limits. By default, the limit values are set by the hosting provider. You may need to increase the limits to send more emails, or decrease them to prevent an excess of outgoing mail.

Note: The options described below are displayed only if outbound email limits are enabled by your hosting provider. Additionally, some limits may not be available (for example, the limit on the number of outbound emails from a mailbox), depending on the mail server used in Plesk.

How to set limits on the number of outgoing emails for a domain:

Cómo limitar el envío de emails en Plesk — captura 1

Go to “Websites & Domains” >> “Mail” and select one or more domains for which you want to change the limit by checking the corresponding checkboxes.

Click “Limit Outgoing Email” on the toolbar.

Cómo limitar el envío de emails en Plesk — captura 2

Edit the limit in the outgoing messages field and click “OK”:

Cómo limitar el envío de emails en Plesk — captura 3

To set limits on the number of outgoing email messages for a mailbox:

From the “Mail” tab , click on the email account, check the “Custom value for the mailbox” box, and specify the number of outgoing emails:

Cómo limitar el envío de emails en Plesk — captura 4

You can also limit all emails related to a domain:

Go to the “Mail” tab >> “Mail Settings” >> “Edit Limit”:

Cómo limitar el envío de emails en Plesk — captura 5

Then edit the limit on outgoing messages:

Cómo limitar el envío de emails en Plesk — captura 6

Spam Protection in Plesk

  1. From the Plesk panel, go to the "Mail" tab.
  2. Select the email account for which you want to enable the anti-spam filter: Protección contra spam en Plesk — captura 1.
  3. Select the “Anti-Spam Filter” tab :
  4. Check the box labeled “Enable anti-spam filter for this email address”:
  5. You can also specify what should be done with incoming emails that are considered spam.
  6. Once this is configured, click “OK,” and if you want to configure additional settings for the spam filter, click “Show Advanced Settings.”
Protección contra spam en Plesk — captura 2

In the advanced settings, you can select the following options:

  • Specify the sensitivity of the spam filter.
  • Add domains from which you receive email containing important information to the “whitelist” so that the spam filter doesn’t classify them as spam.
  • Add the domains from which you receive junk mail or spam to the “blacklist.”

How can we add a specific domain to these lists?

Example: Type *@domain.com, or if you want to specify a particular account on a domain, type usuario@*.com

Protección contra spam en Plesk — captura 3

NOTE:

If you access your mailbox via the IMAP protocol, you must select the option “Move spam to the Spam folder” so that spam messages appear in the correct folder.

Since all messages are automatically deleted from the spam folder after 30 days, you’ll need to check the contents of the spam folder regularly so you don’t miss any important messages and can move them to your inbox.

When you select the “Move spam to the Spam folder” option, you can train the spam filter and improve its accuracy by moving spam messages from the Spam folder to the Inbox and non-spam messages from the Inbox to the Spam folder.

If you need to adjust the spam filter’s sensitivity, click “Show advanced settings,” and enter the number of points a message must reach to be considered spam.

If you need to save emails from specific senders, email addresses, or domain names, you can add them to the whitelist field.

How to Create a Database in Plesk

With Plesk, we can create and delete databases. Here's how:

  1. Go to the “Websites & Domains” section and select the “Databases” option :Cómo crear una base de datos en Plesk — captura 1.
  2. Now click “Add New Database”: Cómo crear una base de datos en Plesk — captura 2.
  3. Fill in the following fields:
    • Database name: If your subscription grants you the appropriate permissions, you can choose a database type and the database server where you want to create it.
    • Select the option to create a user in the database: Enter the username and password. You can also assign permissions to this new user. Remember that a database must have at least one registered user to be accessible.
  4. Once you click “Accept,” you should be able to see your database in its respective domain, as shown in the image below.
Cómo crear una base de datos en Plesk — captura 3

How to Create New Database Users in Plesk

To access the database in Plesk, you must enter the name of a user account associated with it.

Any database user can be set as the default for a database. Plesk always accesses the database using the default user’s credentials, even if there are other users associated with the database. If a database has multiple associated user accounts and none of them is set as the default, the first account in the list will be used.

There are two types of database user accounts in Plesk:

  • User accounts with access to a single database: If you collaborate with others on managing a website and want to grant them access to the database, you must create user accounts for each of them. Each of these accounts is used to access a single database. In this case, you must first create a database and then create the user accounts.
  • Universal user accounts that have access to all databases. Universal users have access not only to all existing databases but also to all newly created databases.

If you plan to install a number of web applications on your site, it might be convenient to create a universal user account so that all applications can access their databases using this account. In this case, you must first create a user account and then specify the application installations.

Note: A universal user operates only within a single database server. If you use multiple database servers, create a separate universal user account for each server.

Database User Operations

  1. Select “Databases” from the left sidebar atOperaciones con los usuarios de bases de datos — captura 1.
  2. Select the “User Management” option .Operaciones con los usuarios de bases de datos — captura 2.
  3. To add a new user, click “Add Database User”Operaciones con los usuarios de bases de datos — captura 3.
  4. Fill in the following fields:
  5. Database username: Your username.
  6. Password: The user’s password.
  7. Database: Select the specific database you want to associate the new user with. Note: If you want to create a universal database user, select “Any”Operaciones con los usuarios de bases de datos — captura 4.

Notes:

  1. You can delete a default database user only by deleting the database associated with that user. Alternatively, you can edit the user and uncheck the “Default User” checkbox for that database, and then delete the user.
  2. If a database user was created by an APS application, you can remove this user only by deleting the respective application in Access Settings.

Starting with Parallels Plesk Panel 12.0, you can allow or deny remote access to a database, or allow access only from specified hosts. Access settings apply to individual database user accounts. For more information, see the section on Configuring Custom Access Rules.

How to Copy Databases in Plesk

Plesk allows you to copy databases from one database server registered in Plesk to another, as well as to any remote server, provided that the source and destination servers are of the same type (for example, MySQL).

To copy a database, select “Websites & Domains” >> “Databases” >> “Copy”:

Cómo copiar bases de datos en Plesk — captura 1

You must specify the destination server, the subscription, and the database name. For a remote server, select “Other” from the list of destination database servers and provide the following additional information:

  • Hostname or IP address of the remote database server.
  • Username and password of the remote database server administrator. (For example, the MySQL administrator credentials.)
  • Copy Types: When copying a database, you can choose to create a full database copy that includes table data (the “Create a full copy” option), or copy only the database structure (in the latter case, Plesk will create tables without data in the destination database).

NOTE:

When you select an existing database as the destination, any tables in the destination database whose names also appear in the source database will be overwritten.

How to Access phpMyAdmin in Plesk

To access the phpMyAdmin database in the Plesk Panel:

    1. Using the WebAdmin link under the “Websites & Domains” >> “Databases” tabs, select the database and then “phpMyAdmin.”Cómo acceder a phpMyAdmin en Plesk — captura 1.
    2. The phpMyAdmin window will open.Cómo acceder a phpMyAdmin en Plesk — captura 2.

In this case, Plesk automatically uses the appropriate database user credentials.

If you need to access your database using other tools (such as SQL Server Management Studio) or want to grant other applications access to it, you’ll need to provide the necessary credentials for those tools and applications. Here’s how:

    • To connect to MySQL and PostgreSQL, you’ll need to provide the hostname (or IP address), the database username, and the password.
    • To connect to Microsoft SQL Server, you’ll also need to specify the Microsoft SQL Server instance. For Microsoft SQL Server 2008, Plesk uses the instance named MSSQLSERVER2008. Therefore, the host can be specified as mydomain.com\MSSQLSERVER2008 or 123.123.123.123\MSSQLSERVER2008. For Microsoft SQL Server 2005, Plesk uses the default instance (MSSQL 2005), and you do not need to specify the instance name.

How to Export or Import a Database in Plesk

In Plesk, you can export or import a database. Here's how:

  • Exporting a database: Save a source database to a file that can be used for storage or distribution.

One reason for exporting databases is security. While Plesk for Windows offers a different feature for database backups, in Plesk for Linux, exporting is the only option for creating standalone database backup files.

Additionally, databases can be backed up along with other data during subscription backups and then restored separately. See the Backup and Restore section of the Websites page for more information.

  • Importing a Database: Restore data from the file to a destination database. You can import a database to the same or a different database server. The only restriction is that the destination database must be of the same type, for example, MySQL.

Export a database

To export a database in the Plesk control panel, click "Export Dump" and then select the folder or directory where the database export will be saved.

Exportar una base de datos — captura 1

Import a database

To import, click "Import Dump, " then select the file from your computer to complete the import.

Importar una base de datos — captura 1

Note: It is recommended that you import the data into a new database.

For instructions on how to import and export data using database management tools, refer to the help sections for those tools.

How to Back Up a Website in Plesk

To back up all data related to your account and all your subscriptions:

    1. If you have access to multiple subscriptions, select the desired subscription from the subscription box at the top of the screen. Alternatively, to view the sites for all your subscriptions, select “All Subscriptions.”
    2. On the “Account” tab, select “Back up my account and websites”Cómo crear un backup del sitio web en Plesk — captura 1.
    3. Now make sure you’re on the “Server Repository” tab and click “Copy”:Cómo crear un backup del sitio web en Plesk — captura 2.
    4. Next, fill in the following fields:
      • Backup name prefix: You cannot specify an arbitrary filename, but you can configure Plesk to add a prefix to backup filenames. (Note that Plesk automatically adds the date and time the backup file was created (in Coordinated Universal Time) to the backup file names.)
      • Comment: A brief description of the backup.
      • Create a multi-volume backup: Splits the backup file into multiple volumes. To create a multi-volume backup, check the box and specify the volume size in megabytes.
      • Save the backup to: The location where you want to save the backup file.
      • Send an email to: Email notification upon completion of the backup. If you want to receive notifications when a backup is completed, enter your email address.
      • Backup contents: You can back up either just the account settings or the account and all data (including databases).
      • Suspend domains until the backup task is complete: Select this option to prevent users from making changes to the content or settings of websites while they are being backed up.

Note:

If you select this last option, once the backup is restored, you will need to manually change each domain alias for every site that requires a domain alias. This can be done under the Websites & Domains tab > domain alias name > Enable.

Click Copy.Cómo crear un backup del sitio web en Plesk — captura 3

      1. When the backup is complete, the backup file will be saved to the selected repository.Cómo crear un backup del sitio web en Plesk — captura 4.
      2. The backup we just created appears in the “Server Repository” tab:
Cómo crear un backup del sitio web en Plesk — captura 5

How to Schedule Backups in Plesk

If you prefer to schedule regular backups in Plesk:

  1. On the "Tools & Settings" tab , select "Backup Management":Cómo programar copias de seguridad en Plesk — captura 1.
  2. Next, click “Schedule”Cómo programar copias de seguridad en Plesk — captura 2.
  3. Now configure the following settings:
    • Check the box next to “Enable this backup task.”
    • Perform a full backup: Choose how often you want the backup to run: You can choose between “Daily, ” “Weekly, ” or “Monthly” (If you select “Daily,” you’ll need to specify the time the backup will start; if “Weekly,” specify the day of the week and the time; and if “Monthly,” specify the day of the month and the time)
    • Add a prefix to the backup name: Enter a name for the backup.
    • Maximum number of backups in the repository: Enter a number if you want to rotate the backup files: When this limit is reached, the oldest backup files will be deleted.
    • Backup content: Select what you want to includein the backup. Check “Client content and settings.” You can also back up only account settings or specific items such as databases or files.
    • Send an email if an error occurs during the backup process: Select this option if you want to be notified by email in case an error occurs during the backup.
    • Suspend domains until the backup task is complete: Select this option to prevent users from making changes to the content or settings of the websites while they are being backed up.
  4. Here we can see that the backup has been scheduled correctly:
Cómo programar copias de seguridad en Plesk — captura 3

How to Store a Backup on an FTP Server Using Plesk

We can use FTP storage to save our backups off the server on an FTP server, which is a way to save space on the server.

In the last option (FTP Storage Settings), specify the settings for your personal remote FTP storage where the backup files should be saved.

Cómo almacenar el backup en un FTP con Plesk — captura 1

How to Restore a Backup in Plesk

To restore a backup from the server repository:

    1. On the “Account” tab, select “Back up my account and websites”:
    2. Next, select the backup you want to restore from (if you have more than one):Cómo restaurar una copia de seguridad en Plesk — captura 1.
    3. Select the items you want to restore:

Select the “Entire System (Full Restore)” option. If, for example, you need to restore one or more domains but leave other domains intact, you must select the specific domains you want to restore.

You can restore data from backup files stored in:

The internal Plesk repository: To restore backup files from the Parallels Plesk Panel repository, select the name of the backup file you want to restore on the Account tab > Back Up My Account and Websites > Repository Server tab.

An external FTP repository: To restore backup files from the Parallels Plesk Panel repository, select the name of the backup file you want to restore on the Account tab > Back Up My Account and Websites > Personal FTP Repository tab.

  1. After you select a backup file name from the list of backups, Plesk launches the restore wizard.

Select data to restore

Note:

Starting with Parallels Plesk Panel 12.0, you can select which objects to restore from a backup. You can restore a specific site, file, database, and so on. This will help you restore only what you need, without overwriting other objects. For example, if you want to restore only the DNS zone for a domain, such as example.tld, there is no need to restore the settings for all other domains. Restoring selected objects is possible only from backups created in Parallels Plesk Panel 12.0 or later.

To restore all objects: Select the "Entire System (Full Restore)" option.

If prompted, specify the data types to restore, such as domain settings, virtual host content, databases, or mail settings and accounts. For example, if you select mail settings, the mail settings for all domains will be restored.

To restore specific objects of a particular type, such as a mailbox or a domain’s DNS zone:

  • Select the "Select Objects" option.
  • Select the type of object you want to restore. For example, the database.
  • Select the subscription to which the object belongs in the Subscription box (applicable to all object types except subscriptions). Click the box to view the list of all subscriptions, or type the first few letters of the subscription name, and Plesk will find matches. For example, example.com.
  • Select one or more objects of the selected type. For example, wordpress_database_8.

Specify restore options:

“Suspend domains until the restore task is complete.” Select this option if you want to avoid potential conflicts that may occur when users modify site content or settings while the sites are being restored.

“Send an email notification once the restoration is complete”: Enter your email address if you want the control panel to notify you when the restoration is complete.

If you choose the “Selected objects” option, you can select the types of objects you want to restore:

Cómo restaurar una copia de seguridad en Plesk — captura 2

And if you choose the “Entire system (full restore)” option .

Cómo restaurar una copia de seguridad en Plesk — captura 3

Select the items you want to restore—by default, both “Customer Account Settings” and “Customer Domains” are checked—and click “Restore”:

Cómo restaurar una copia de seguridad en Plesk — captura 4

We can see that the restoration has already begun; we’ll wait a few minutes for it to finish:

Once the restoration process is complete, the following message appears:

Cómo restaurar una copia de seguridad en Plesk — captura 5

How to Add an FTP Account in Plesk

If you need to create an FTP account in addition to the default one, follow these steps:

NOTE:

If you have access to multiple subscriptions, select the desired subscription from the subscription box at the top of the screen. Alternatively, to view the sites for all your subscriptions, select All Subscriptions.

    1. Go to the "Websites & Domains " tab and click "FTP Access"Cómo añadir una cuenta FTP en Plesk — captura 1.
    2. On the “FTP Accounts” tab, click “Add New FTP Account”:Cómo añadir una cuenta FTP en Plesk — captura 2.
    3. You’ll need to fill in the following fields:
      • FTP Account Name: Enter any name you like.
      • Home Directory: Select the directory where the user will be taken when he or she logs in to the FTP account.
      • New password...
      • Confirm password...
Cómo añadir una cuenta FTP en Plesk — captura 3
  1. In the hosting window, if you do not grant any permissions, a connection will be made to the FTP account, but the contents of the home directory will not be displayed to the user. Click “OK.”
Cómo añadir una cuenta FTP en Plesk — captura 4

How to Change the Properties of an FTP Account

  1. On the "Websites & Domains" tab, click " FTP Access."
  2. Select the FTP account name from the list.
  3. Make the necessary changes and click "OK."

How to Delete an Additional FTP Account

    1. On the "Websites and Domains" tab, click " FTP Access."
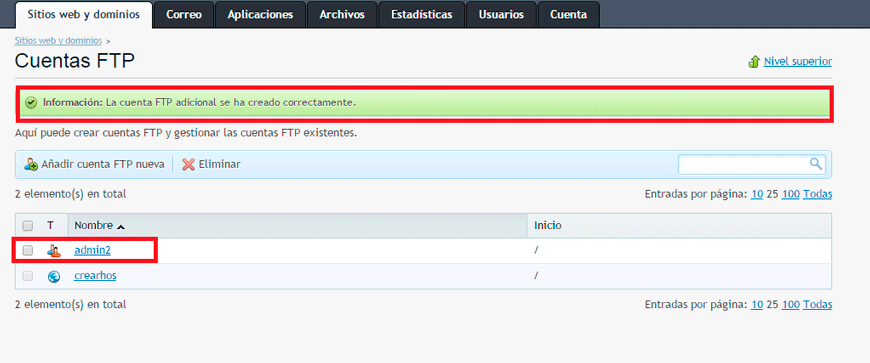
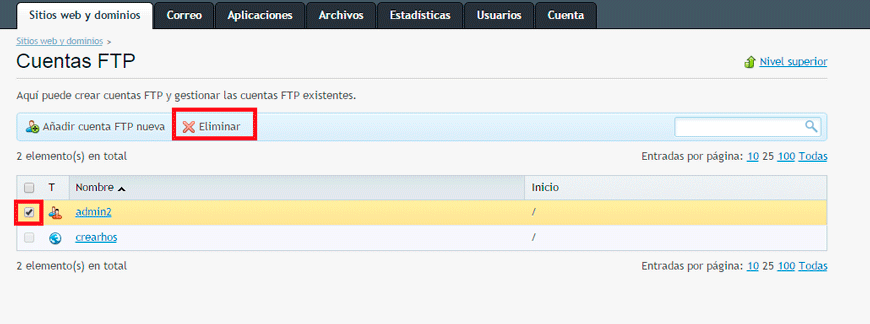
    2. Check the box next to the FTP account you want to delete, then click "Delete."
    3. Confirm the deletion and click OK.
Cómo eliminar una cuenta FTP adicional — captura 1

How to Change FTP Login Information in Plesk

If you have access to multiple subscriptions, select the desired subscription from the subscription box at the top of the screen. Alternatively, to view the sites for all your subscriptions, select “All Subscriptions.”

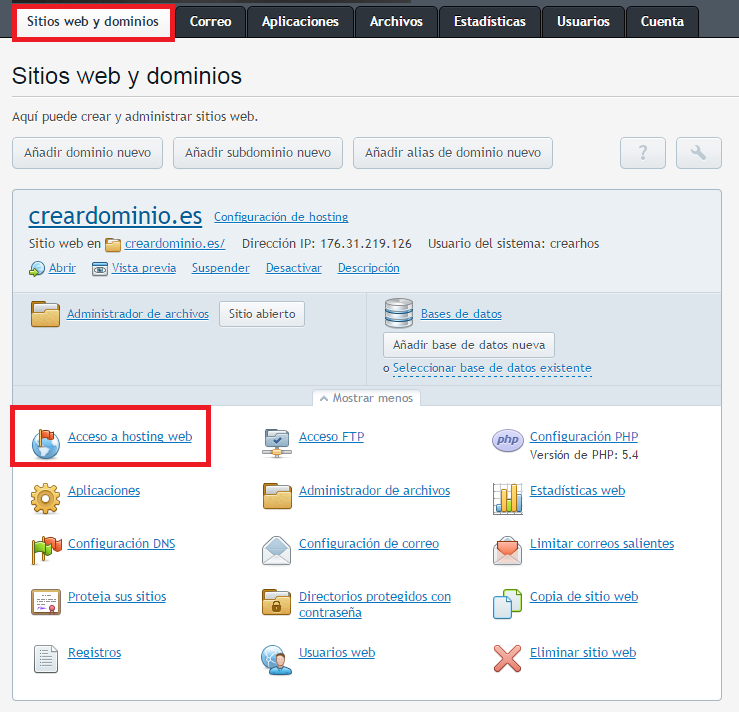
    1. Click the "Websites and Domains" tab .
    2. Click “Web Hosting Access”:
Cómo cambiar los datos de acceso FTP en Plesk — captura 1
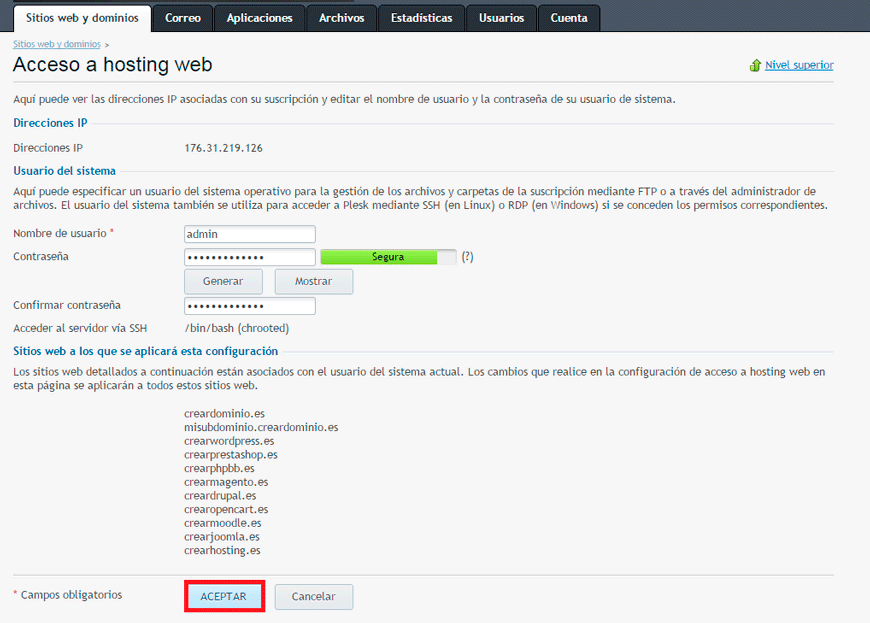
    1. Enter a new username or password.
    2. Click “OK.”
Cómo cambiar los datos de acceso FTP en Plesk — captura 2

How to Automatically Install WordPress in Plesk

Let's install WordPress in a few simple steps:

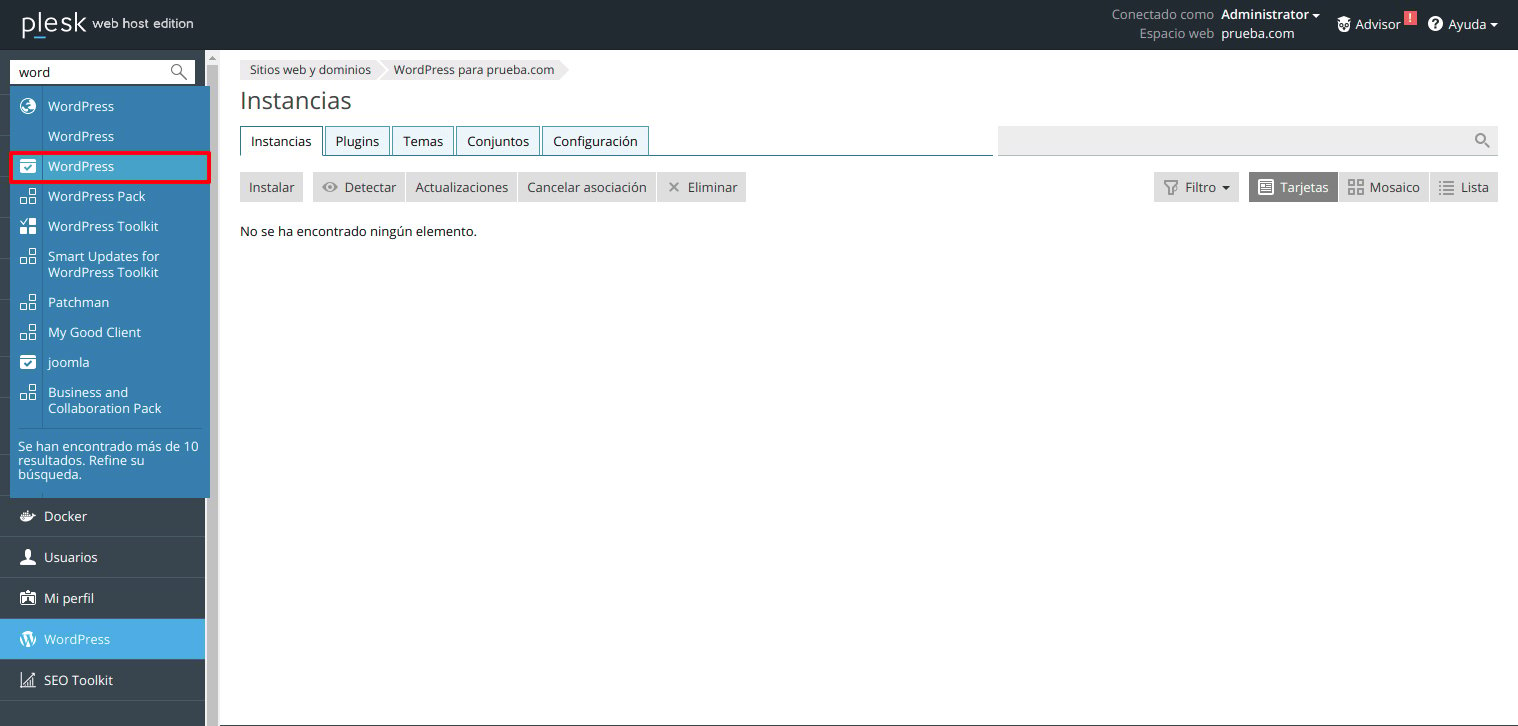
      1. In the search bar on the left side of your Plesk panel, search for “WordPress” and click on it.Cómo instalar WordPress automáticamente en Plesk — captura 1.
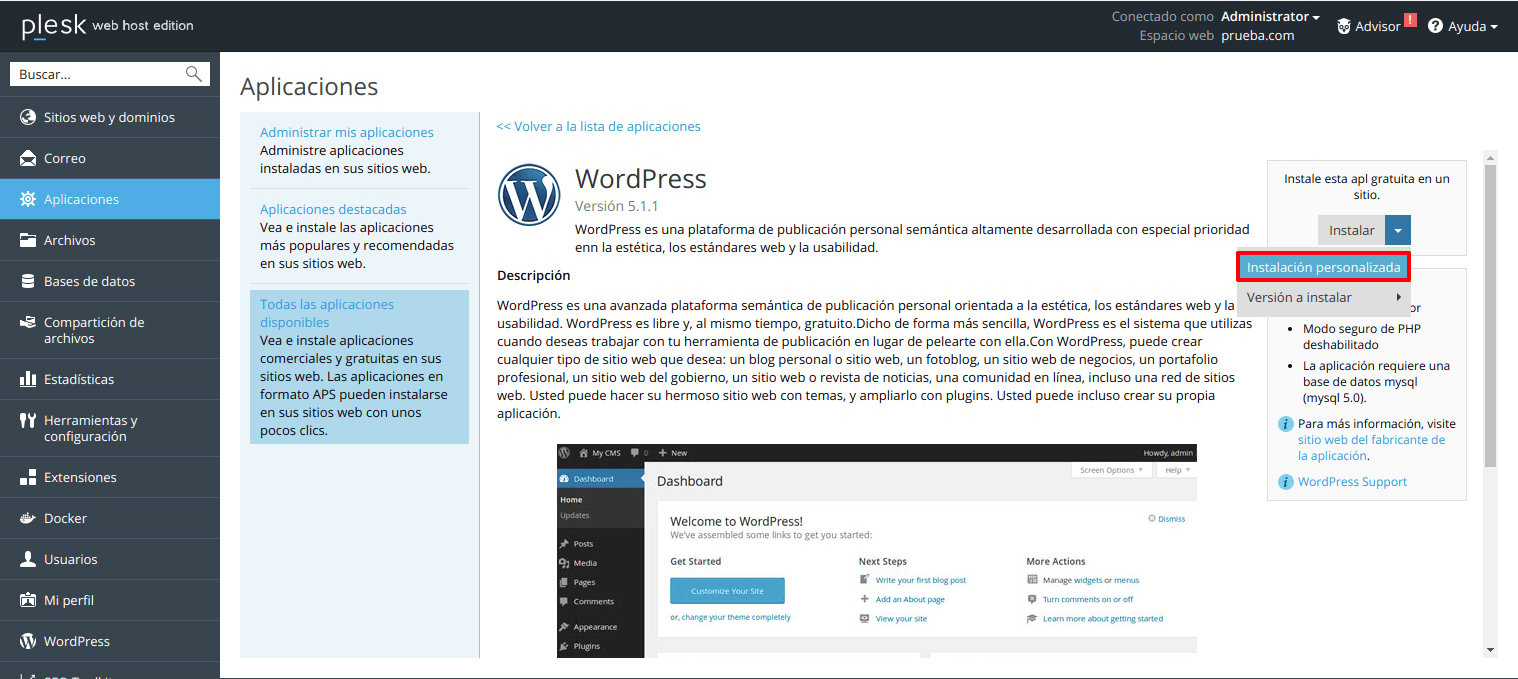
      2. In the Applications panel, select “Custom Installation”:Cómo instalar WordPress automáticamente en Plesk — captura 2.
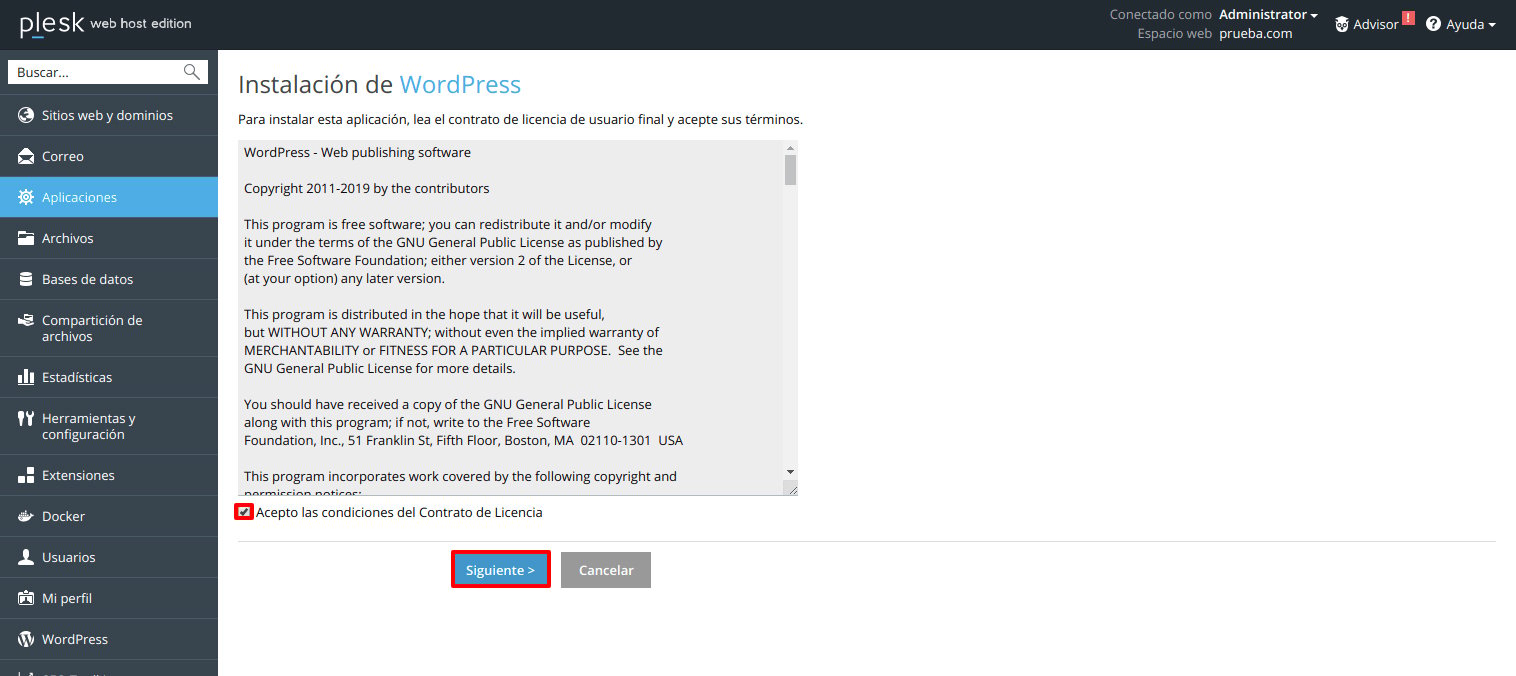
          1. Accept the WordPress installation terms:Cómo instalar WordPress automáticamente en Plesk — captura 3.
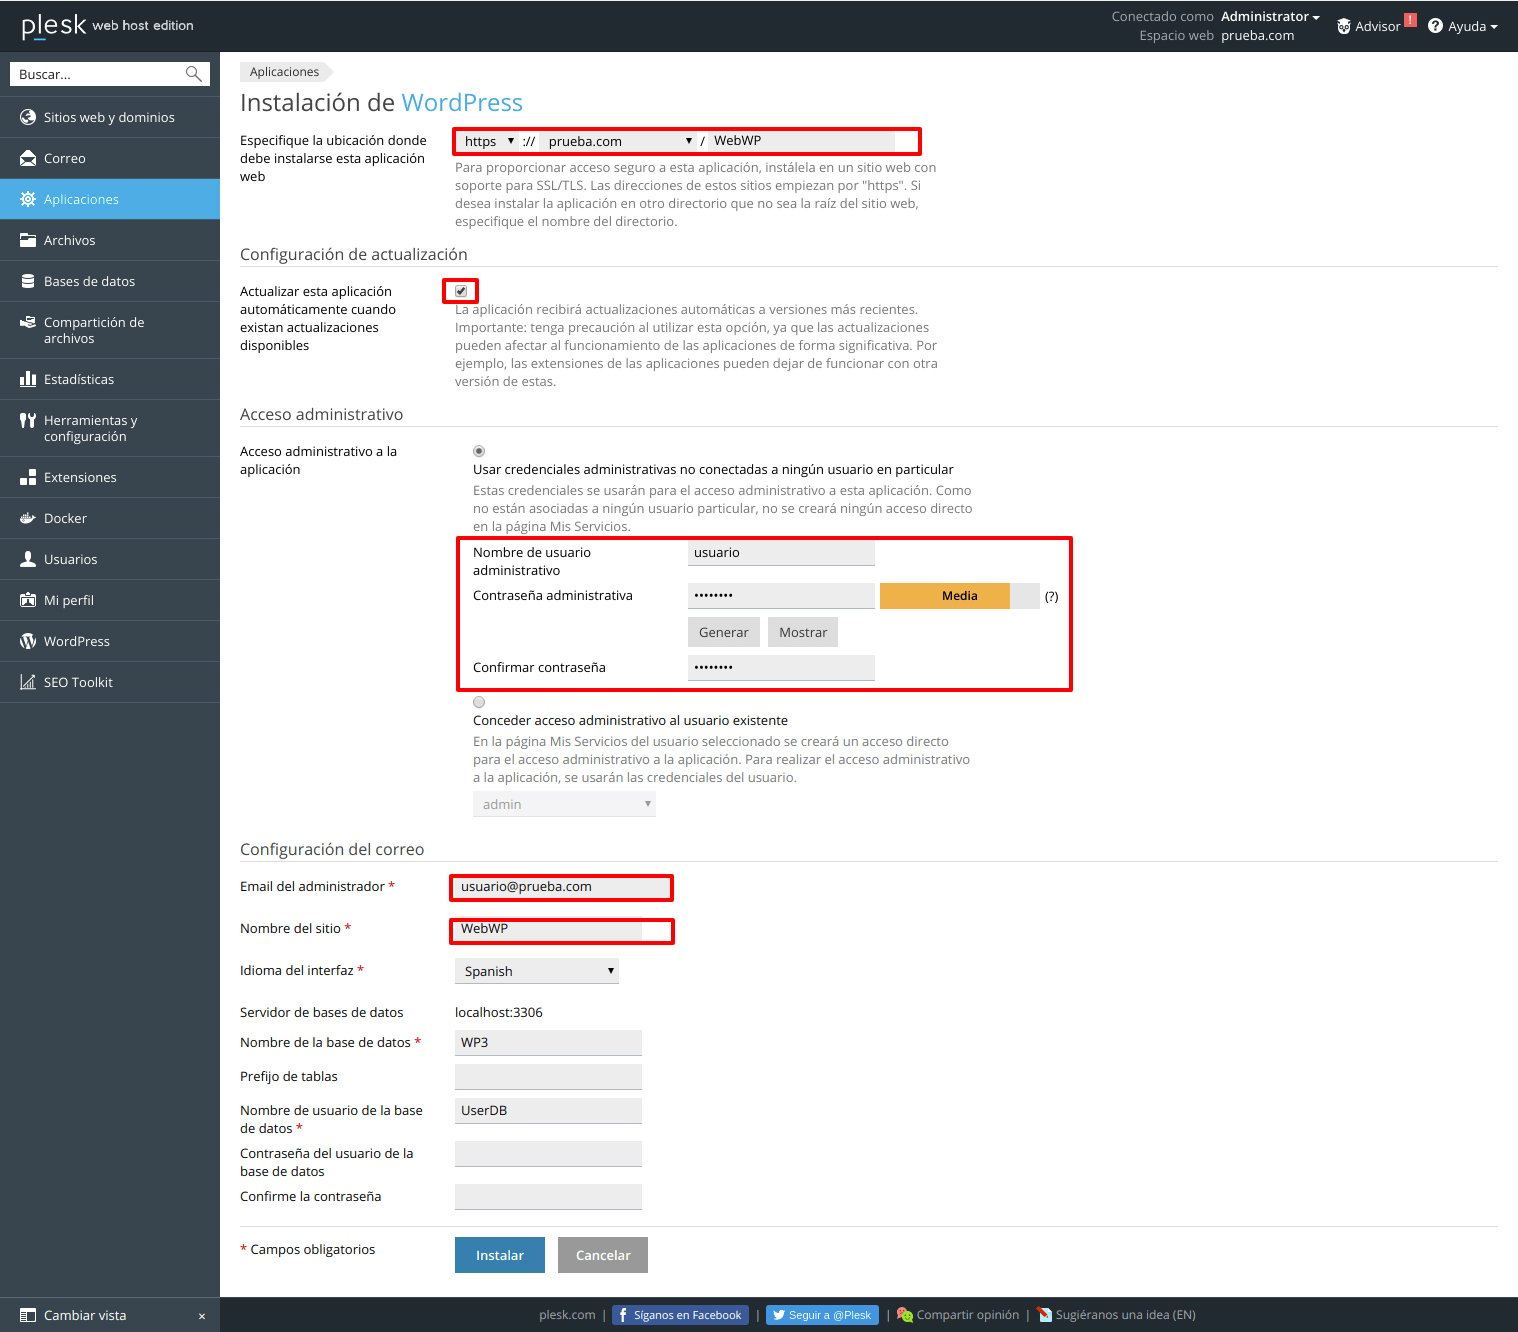
              1. Now let’s configure the WordPress installation settings:
                • Specify the domain directory where you’ll install WordPress (it must be a domain with no existing content) , for example , “http://crearwordpress.es.”
                • Update Settings: We can check this option if we want this application to update automatically.
                • Administrative Access:

Select “Use administrative credentials not linked to any specific user.” In the following fields, enter a username and password.

                • Fill in the fields related to “Email Settings”:
                  • Administrator email: Enter an email address.
                  • Site Name: This will be the name displayed by WordPress once it is installed.
                  • Interface Language: Select “Spanish.”
                  • Database Name: You can leave the default name or enter a custom one.
                  • Database User Password: If you leave this field blank, a password will be automatically assigned to the database user.
              1. Once the password is confirmed , click the “Install” button .
Cómo instalar WordPress automáticamente en Plesk — captura 4

How to Access the WordPress Admin Panel in Plesk

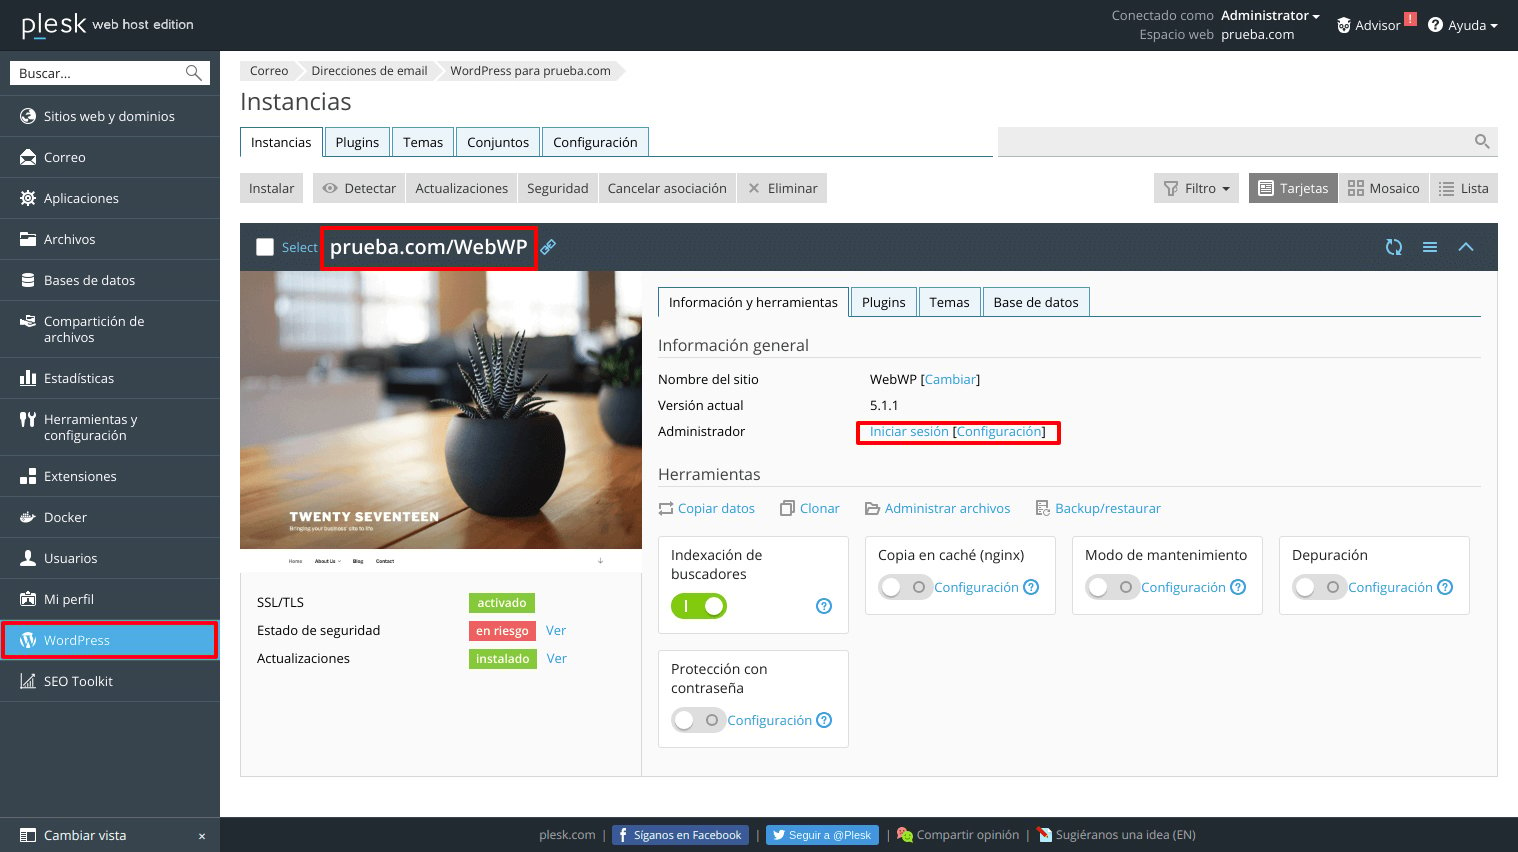
Now, if we want to access our WordPress site from the Plesk control panel's home page, we'll need to click on "Websites & Domains":

Cómo acceder a la administración de WordPress en Plesk — captura 1

Once there, locate the domain where you previously installed WordPress and use it to access your website.

The WordPress page will open.

How to Install the PrestaShop Online Store on Plesk

Tutorial on how to install your PrestaShop online store using our Plesk Auto-Installer.

Steps to automatically install PrestaShop:

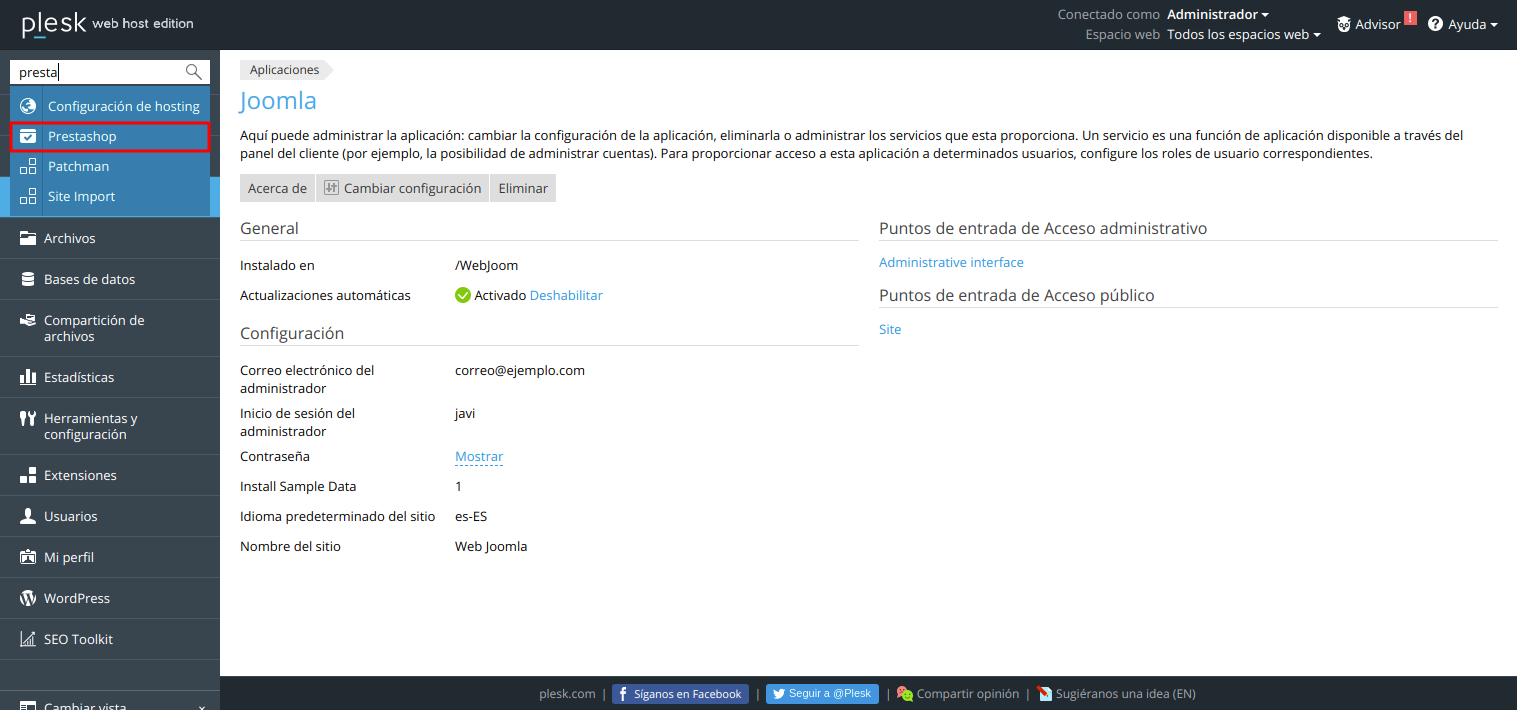
  1. Go to the top of the left sidebar, enter the application name “PrestaShop,” and then click the “magnifying glass”:Cómo instalar la tienda virtual PrestaShop en Plesk — captura 1.
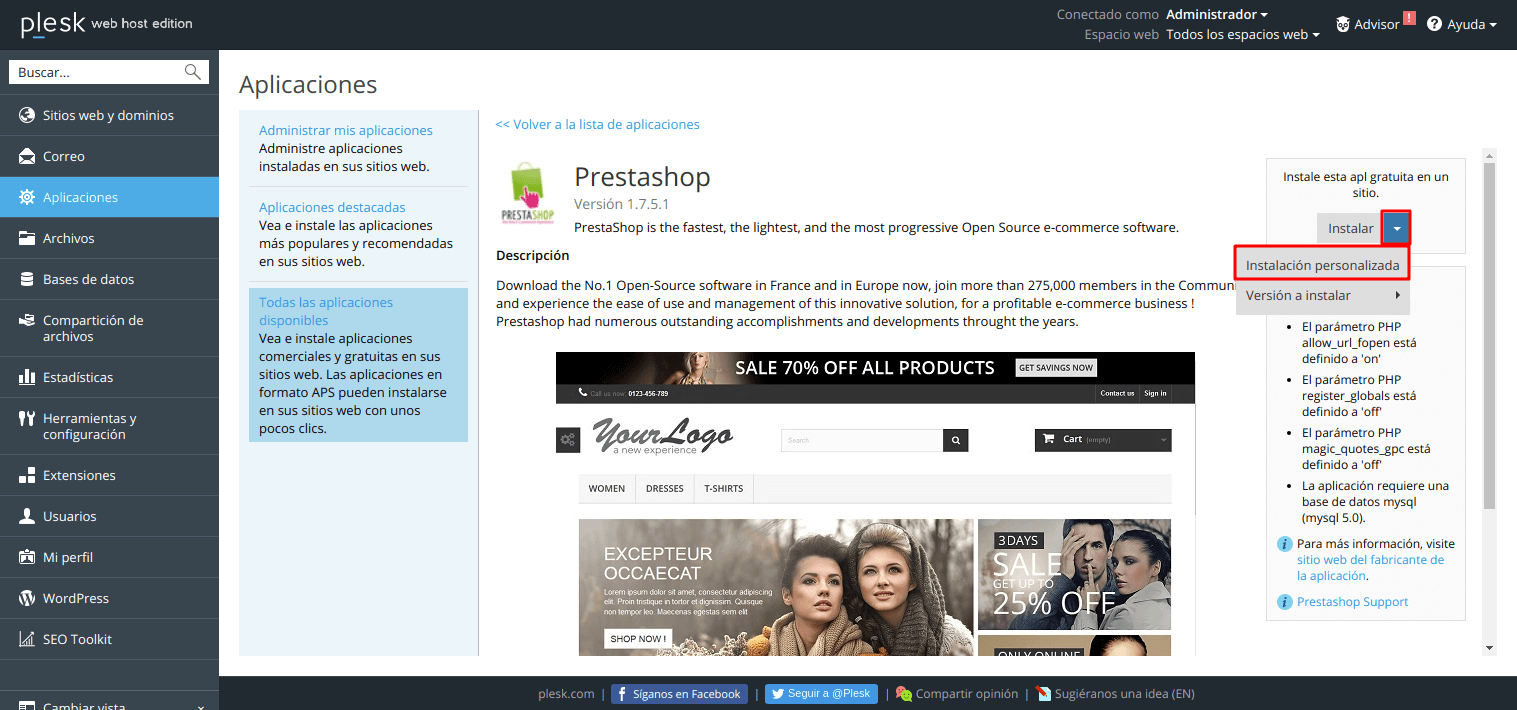
  2. The PrestaShop application will appear; now select “Install (Custom)”:Cómo instalar la tienda virtual PrestaShop en Plesk — captura 2.
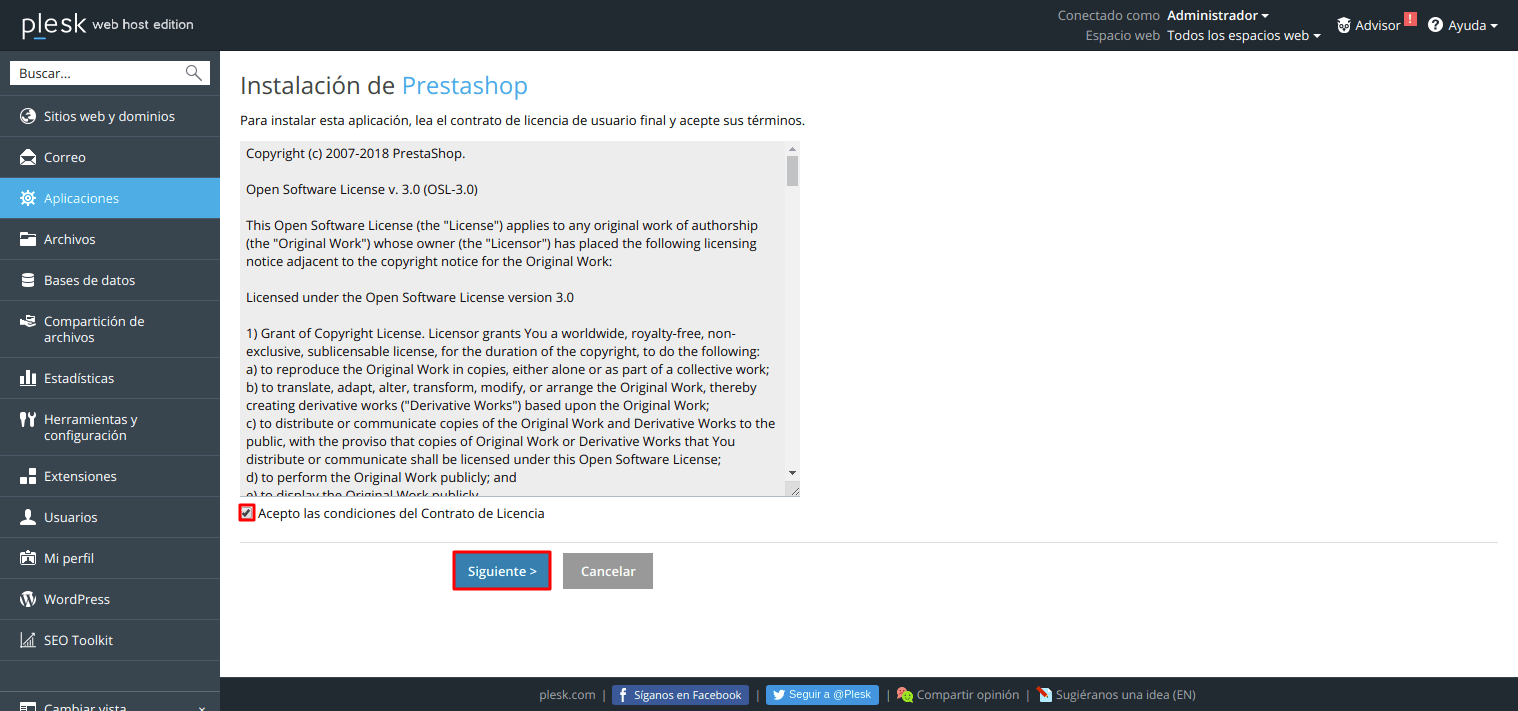
  3. Accept the PrestaShop installation terms:Cómo instalar la tienda virtual PrestaShop en Plesk — captura 3.
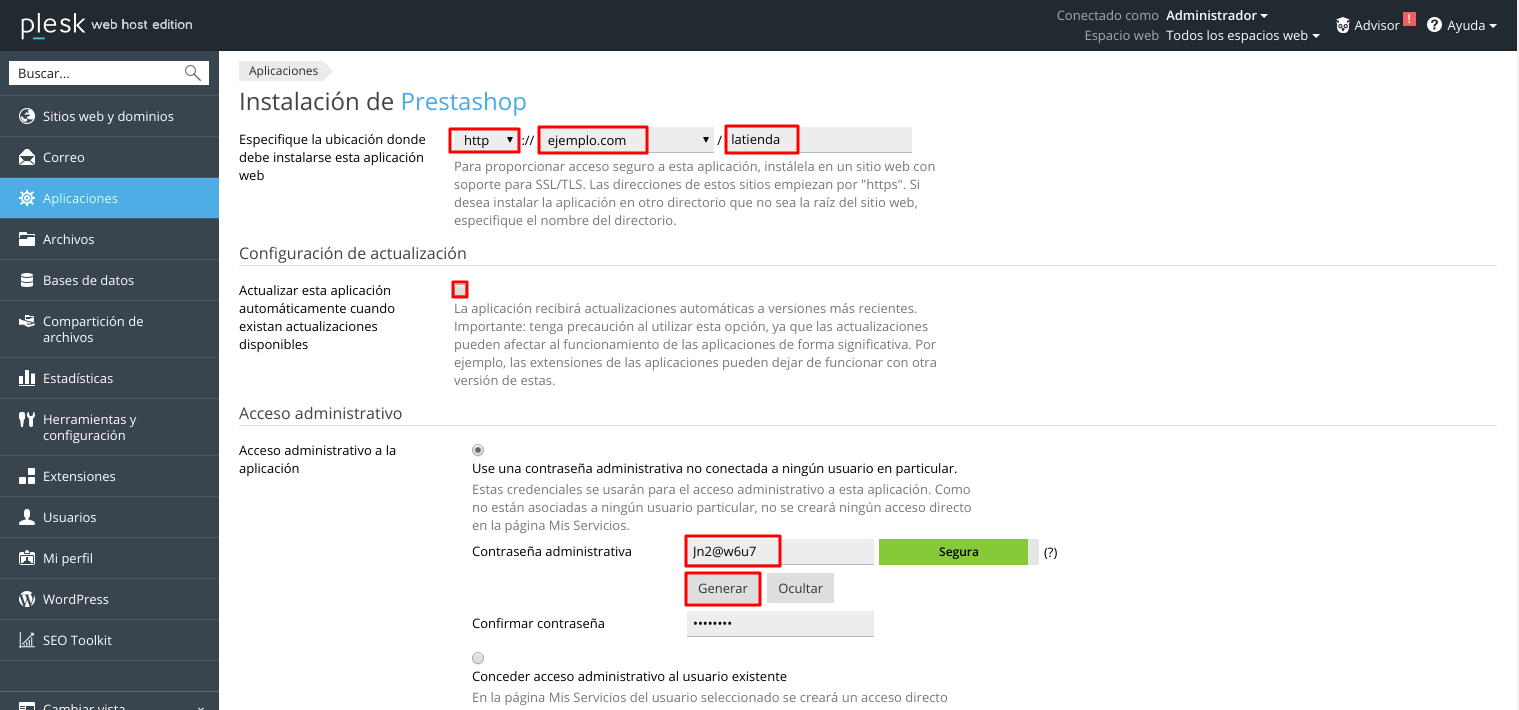
  4. Fill in the required parameters to complete the PrestaShop installation:
      • Select the domain and the folder where the application will be installed (in the example image, the root folder of the “crearprestashop.es” domain is used):
      • Update Settings: Check this box if you want the application to update automatically.
      • Administrator Access: Select the option “Use an administrator password not associated with any specific user, then enter and confirm the password.
    Cómo instalar la tienda virtual PrestaShop en Plesk — captura 4
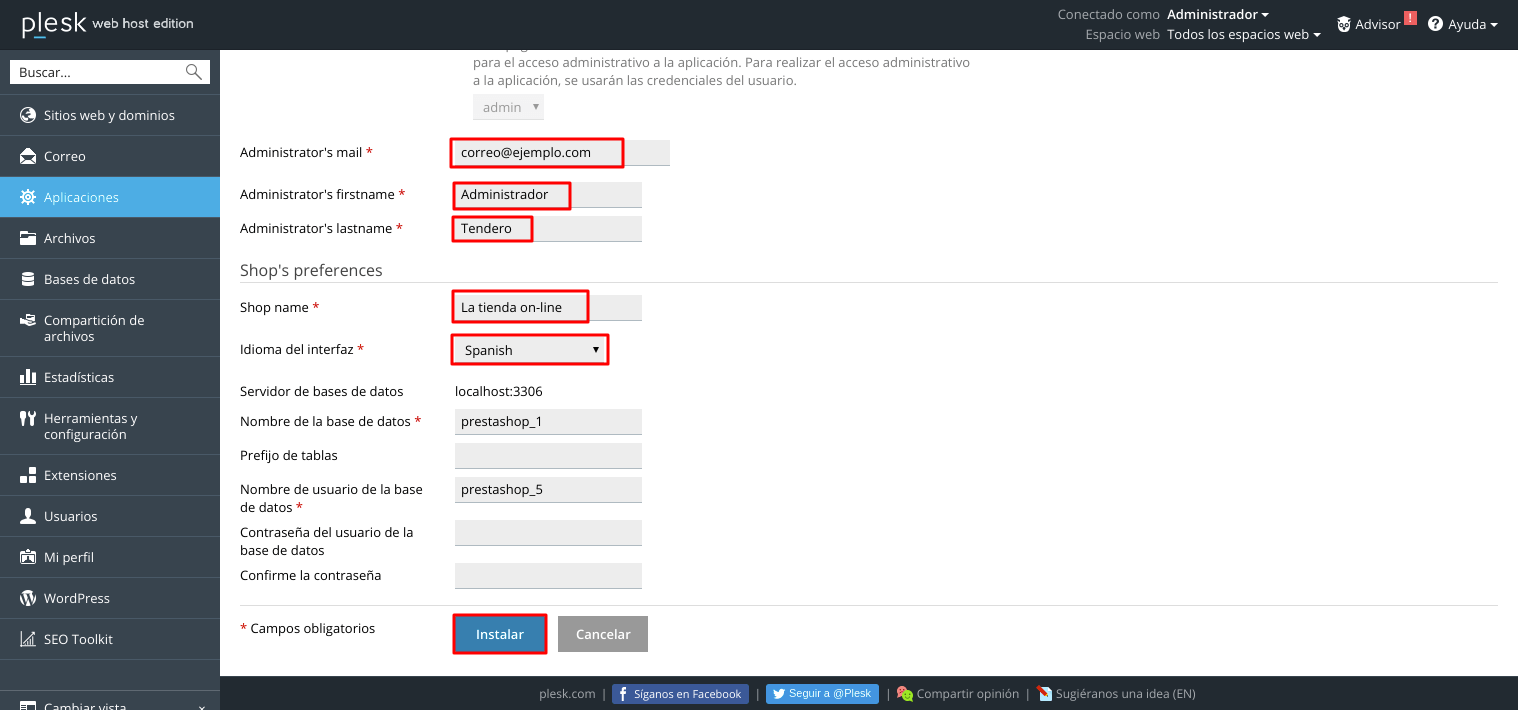
    • Fill in the following fields:
      • Administrator Email: Your email address.
      • Administrator First Name: Your first name.
      • Administrator Last Name: Your last name.
      • Store Email: A valid email address where you’ll receive notifications from your PrestaShop store.
      • Store Name: The name of our store; it will be displayed once the application is installed.
      • Database Name: You can leave this as the default or enter a different name for the database.
      • Table Prefix: We recommend leaving this as the default.
      • Database Username: You can keep the default username or set your own.
      • Database User Password: You can set a password for the database user or leave it blank; if left blank, one will be generated automatically.
    .
  5. Click “Install” to complete the installation ofCómo instalar la tienda virtual PrestaShop en Plesk — captura 5.
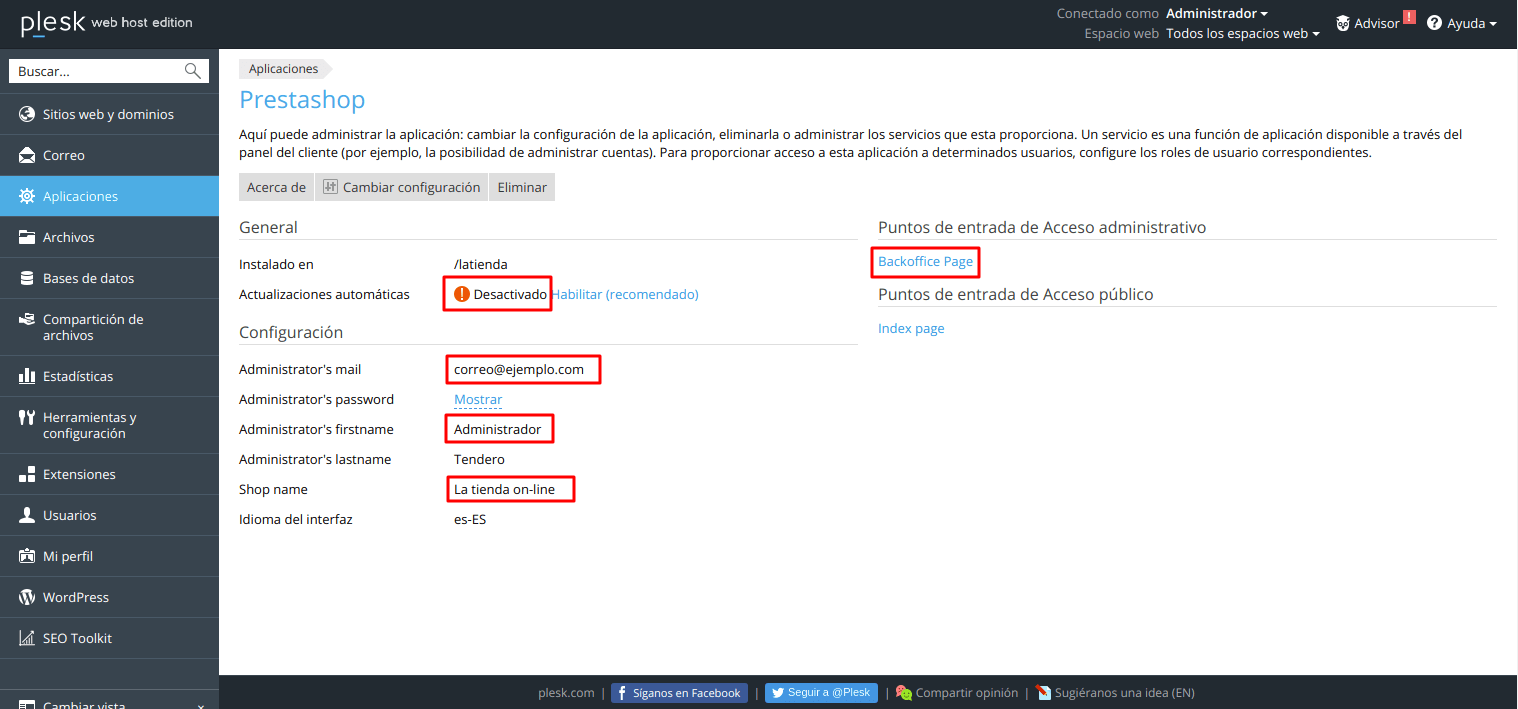
  6. We can see that the PrestaShop installation has completed successfully:
Cómo instalar la tienda virtual PrestaShop en Plesk — captura 6

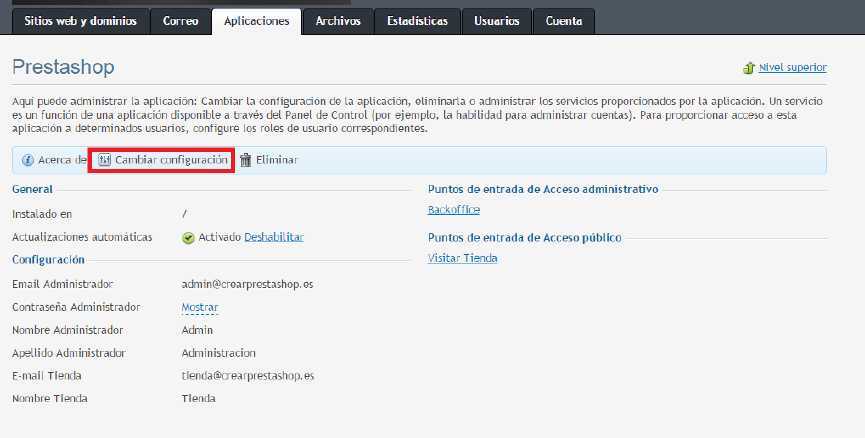
How to Access the PrestaShop Admin Panel in Plesk

To access PrestaShop from the Plesk control panel, go to the "Websites & Domains" tab, select the domain on which you have installed PrestaShop, and click "Open":

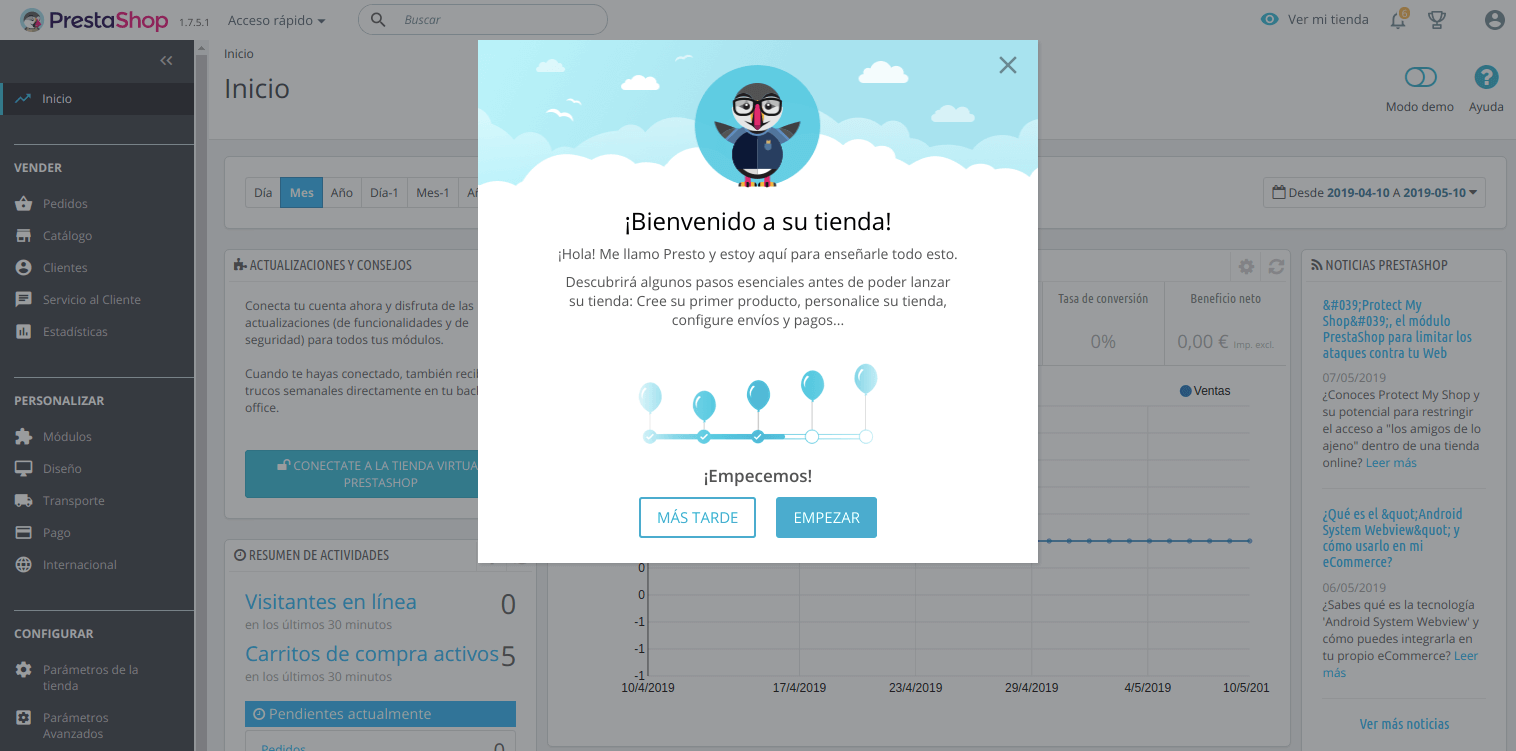
You’ll see the default page of your PrestaShop store:

Cómo acceder a la administración de PrestaShop en Plesk — captura 1

How to Automatically Install the Magento Online Store in Plesk

Steps to automatically install a Magento online store from the Plesk control panel:

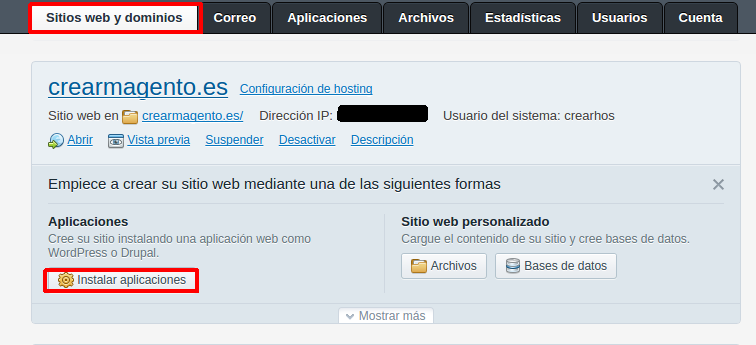
    1. From the Plesk control panel’s “Websites & Domains” homepage, hover over the domain where you want to install the Magento application and click “Install Applications”:Cómo instalar la tienda virtual Magento automáticamente en Plesk — captura 1.
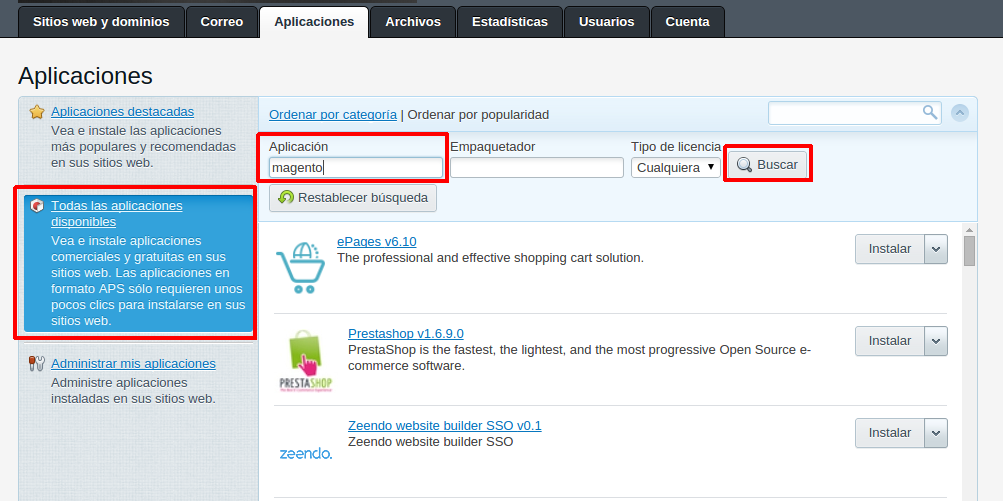
    2. In the “Application” field, enter the name of the application and click “Search”:Cómo instalar la tienda virtual Magento automáticamente en Plesk — captura 2.
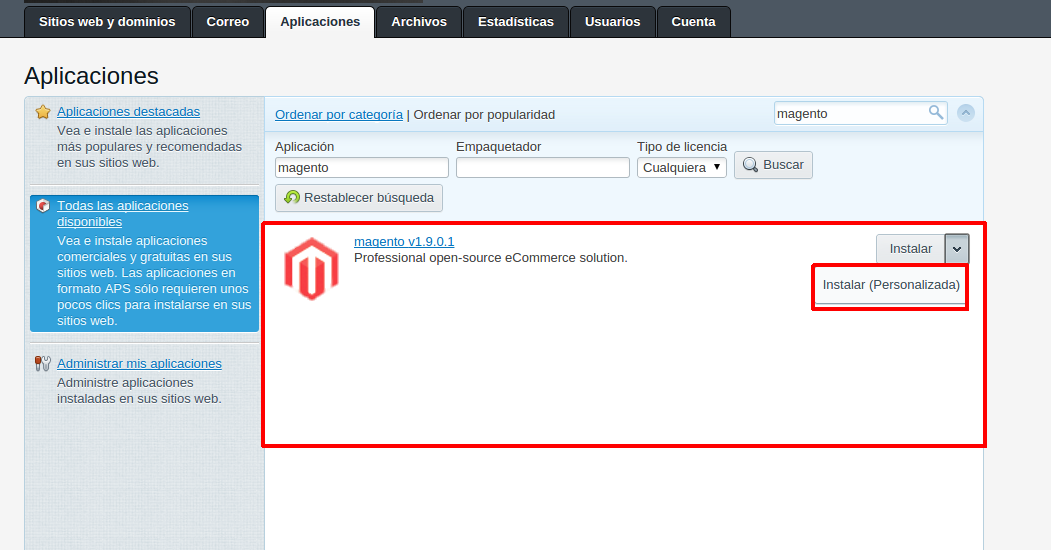
    3. Select the Magento application and click “Install (Custom)”:Cómo instalar la tienda virtual Magento automáticamente en Plesk — captura 3.
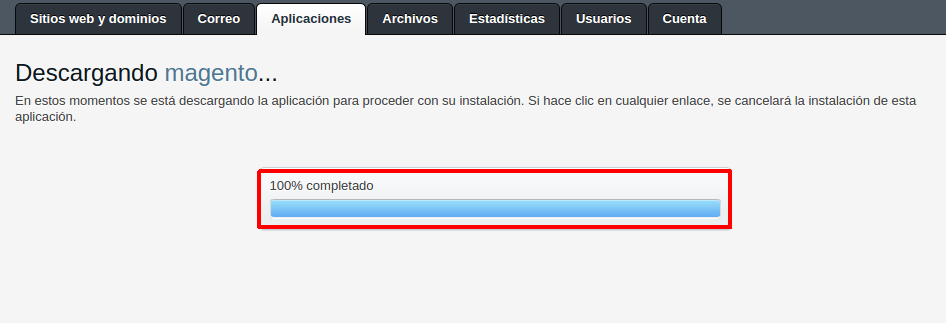
    4. Wait while Magento downloads:Cómo instalar la tienda virtual Magento automáticamente en Plesk — captura 4.
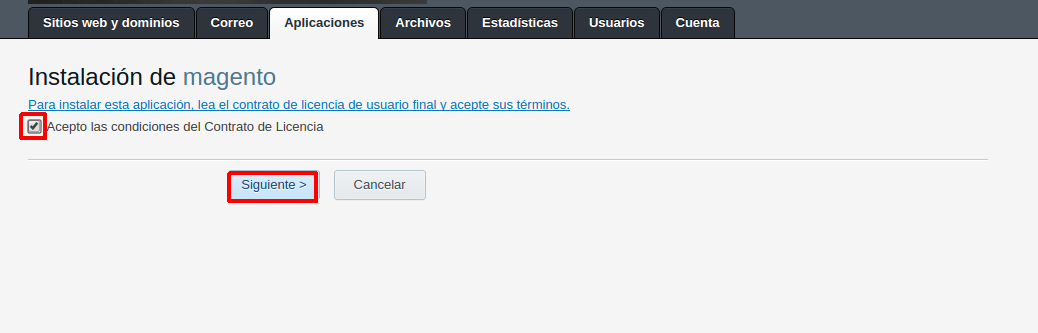
    5. Accept the installation license terms and conditions, then click “Next”:Cómo instalar la tienda virtual Magento automáticamente en Plesk — captura 5.
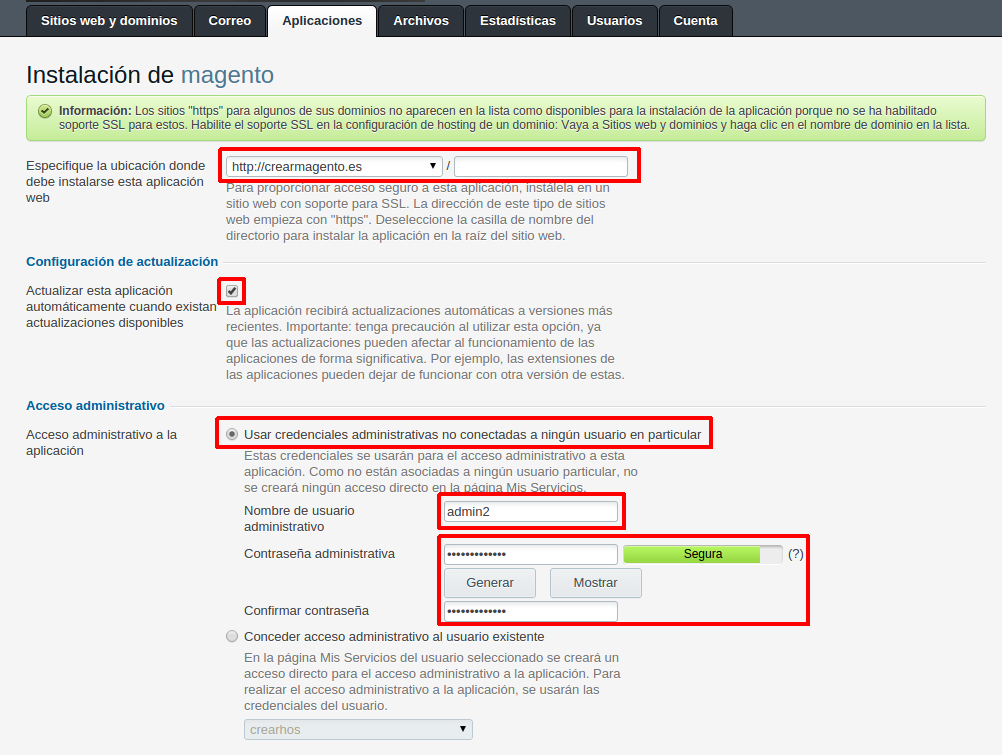
    6. Next, fill in the following fields:
      • Magentodomain and installation directory (In this case, it will be installed in the root directory of the crearmagento.es domain).
      • Check the box for automatic updates if you want Magento to update automatically (not recommended).
      • Make sure the “Use administrative credentials not tied to any specific user” option is checked.
      • Enter the administrator’s username and password.
Cómo instalar la tienda virtual Magento automáticamente en Plesk — captura 6
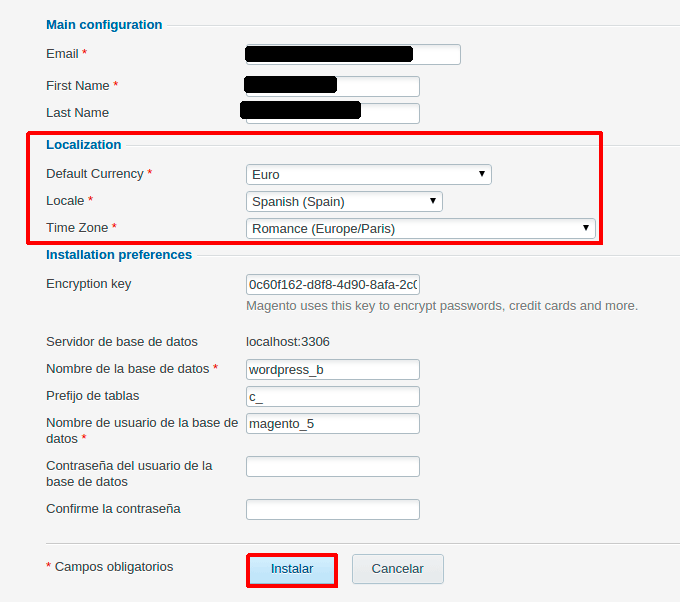
  1. Fill in the following fields:
    • Administrator email...
    • First name: Your first name.
    • Last Name: Your last name.
    • Default Currency: Select the currency your store will use (select “Euro”).
    • Locale: Select a language.
    • Time Zone: Select your time zone.
  2. Click “Install”:Cómo instalar la tienda virtual Magento automáticamente en Plesk — captura 7.
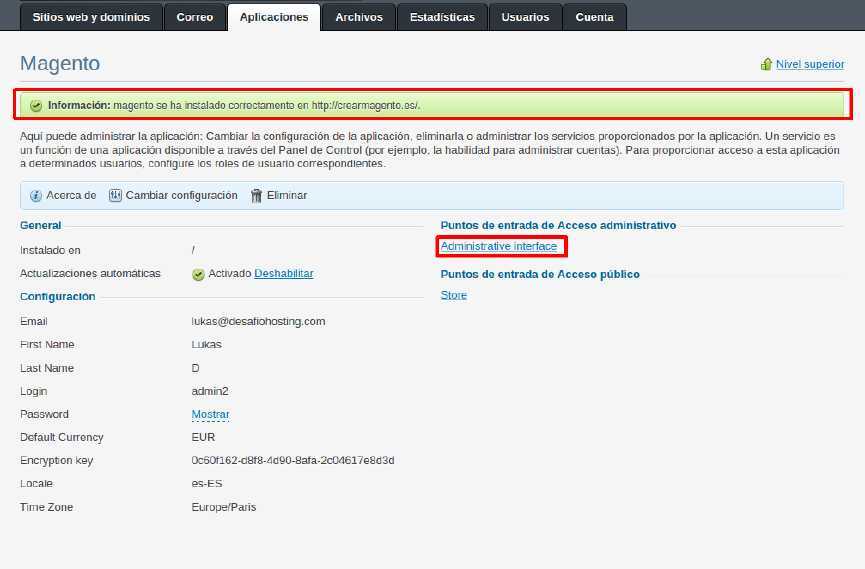
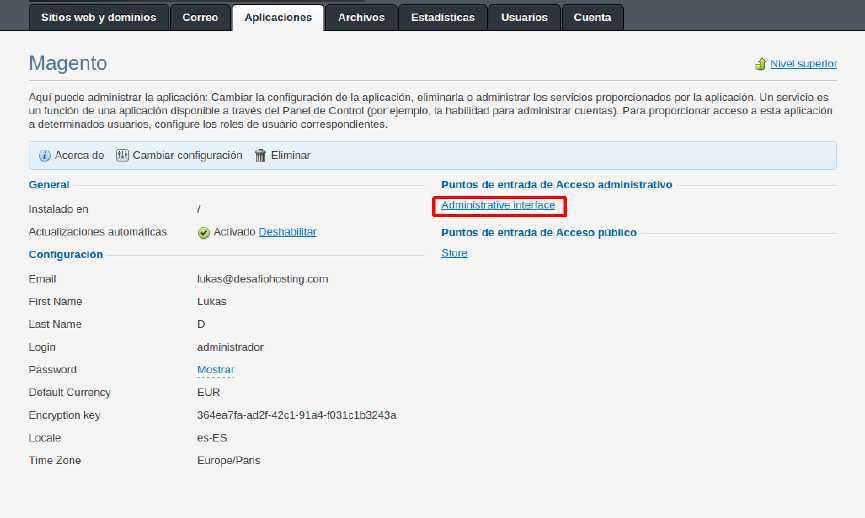
  3. We can see that the installation is complete. Now, to access the admin panel for our Magento store, click “Administrative Interface”:Cómo instalar la tienda virtual Magento automáticamente en Plesk — captura 8.
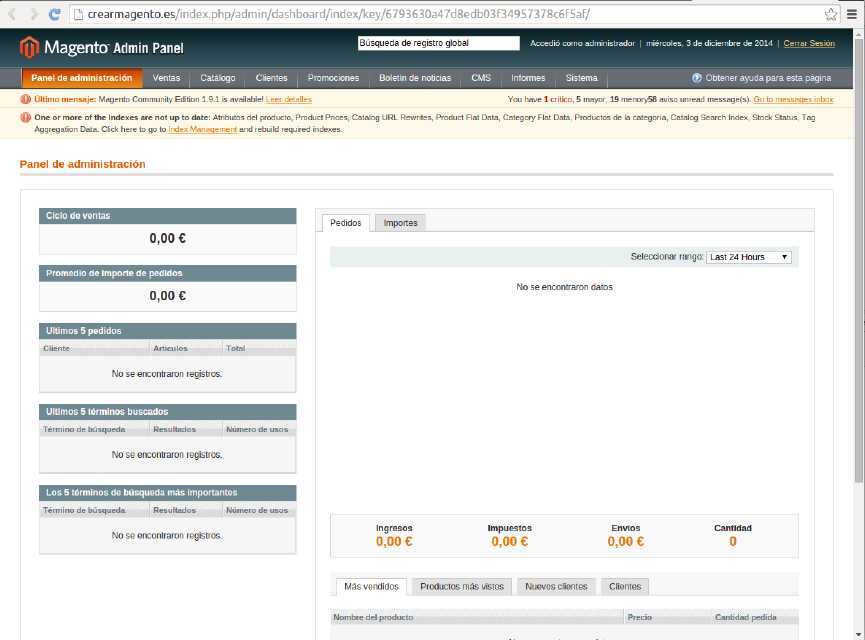
  4. This is what our Magento admin interface will look like:
Cómo instalar la tienda virtual Magento automáticamente en Plesk — captura 9

How to Access the Magento Admin Panel in Plesk

To access the admin panel for our Magento site, follow these steps:

There are two ways to access it: from the Plesk control panel or directly through your browser by entering the URL of the domain where your Magento store is installed.

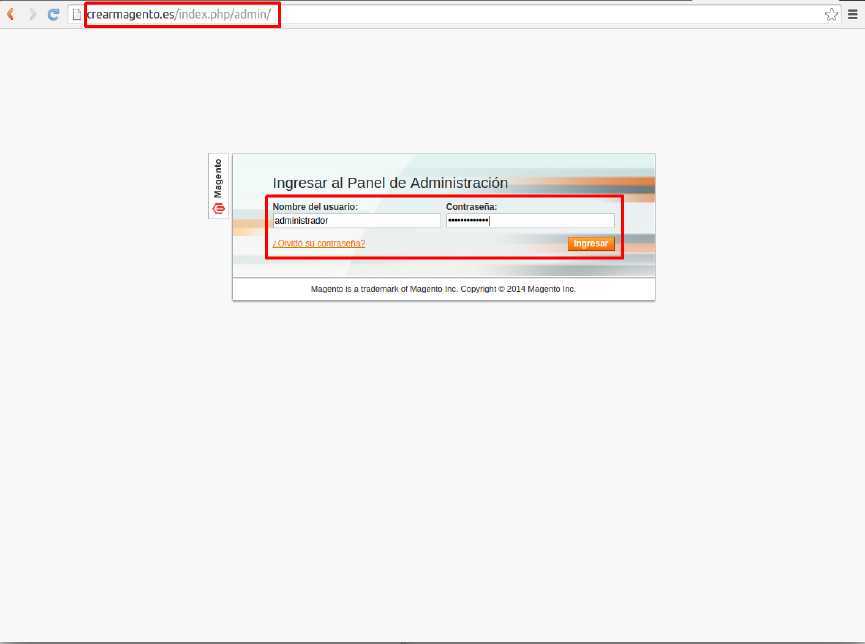
    1. FROM OUR DOMAIN’S URL:
      • Enter the following URL into your web browser:
tudominio.com/index.php/admin
        (replace tudominio.com with your domain name)
      • Enter the Magento administrator username and password:
Cómo acceder a la administración de Magento en Plesk — captura 1
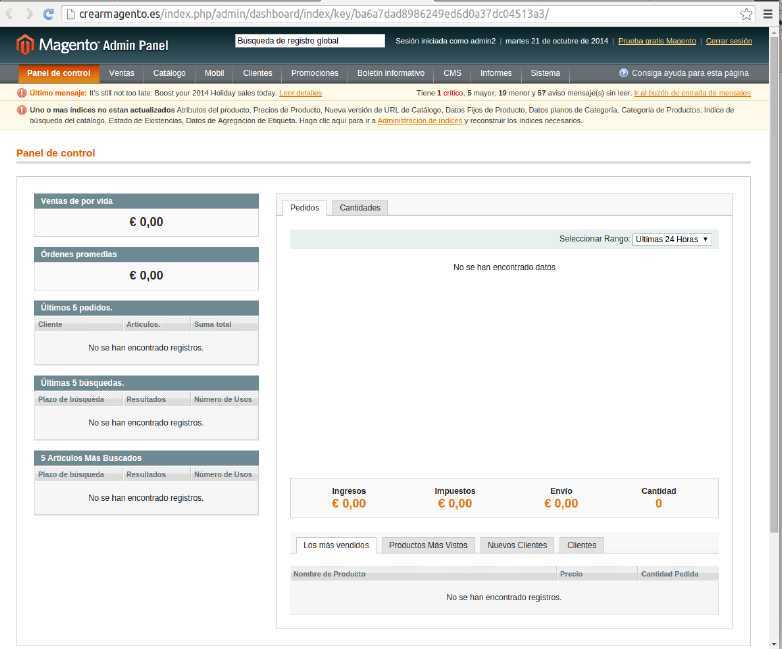
      • And now you have access to the admin panel of your Magento store:
Cómo acceder a la administración de Magento en Plesk — captura 2
  1. IF YOU WANT TO ACCESS IT FROM THE PLESK PANEL:

NOTE:

This option only appears if you have installed Magento automatically from the Plesk control panel’s applications:

From the main “Websites & Domains” tab in the Plesk control panel, click “Magento” for the domain that hosts your Magento store:

Next, click “Administrative interface”:.

Cómo acceder a la administración de Magento en Plesk — captura 3

Since the Plesk control panel has the administrator’s login credentials saved, we can access the Magento store’s administration directly without having to log in.

Cómo acceder a la administración de Magento en Plesk — captura 4

How to Automatically Create a phpBB Forum in Plesk

Below, we'll walk you through the step-by-step process of automatically installing a phpBB forum from Plesk

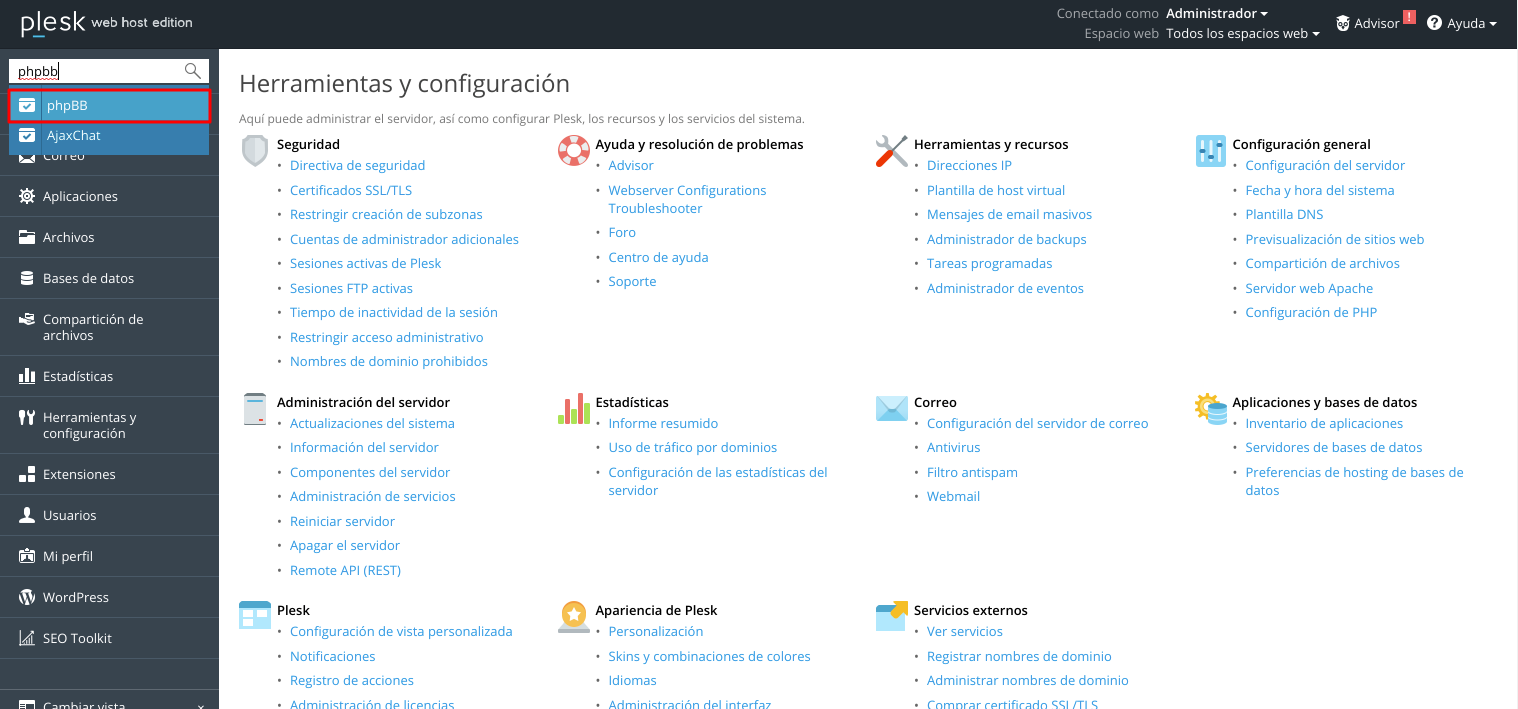
Now type “phpBB” and click the “Search” button:

Cómo crear un foro phpBB automáticamente en Plesk — captura 1

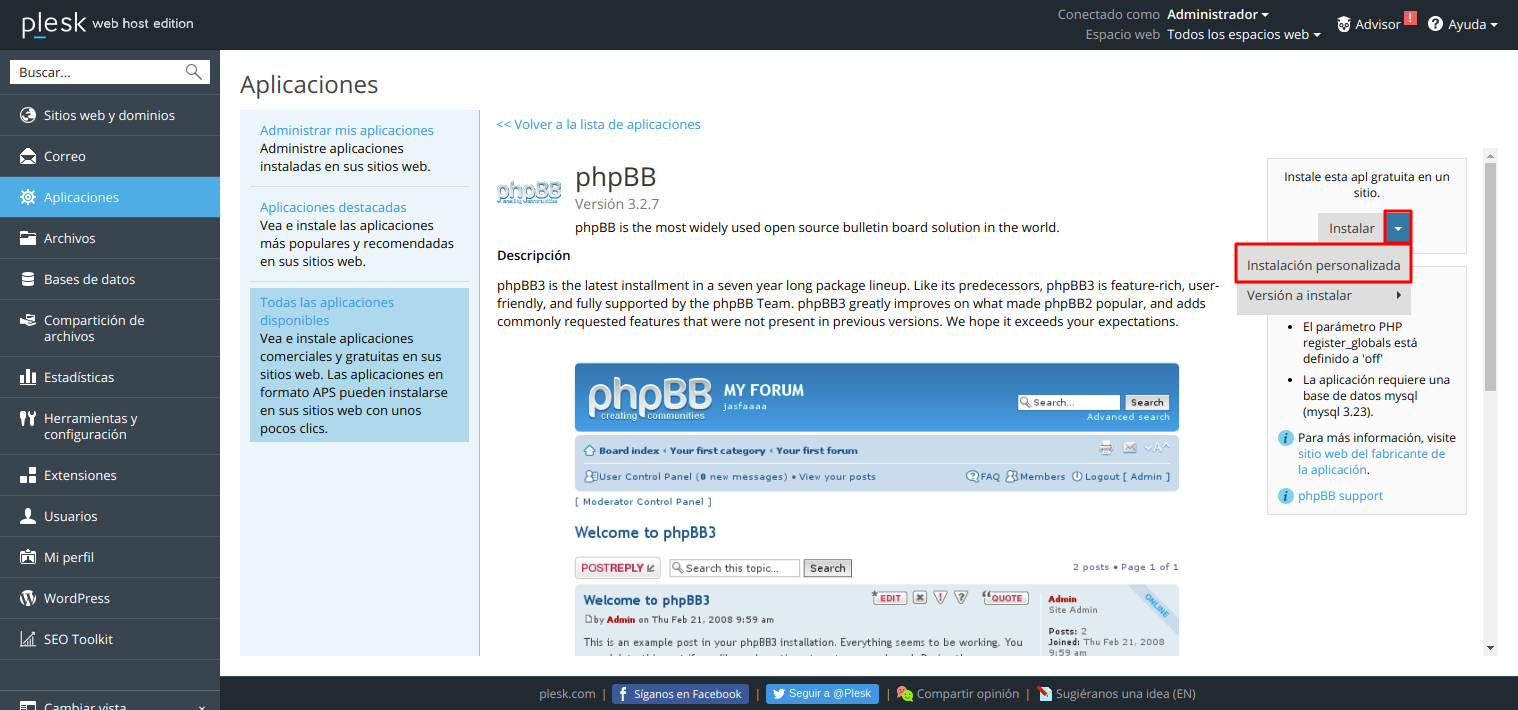
Once the search is complete, the application with that name will appear; now click “Install (Custom)”:

Cómo crear un foro phpBB automáticamente en Plesk — captura 2

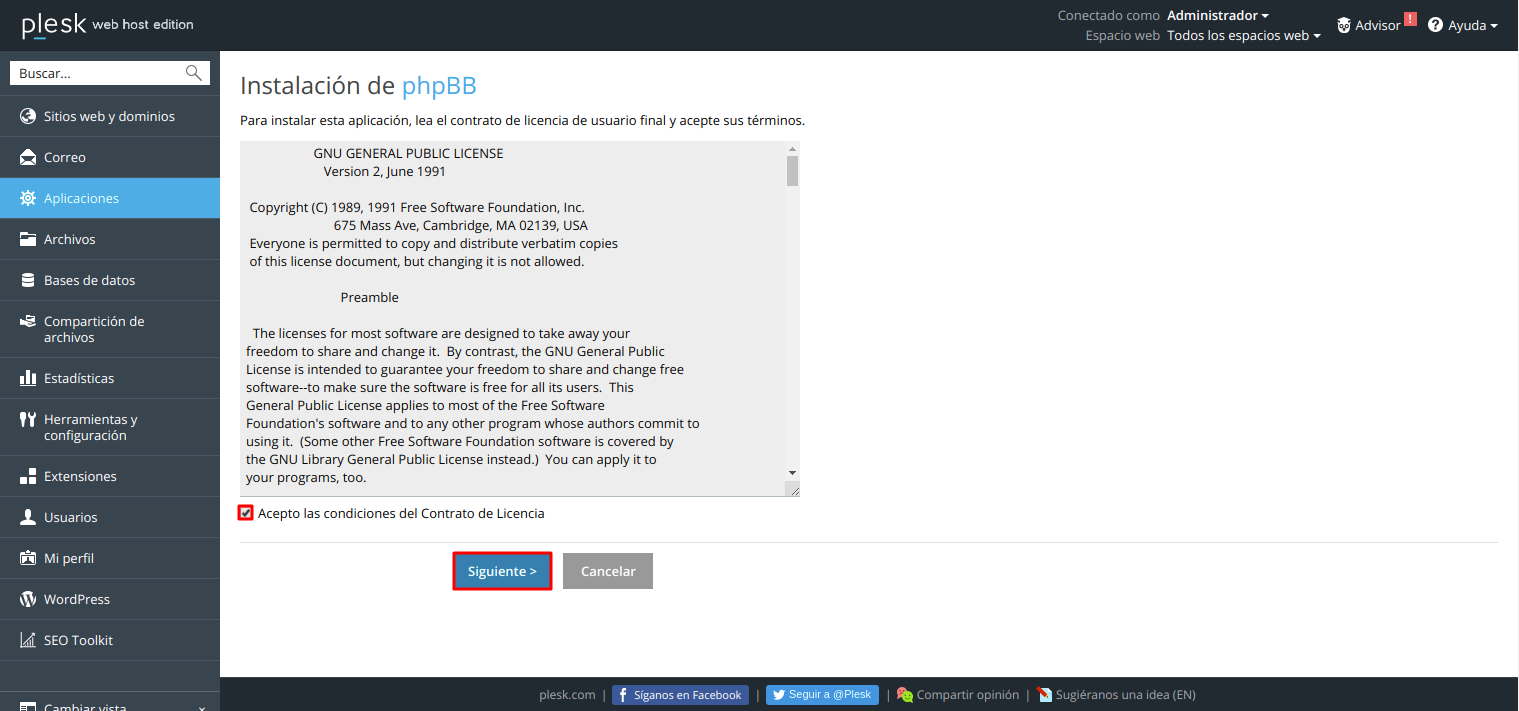
Next, we’ll accept the phpBB forum installation terms:

Cómo crear un foro phpBB automáticamente en Plesk — captura 3

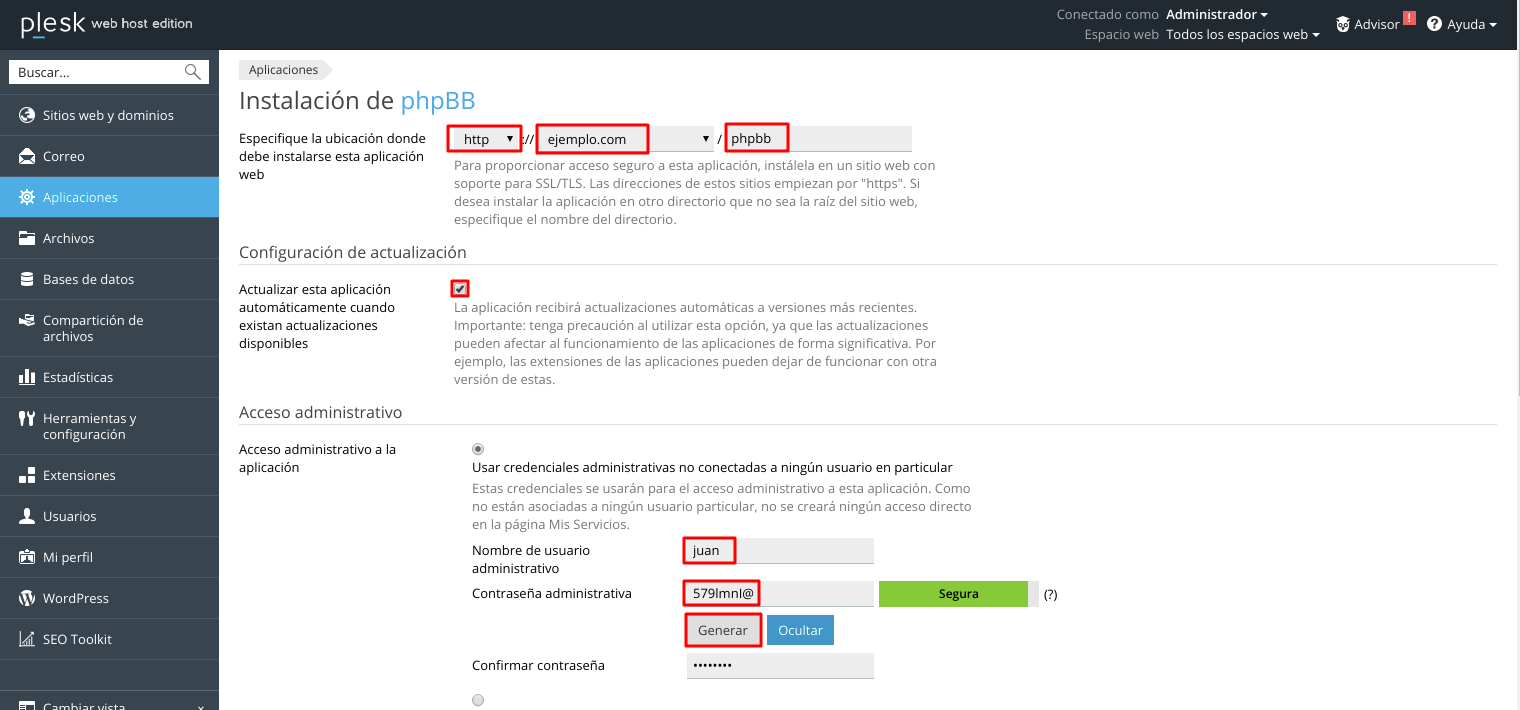
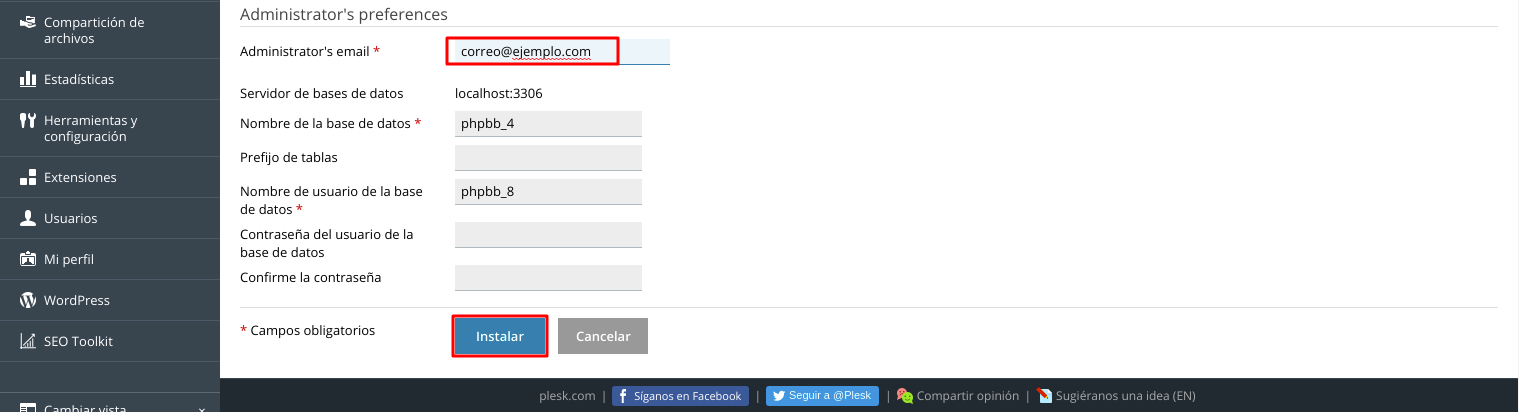
Now fill in the various fields to complete the installation:

Cómo crear un foro phpBB automáticamente en Plesk — captura 4
  • Location where the application will be installed: Select the domain and folder where you will install the phpBB forum (in this example, it will be installed in the root folder of the “crearphpbb.es” domain).
  • Update settings: Check this box if you want the application to update automatically when updates are available.
  • Administrator’s Preferences.
  • Administrator’s Email:Enter anemail addressfor the forum’s administrator account.
  • Administrator’s Login: Enter the username for the forumadministrator.
  • Password: Enter the password and then confirm it.
  • Site description: A brief description of your forum.
  • Site name: The name of the forum to be displayed.
  • Database name:It is recommended to leave this as the default or enter the name of a database dedicated to our forum (created previously).
  • Table prefix: Leave it as the default.
  • Database username: You can leave this as the default.
  • Database username password and confirm password: Leave these fields blank.

Next, click “Install”:

Cómo crear un foro phpBB automáticamente en Plesk — captura 5

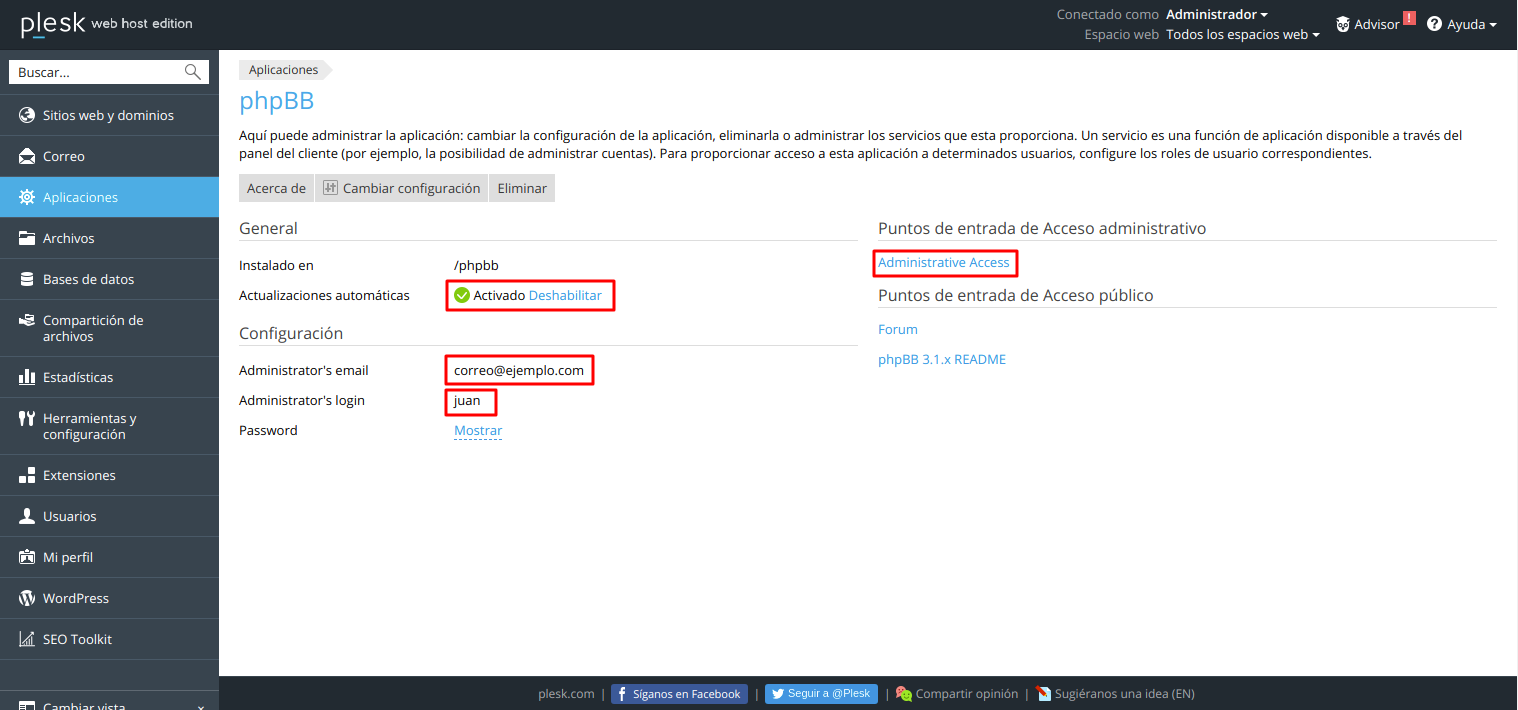
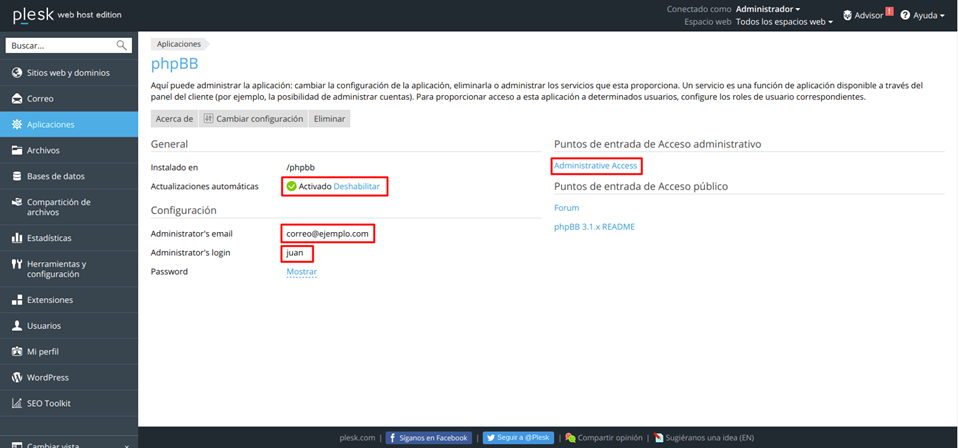
We can see that the installation was successful:

Now go to the “Websites and Domains” page and click “Open” next to your forum domain :

Cómo crear un foro phpBB automáticamente en Plesk — captura 6

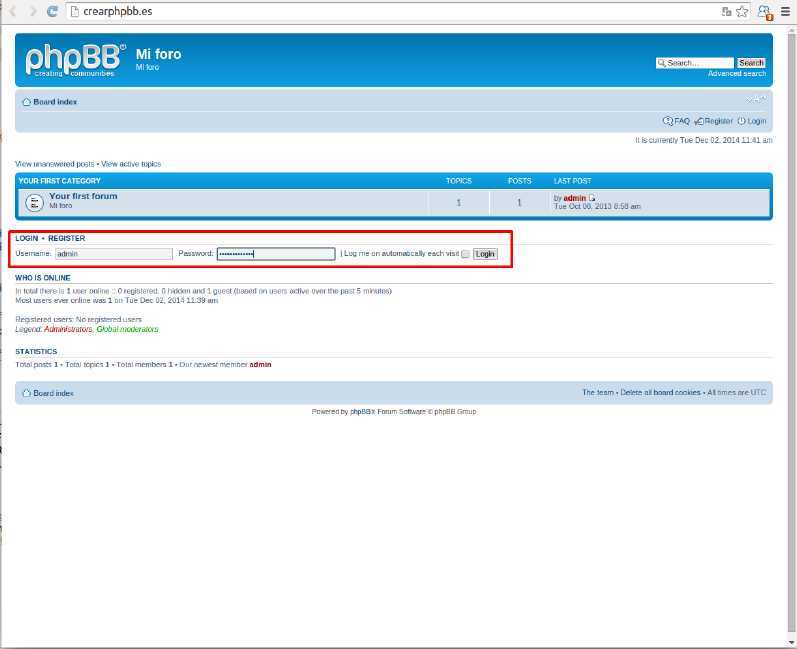
To make changes, we’ll log in as an administrator:

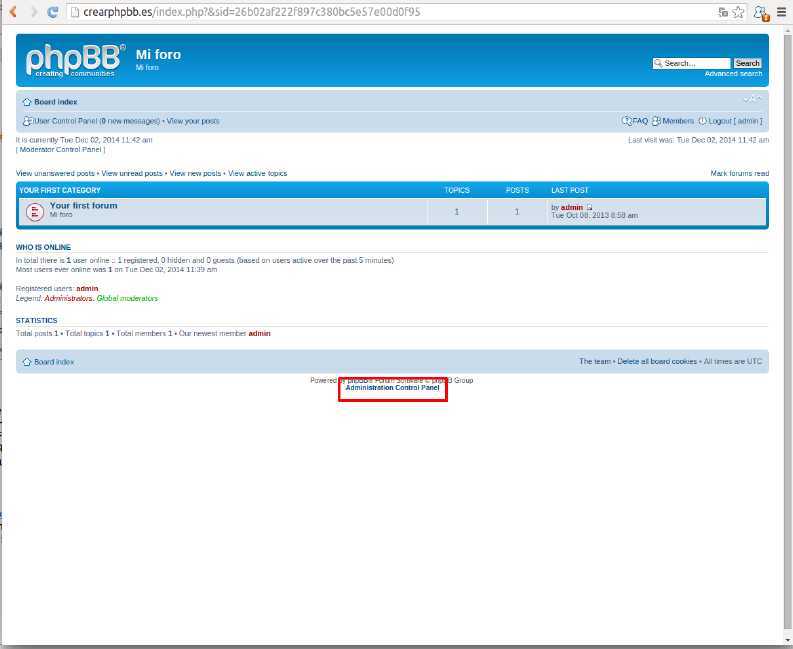
Now click on the link that says “Administration Access”:

Next, we need to log in again as an administrator:

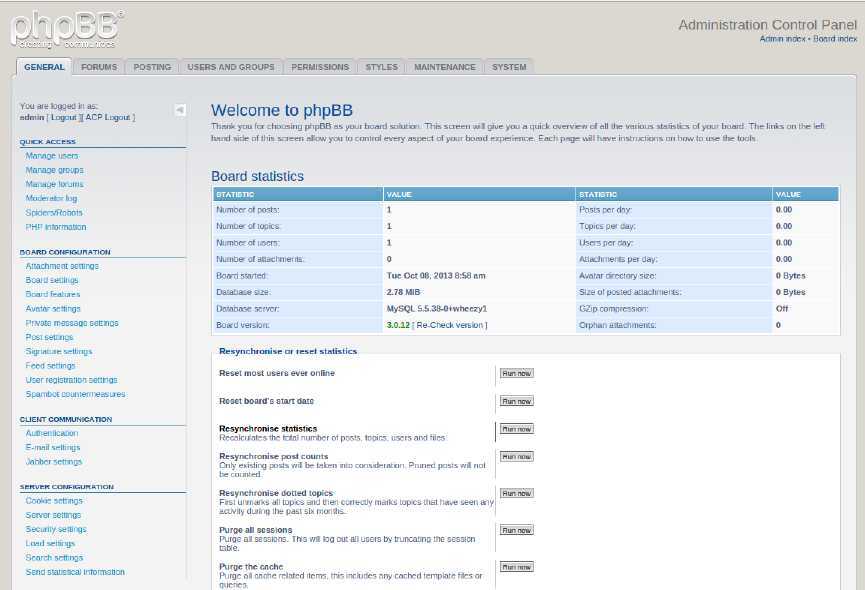
And now we can access the forum's admin panel:

Cómo crear un foro phpBB automáticamente en Plesk — captura 7

How to Access the phpBB Administration Panel in Plesk

To access the admin panel of our phpBB forum, follow these steps:

You can access it directly from your forum's URL or from the Plesk control panel if you have access to it:

(If you access it directly from your forum’s URL, you’ll skip a couple of steps.)

If you access it from the Plesk control panel:

Note: This option only appears if you have automatically installed phpBB from the “Applications” tab in the Plesk control panel:

From the “Websites & Domains” home page, click on phpBB next to the domain where your forum is hosted:

Next, click “Forum”:

Cómo acceder a la administración de phpBB en Plesk — captura 1

We can see that we’re now on the forum’s home page; next, we need to log in as the administrator:

Cómo acceder a la administración de phpBB en Plesk — captura 2

Once we’ve logged in as the administrator, the “Administration control panel” option will appear at the bottom of the index page; click on it

Cómo acceder a la administración de phpBB en Plesk — captura 3

How to Automatically Install Drupal in Plesk

Steps to automatically create a Drupal installation from the Plesk control panel:

From the “Websites & Domains” home page, select the domain where you want to install Drupal and click “Install Applications”:

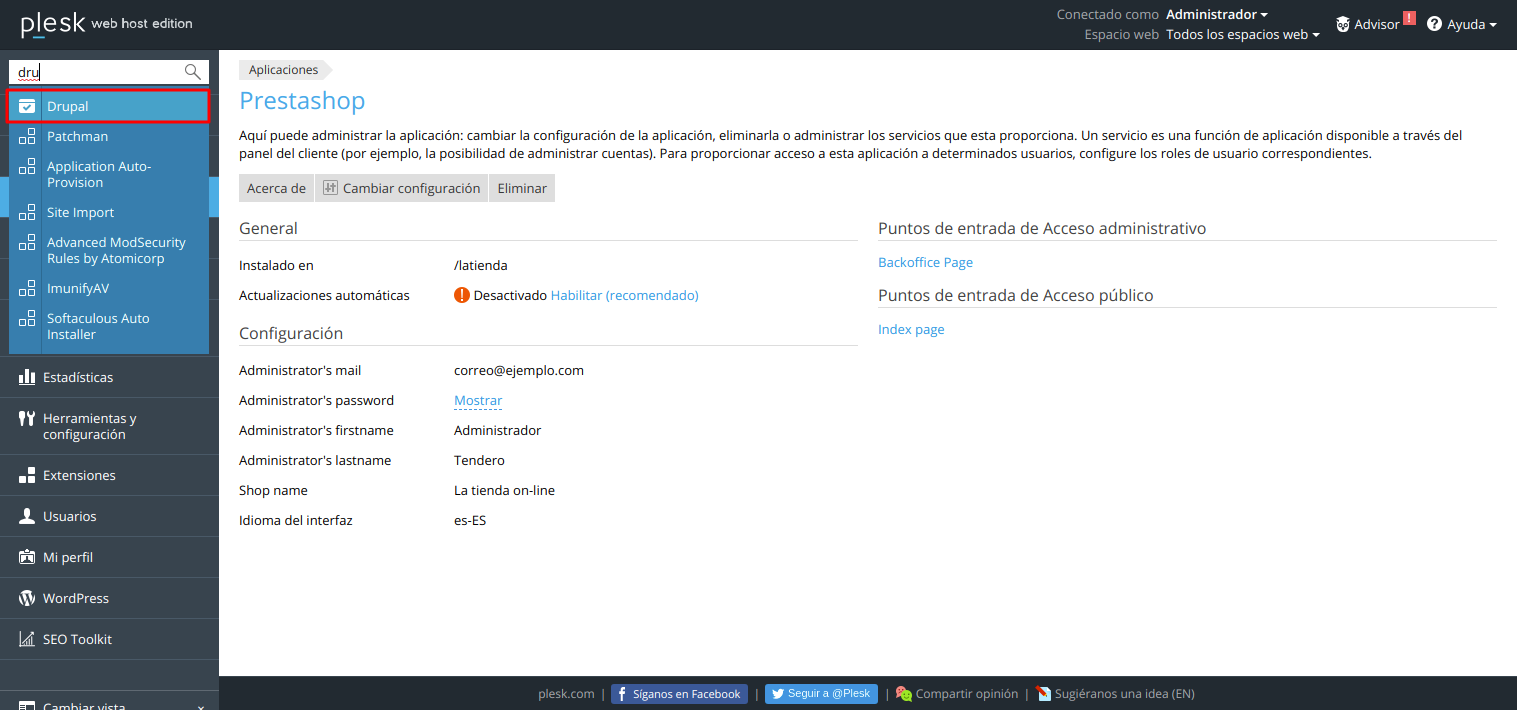
Now type “Drupal” and click “Search”:

Cómo instalar Drupal automáticamente en Plesk — captura 1

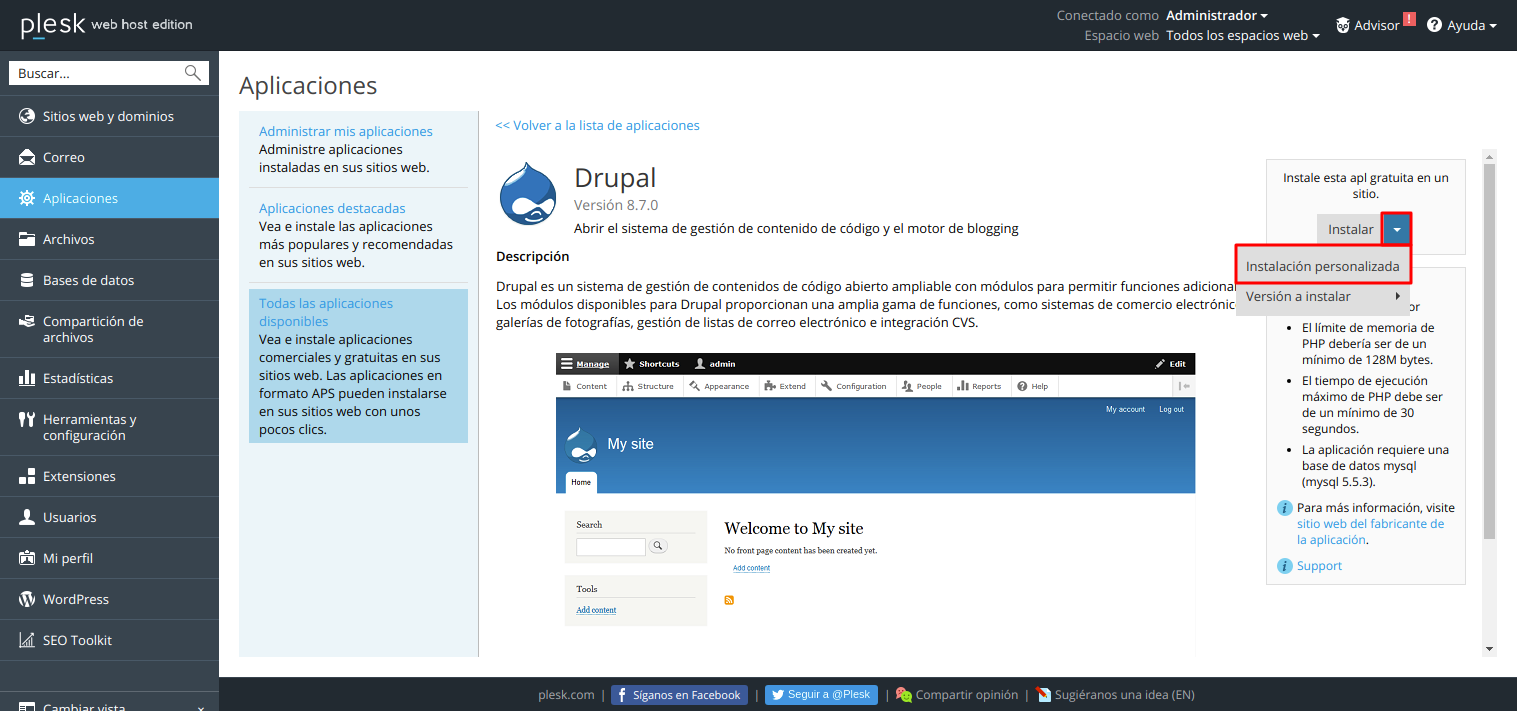
Select the Drupal application and click “Install (Custom)”:

Cómo instalar Drupal automáticamente en Plesk — captura 2

Wait while Drupal downloads:

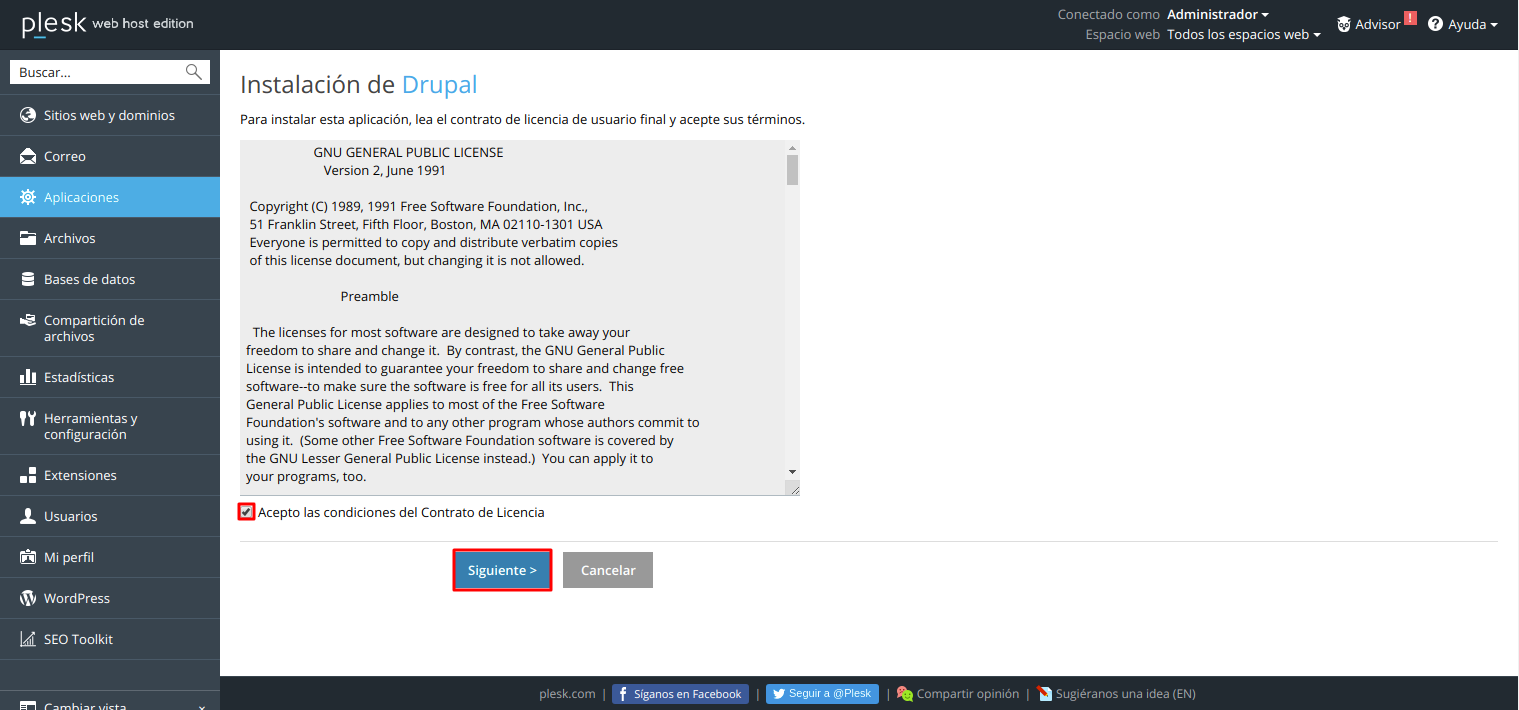
Accept the Drupal installation license terms and conditions, then click “Next”:

Cómo instalar Drupal automáticamente en Plesk — captura 3

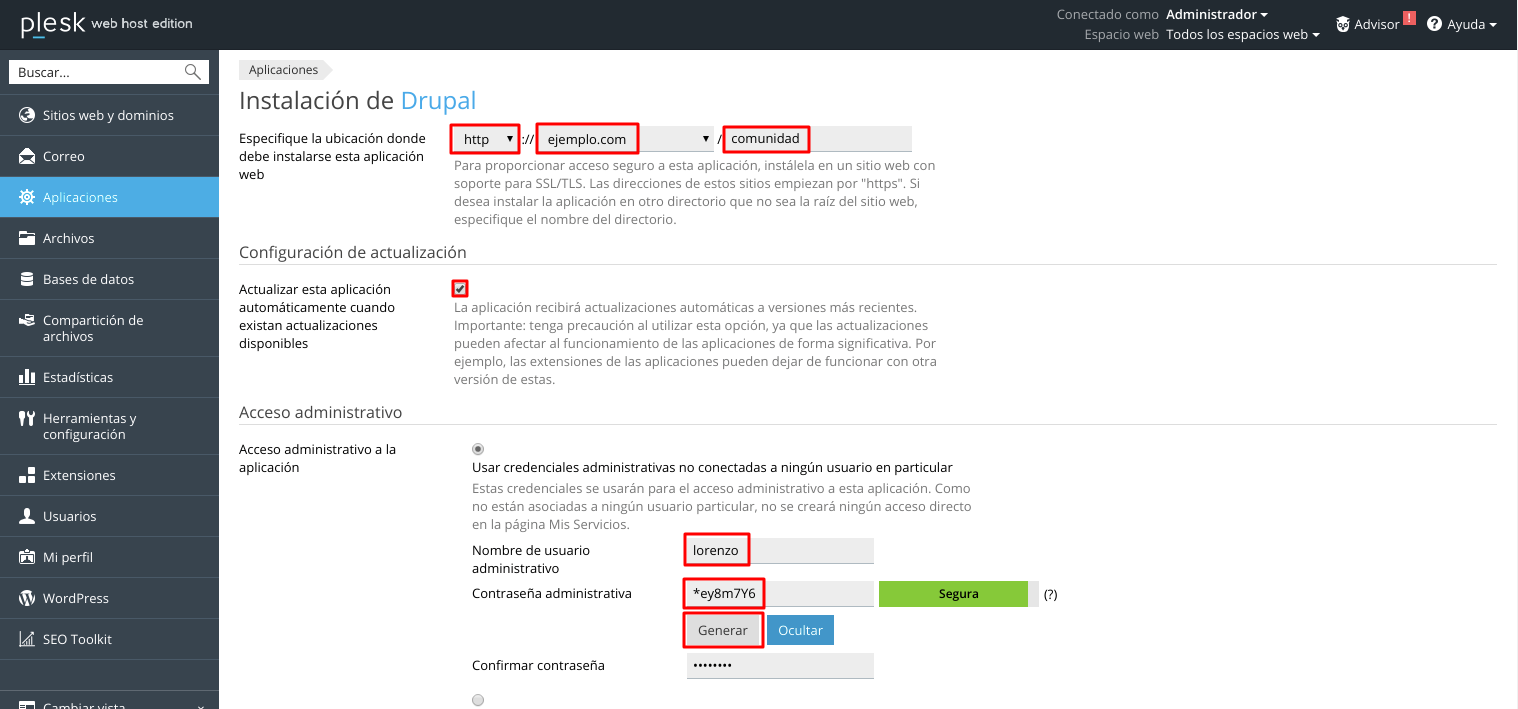
Next, we’ll fill in the following fields to complete the installation:

Drupaldomain and installation directory (In this case, we will install Drupal in the root directory of the creardrupal.es domain).

Check the box for automatic updates.

Make sure the option “Use administrative credentials not associated with any specific user” is checked.

We’ll enter a username and password for the site administrator.

Cómo instalar Drupal automáticamente en Plesk — captura 4

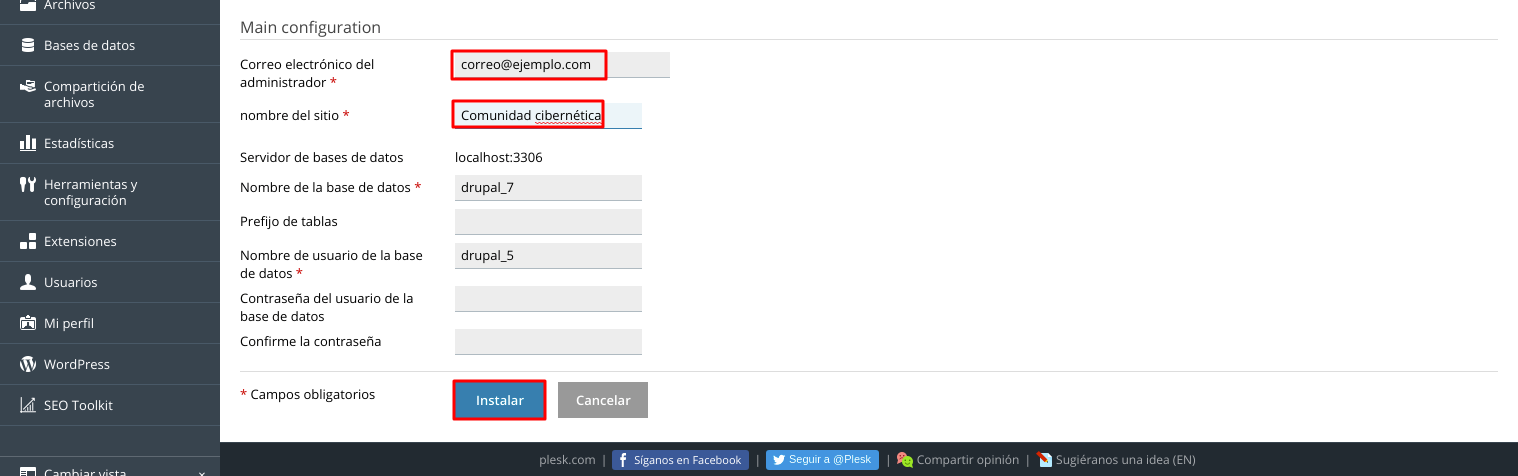
Enter an email address for the site administrator.

We will enter the name of our site.

We’ll fill in the fields related to our site’s database.

Now we’ll click “Install”:

Cómo instalar Drupal automáticamente en Plesk — captura 5

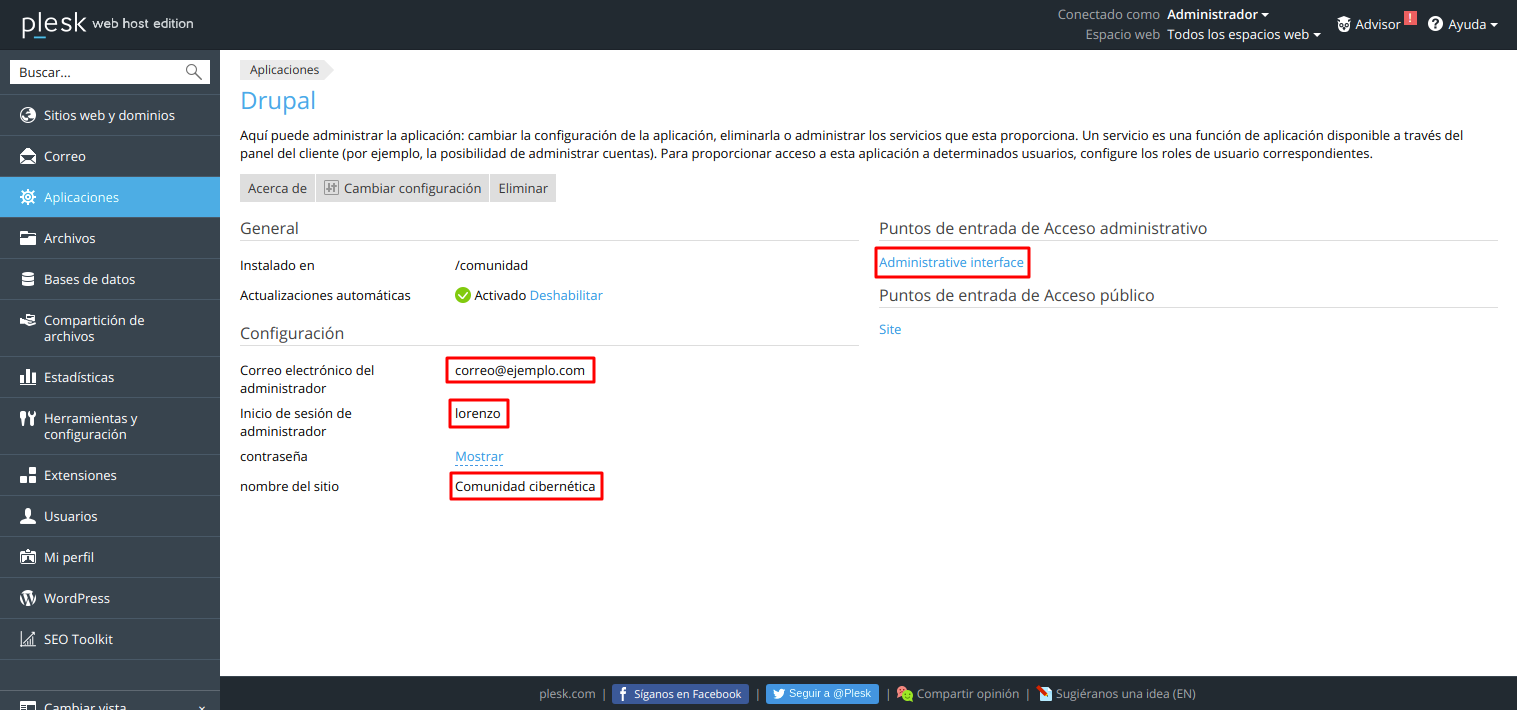
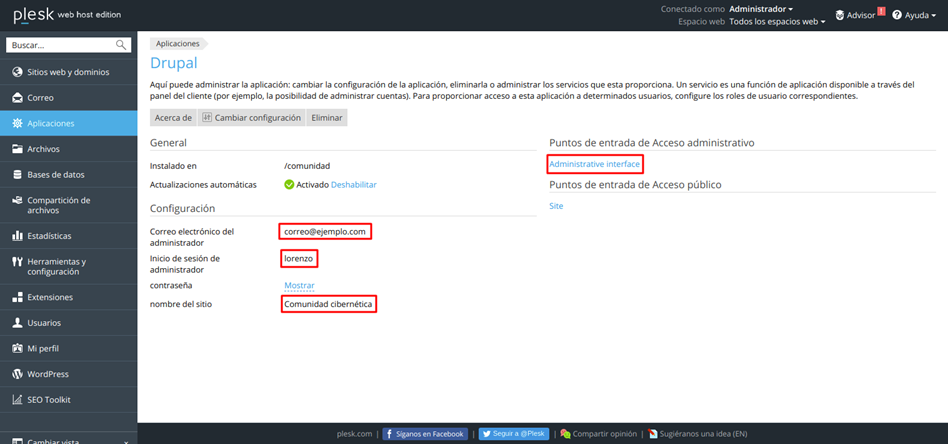
We can see that Drupal has been installed successfully. Next, to access the website’s administrative panel, click “Administrative Interface”:

Cómo instalar Drupal automáticamente en Plesk — captura 6

We log in using the administrator username and password specified earlier:

And now we can make changes to our website:

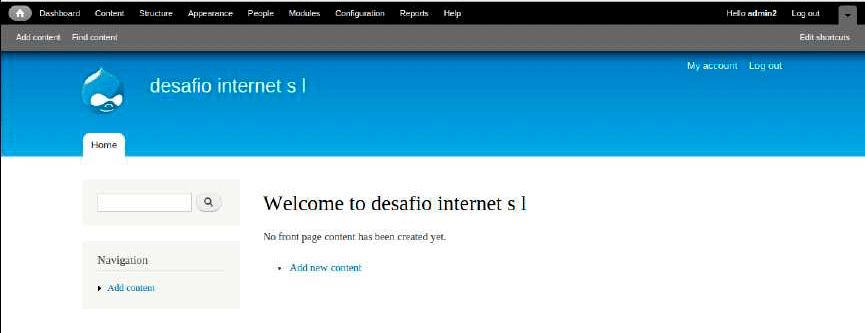
This is the default page of our Drupal website:

Cómo instalar Drupal automáticamente en Plesk — captura 7

How to Automatically Install Moodle on Plesk

Steps to automatically install Moodle from the Plesk control panel:

From the Plesk control panel’s “Websites & Domains” home page, select the domain where you want to install the Moodle application and click “Install Applications”:

Now enter the name of the application and click “Search”:

Cómo instalar Moodle automáticamente en Plesk — captura 1

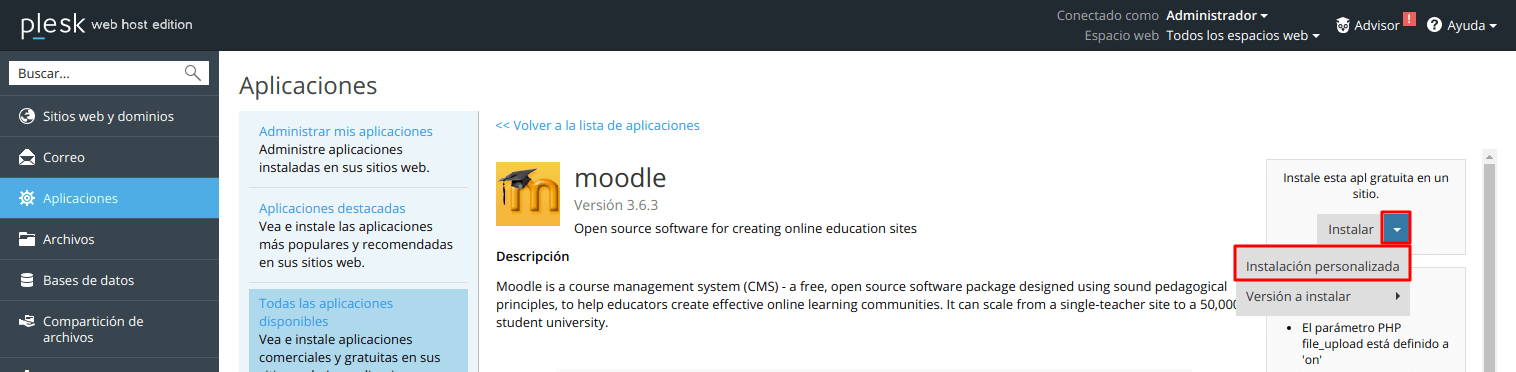
Select the application and click “Install (Custom)”:

Cómo instalar Moodle automáticamente en Plesk — captura 2

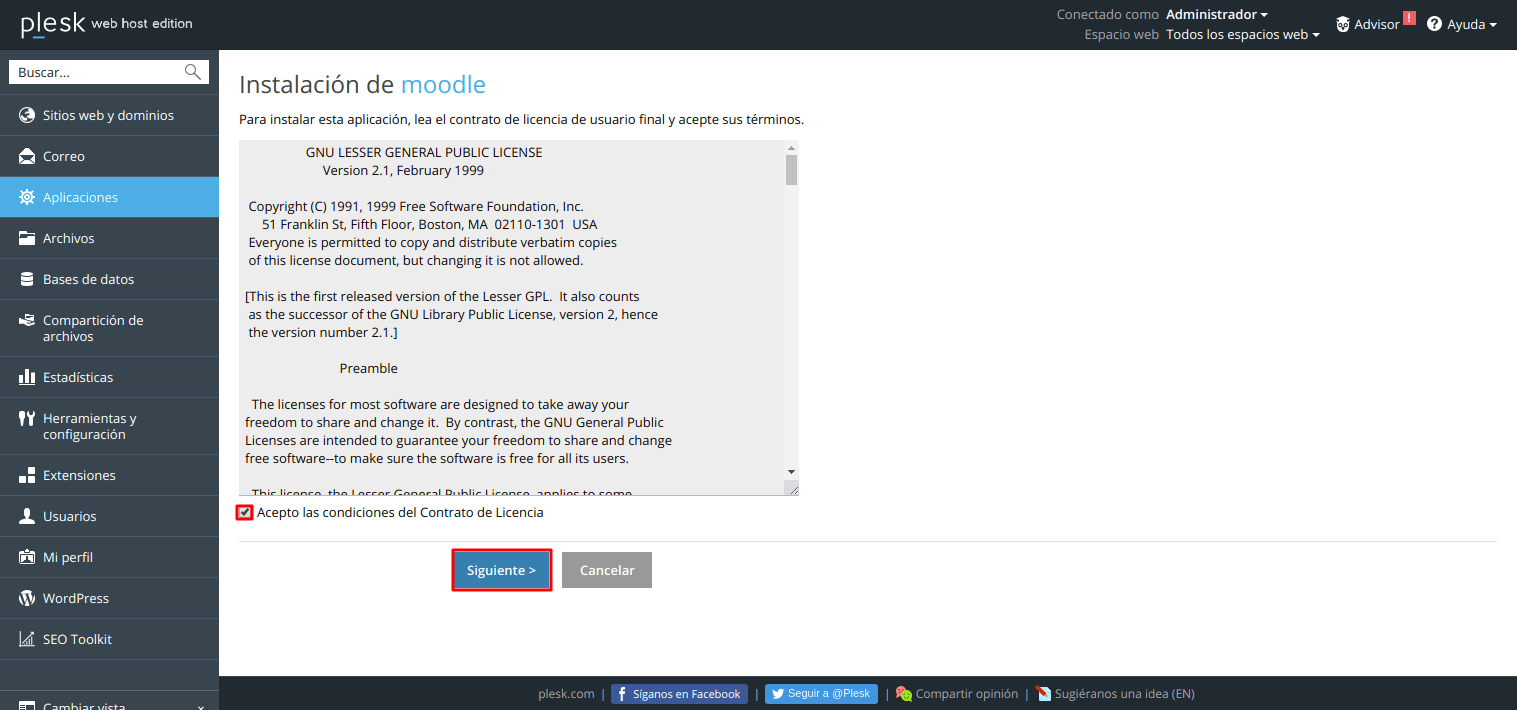
Next, check the box for Moodle’s terms and conditions and installation licenses, then click “Next”:

Cómo instalar Moodle automáticamente en Plesk — captura 3

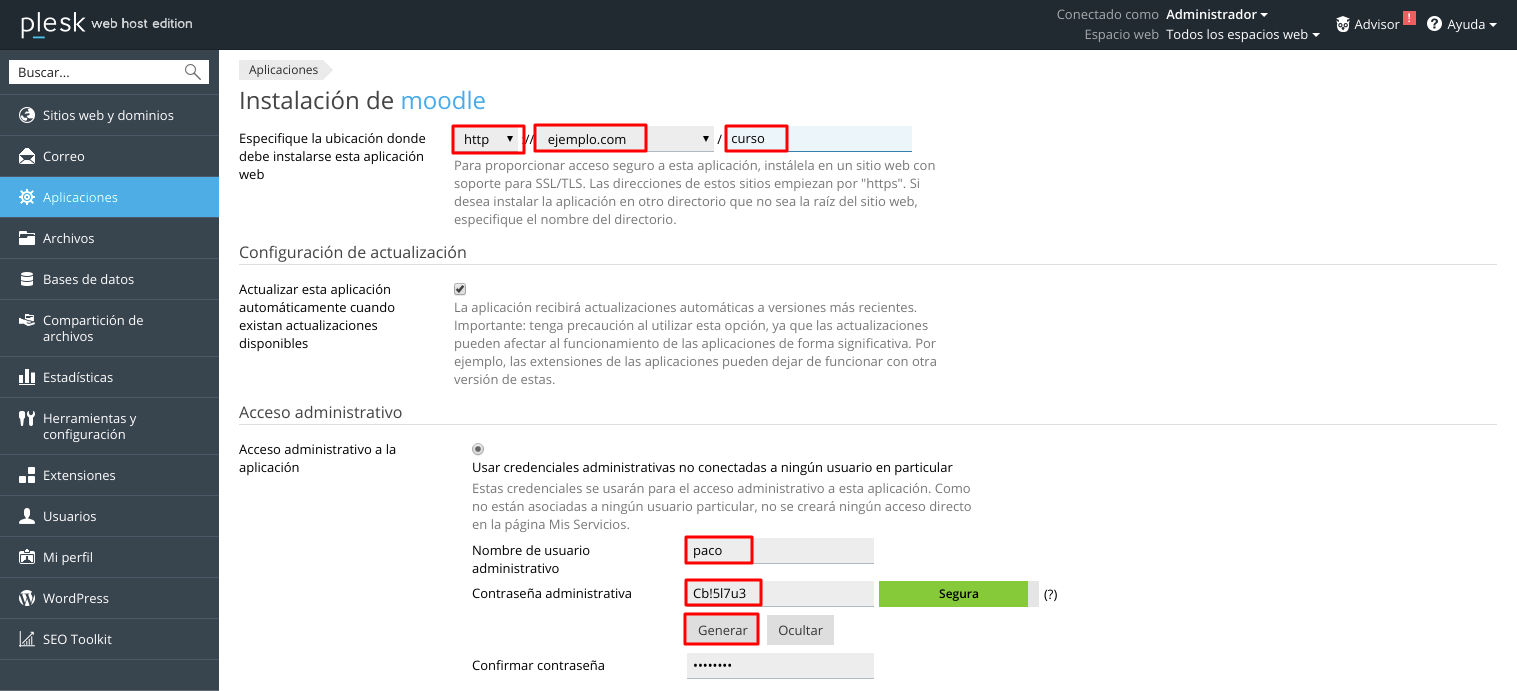
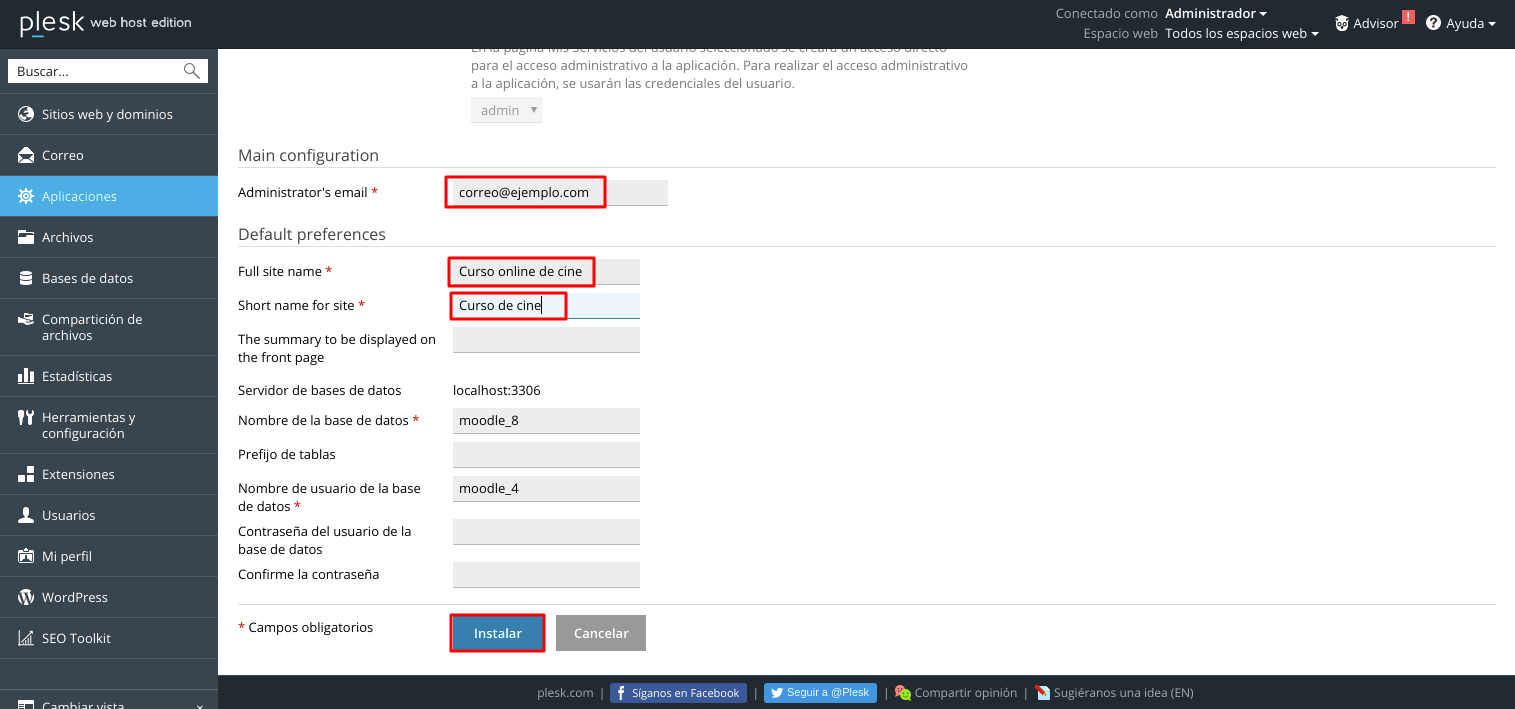
Now let’s configure the following settings to complete the installation:

Domain and directory where you want to install Moodle (In this example, we’ll install Moodle in the root directory of the crearmoodle.es domain).

Update settings: Check the box for automatic application updates.

Specify a username and password for the administrator:

Cómo instalar Moodle automáticamente en Plesk — captura 4

Specify an email address for the administrator.

We will enter the name of our city.

From the drop-down list, select your country.

The full name and short name of our Moodle site.

Select the interface language for your Moodle (by default, it is in English and cannot be changed during the installation process; it can be changed later by installing language packs).

Click “Install” to complete the installation:

Cómo instalar Moodle automáticamente en Plesk — captura 5

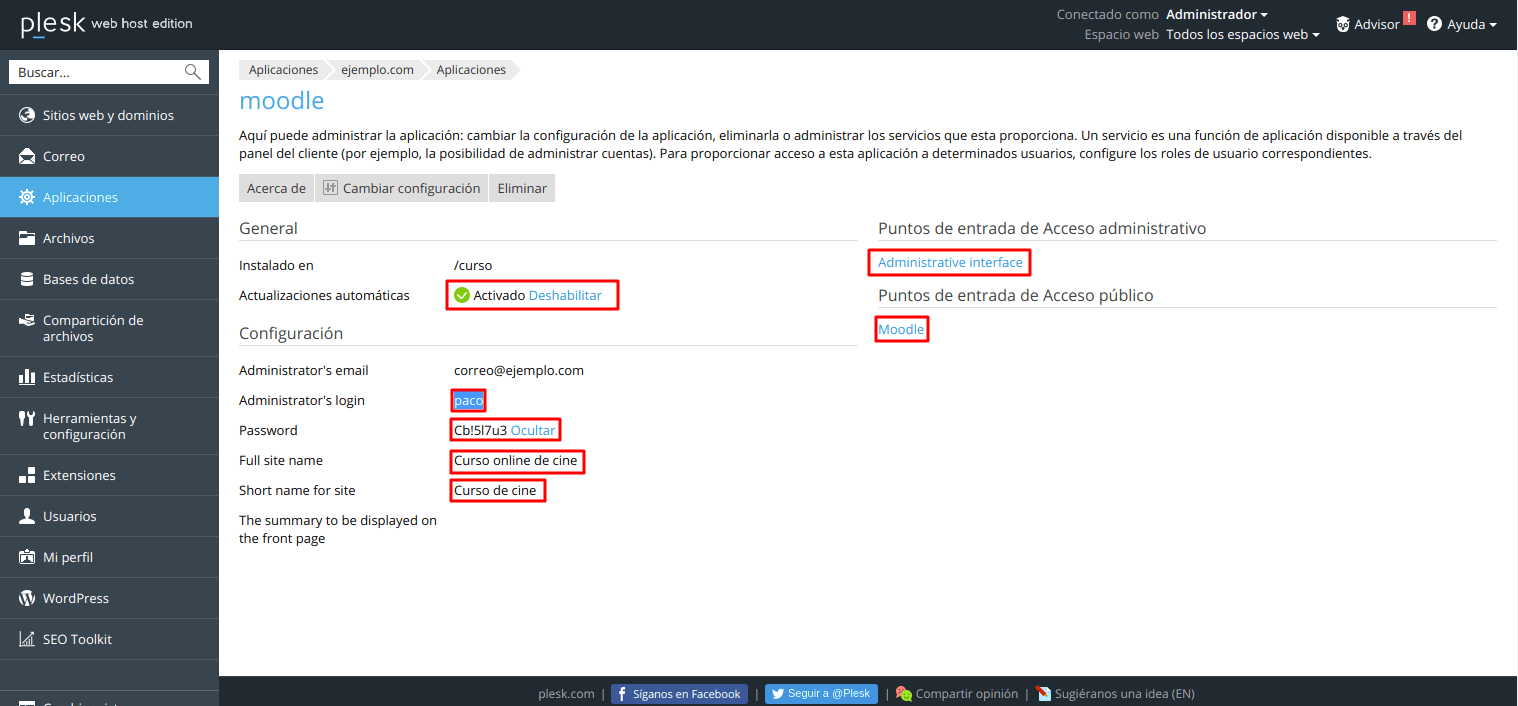
Moodle has been installed successfully. You can now access the Moodle administrative interface by clicking “Administrative Interface, or access the default Moodle site by clicking “Moodle”:

Cómo instalar Moodle automáticamente en Plesk — captura 6

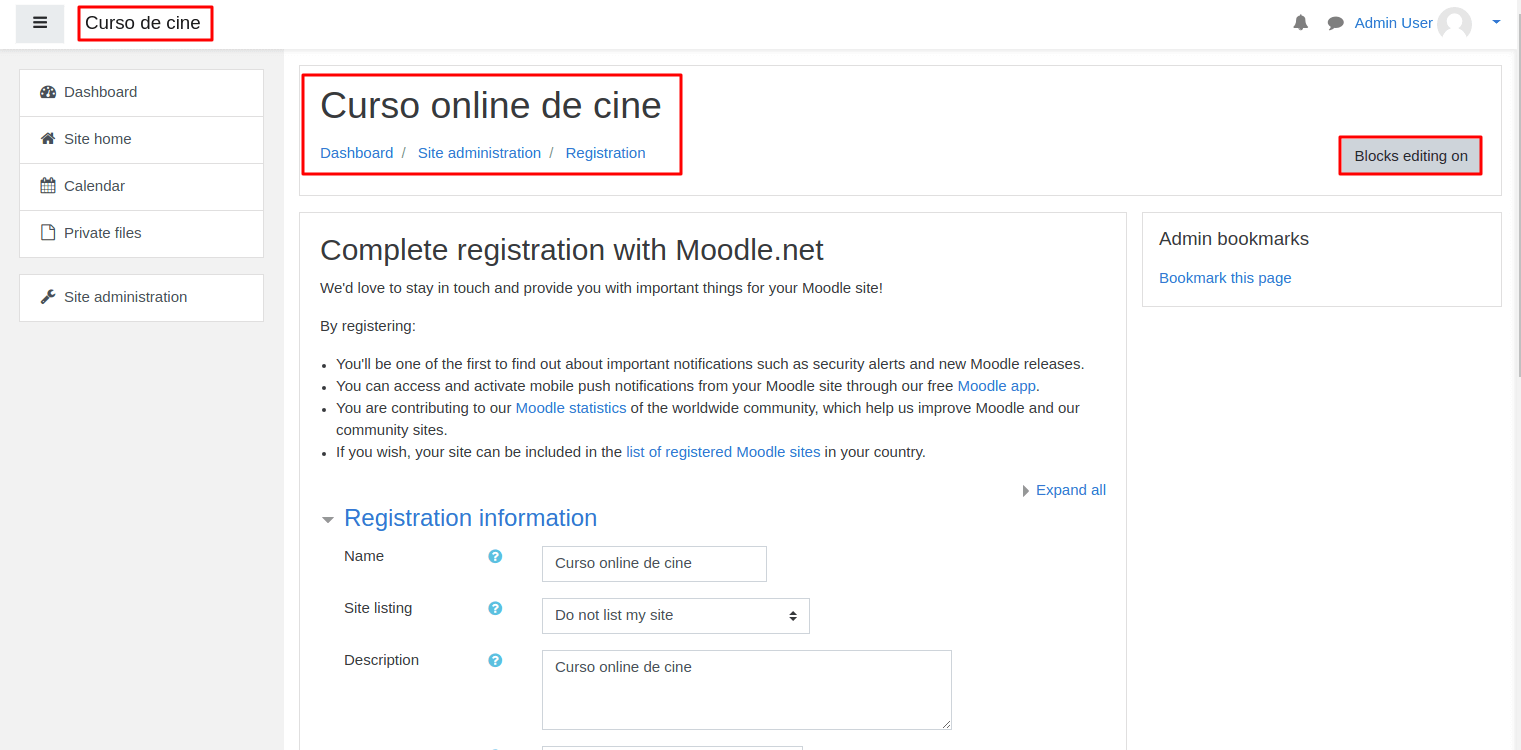
This is what our default Moodle looks like:

Cómo instalar Moodle automáticamente en Plesk — captura 7

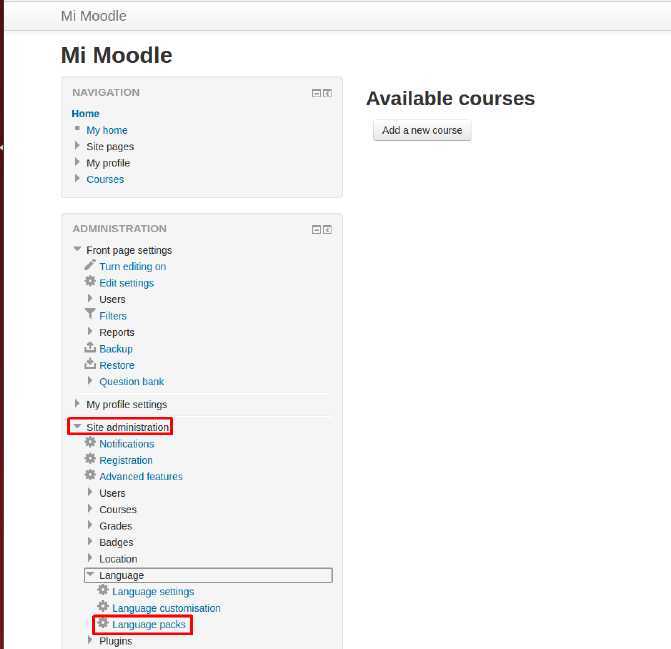
Change the language of the Moodle interface:

Go to the menu on the left, click on “Site administration,” and then on “Language packs”:

Cómo instalar Moodle automáticamente en Plesk — captura 8

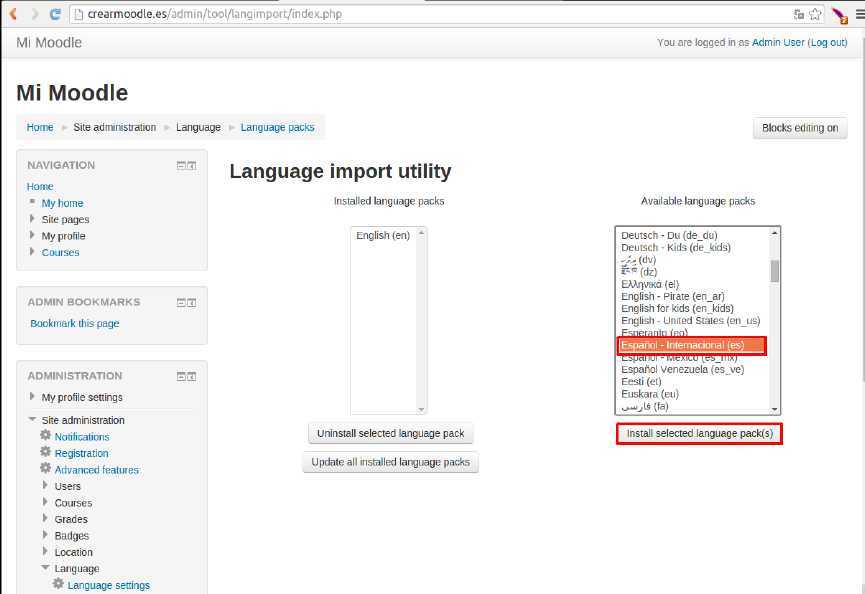
Next, find the language “Spanish-International (es)” in the list of languages, select it, and click “Install selected language pack(s)”:

Cómo instalar Moodle automáticamente en Plesk — captura 9

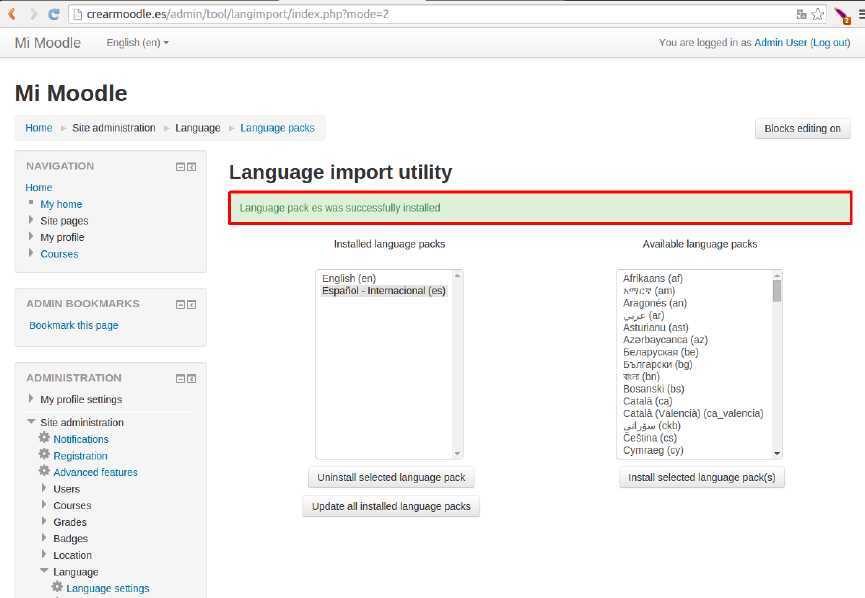
We can see that the language pack has been installed successfully:

Cómo instalar Moodle automáticamente en Plesk — captura 10

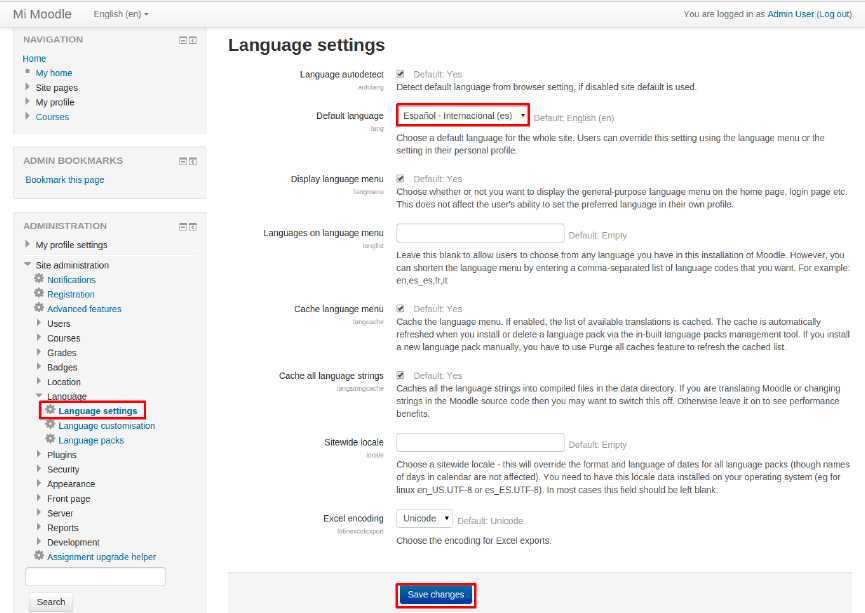
Now let’s set that language pack as the default language: Go to “Site administration” > “Language Settings,” and in the “Default language” field, select the language pack installed in the previous step, then click “Save changes”:

Cómo instalar Moodle automáticamente en Plesk — captura 11

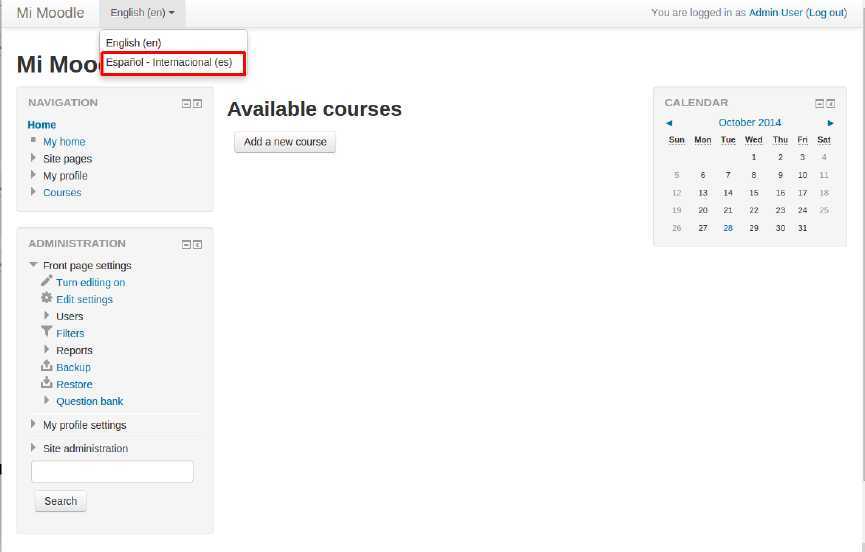
Now, on the Moodle homepage, we can choose which language the interface appears in:

Cómo instalar Moodle automáticamente en Plesk — captura 12

How to Automatically Install Joomla in Plesk

Steps to automatically install the Joomla application from the Plesk control panel:

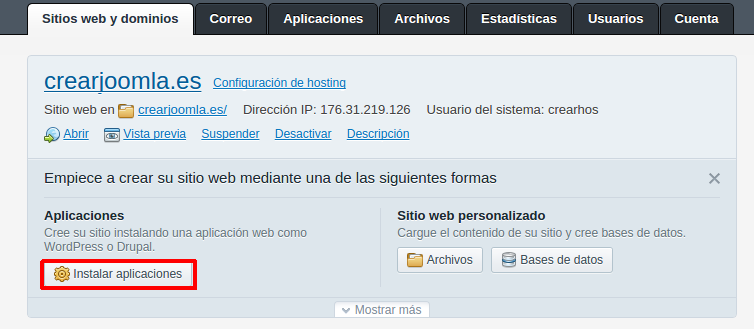
First, from the main Plesk dashboard under “Websites & Domains,” select the domain where you want to install the Joomla application and click “Install Applications”:

Cómo instalar Joomla automáticamente en Plesk — captura 1

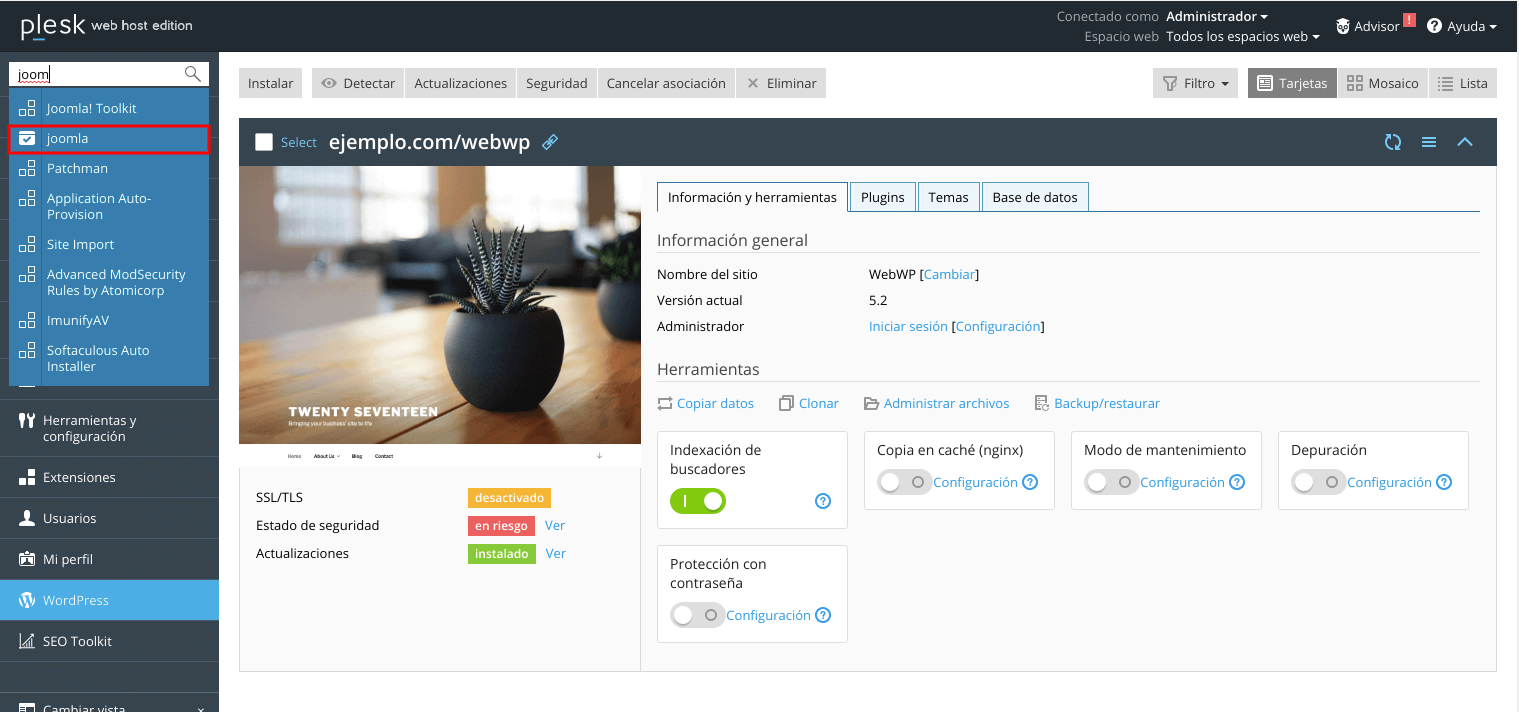
Now, make sure the “All Available Applications” section is selected. In the “Applications” field, type “Joomla” and click “Search”:

Cómo instalar Joomla automáticamente en Plesk — captura 2

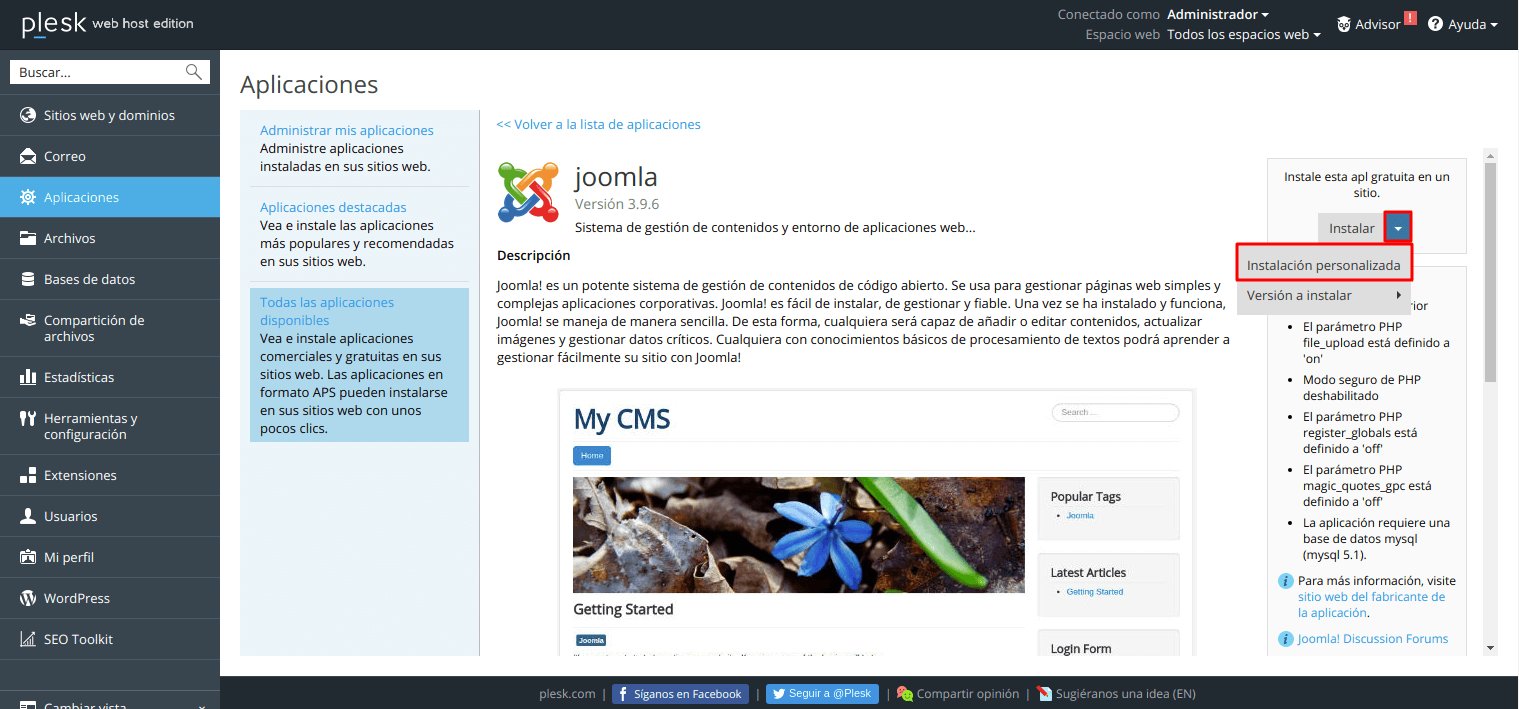
When the search is complete, select the Joomla application and click “Install (Custom)”:

Cómo instalar Joomla automáticamente en Plesk — captura 3

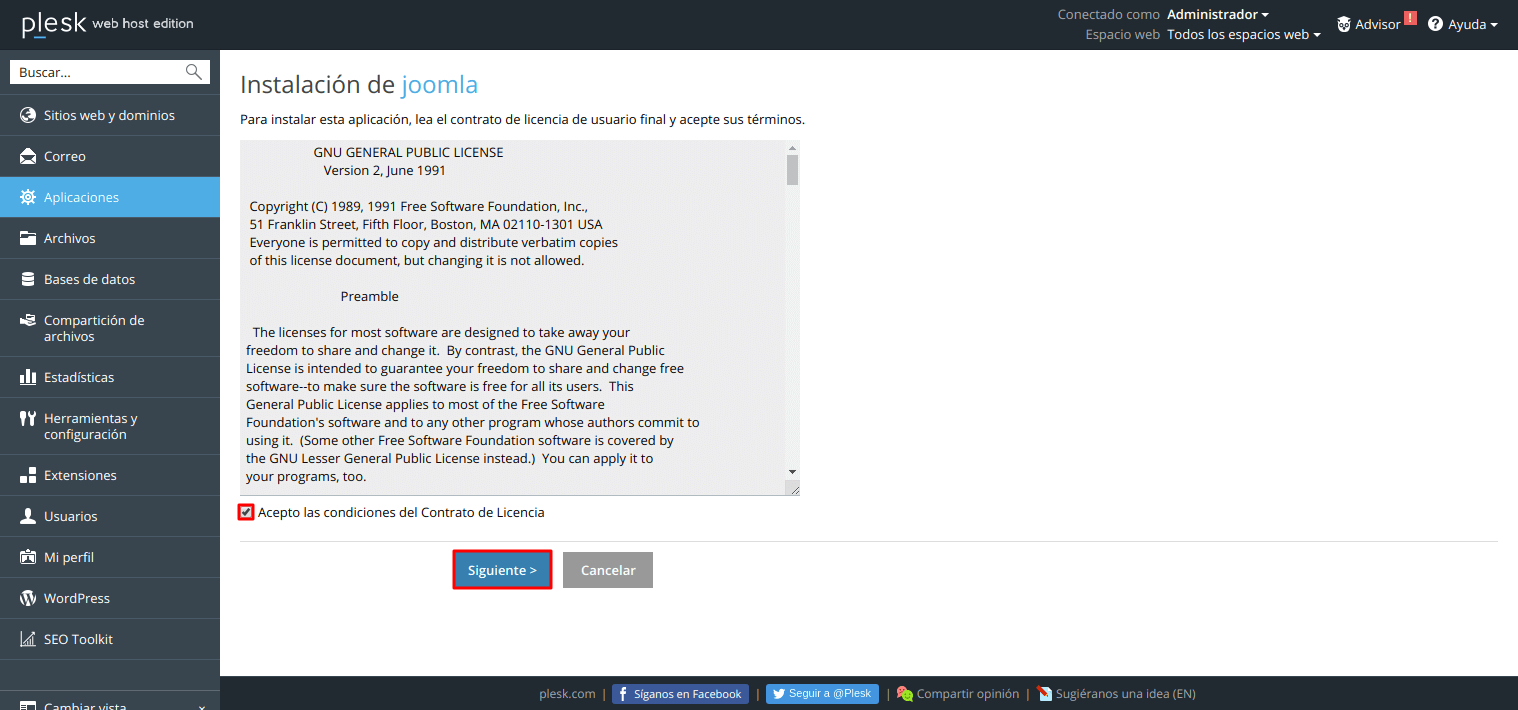
Next, accept the Joomla installation terms and click “Next”:

Cómo instalar Joomla automáticamente en Plesk — captura 4

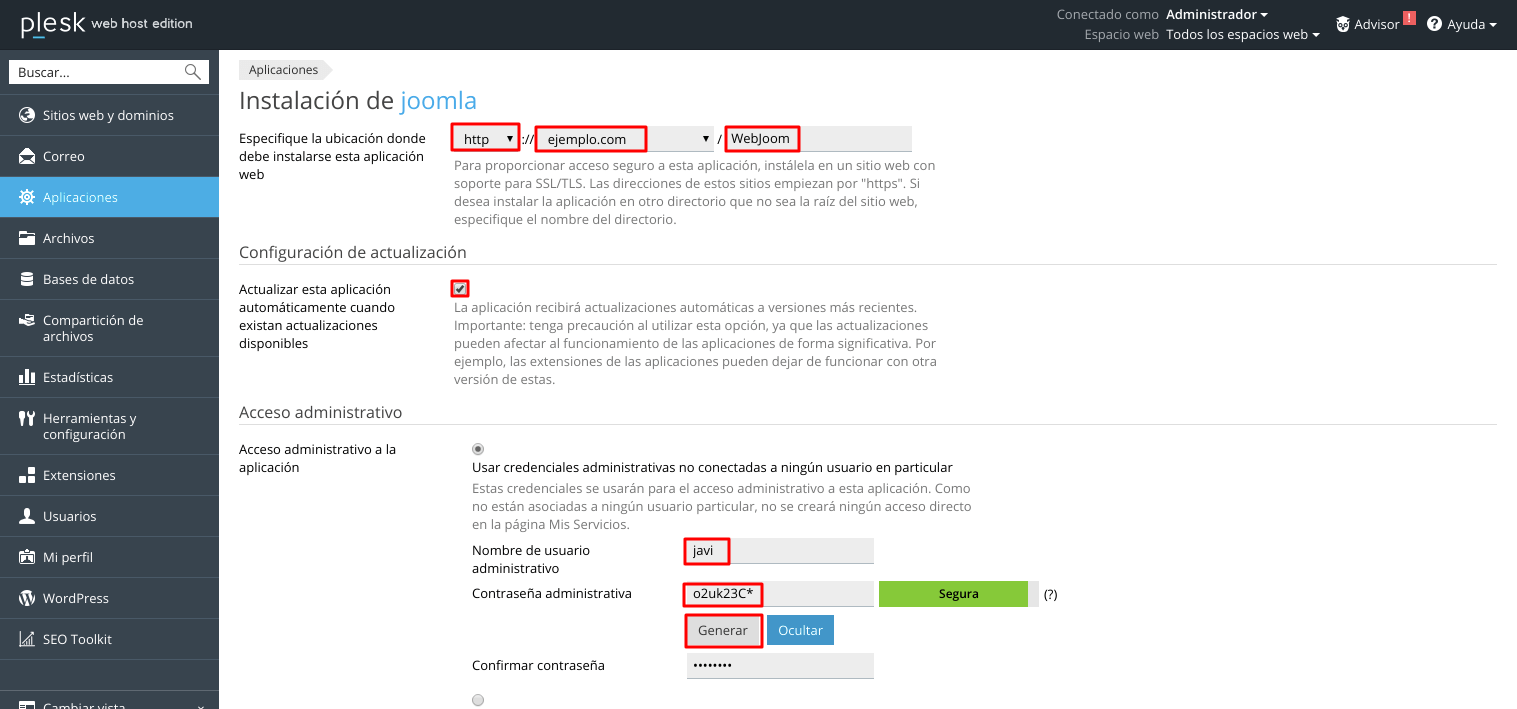
Now fill in the following fields to complete the Joomla installation:

  • Domain and directory where the Joomla application files will be hosted (In our case, we’ll host them in the root directory of the “crearjoomla.es” domain):
  • Update Settings: Check the box if you want the application to update automatically when updates are available.
  • Administrative Access: Select the option: “Use administrative credentials not linked to any specific user.”
  • Administrator username and password: Enter the username and password for the administrator account.
Cómo instalar Joomla automáticamente en Plesk — captura 5

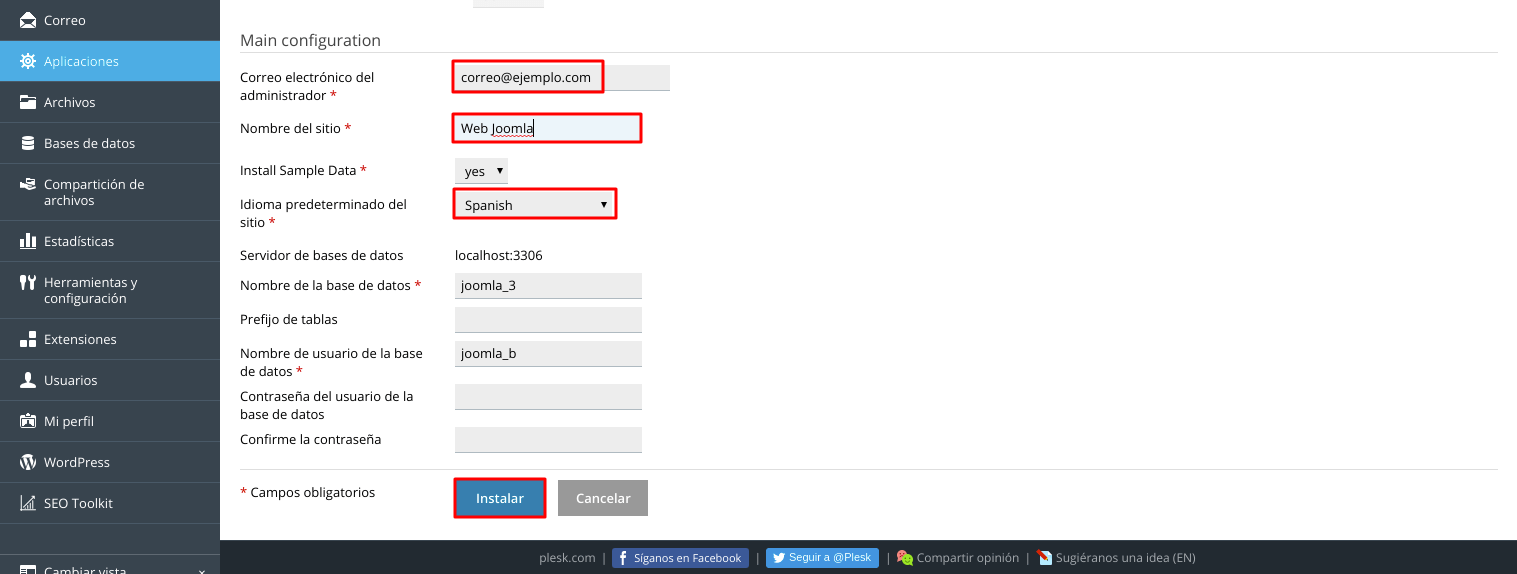
“Main Configuration” section :

  • Site name: Enter the name of your website.
  • Default Site Language: Select “Spanish.”
  • Database Name: You can leave this as the default or enter the name of the database you created specifically for installing Joomla.
  • Table prefix: It is recommended to leave this as the default.
  • Database username: You can leave this as the default, or specify a database user for the database where Joomla will be installed (previously created).
  • Database user password and confirm password: If you leave these fields blank, a password will be generated automatically; if you previously specified a database created before the installation process, you’ll need to enter the database user’s password.

Click “Install” to complete the installation process:

Cómo instalar Joomla automáticamente en Plesk — captura 6

A message indicates that the application has been installed successfully:

Next, go to the “Websites and Domains” page, select the domain where you installed the Joomla app, and click “Open”:

Cómo instalar Joomla automáticamente en Plesk — captura 7

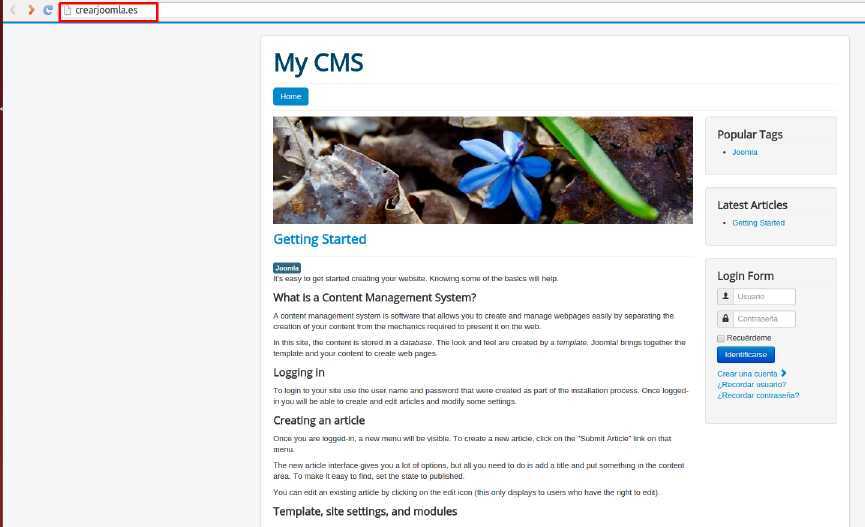
Here’s what our default Joomla page looks like:

Cómo instalar Joomla automáticamente en Plesk — captura 8

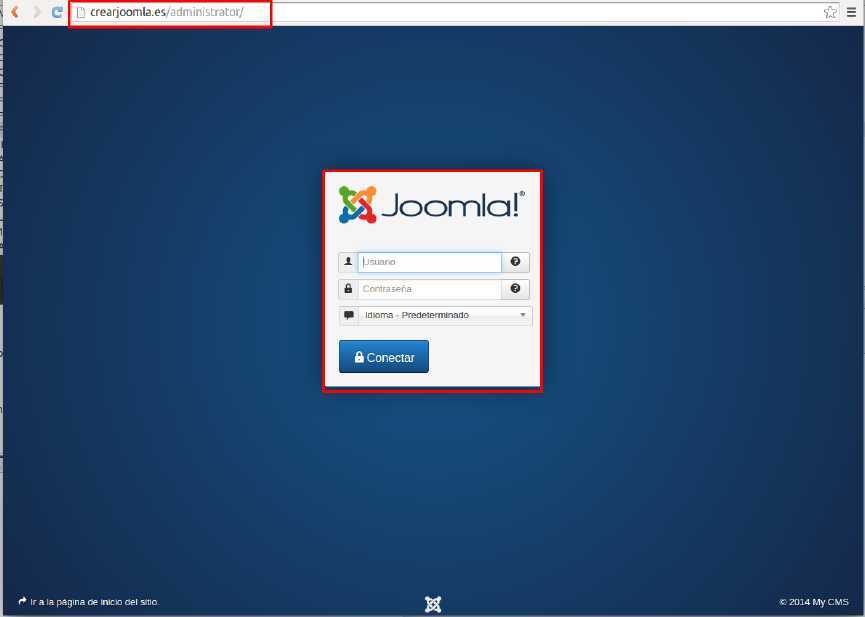
To access the admin panel, type your domain name followed by /administrator/ into the browser

Then log in as an administrator.

Cómo instalar Joomla automáticamente en Plesk — captura 9

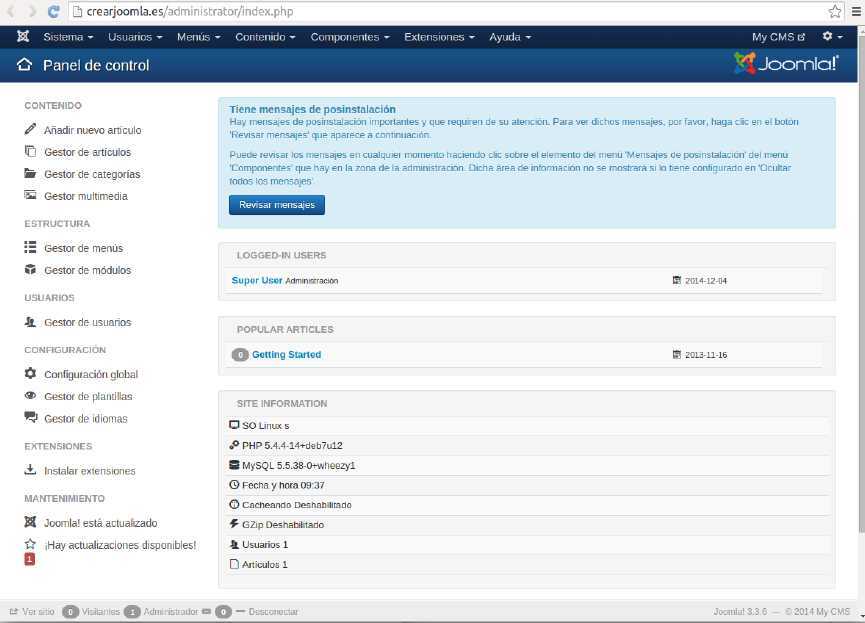
You can now access your Joomla administration panel:

Cómo instalar Joomla automáticamente en Plesk — captura 10

How to Manage Applications in Plesk

Installing Applications.

Depending on your needs and level of experience, you can choose one of the following ways to install an app:

Quick: This is the easiest way to install an application. If you choose this option, Plesk will perform a typical installation of the latest version of the selected application, using the default settings for the application configuration. For example, your Plesk login credentials will be used as the application administrator credentials.

Note: Some applications require you to specify certain settings, even if you select the quick installation. Custom: This option allows you to customize application installation settings, such as administrator credentials, installation location, installation path, and more. In particular, you should use the custom installation if you want to disable automatic application updates.

To install an application:

Select the “Apps” tab and find the app you need.

Click the “Install” button for a quick installation or “Install (Custom)” for a custom installation.

Example:
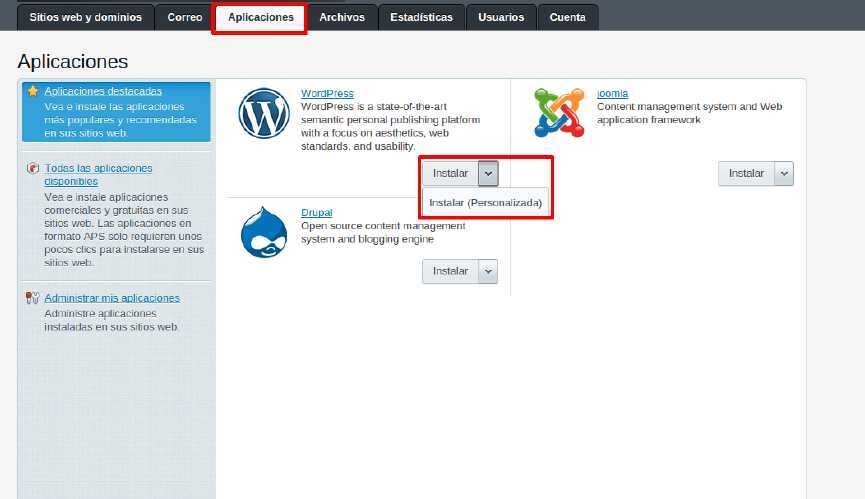
Cómo administrar aplicaciones en Plesk — captura 1

Sometimes, you may need to install a specific version of an app. For example, if you want to use app extensions that aren’t compatible with the latest version of the app. In this case, click on the “app name,” select “Choose a different version, and then choose the version you need. Next, install the app.

Example:
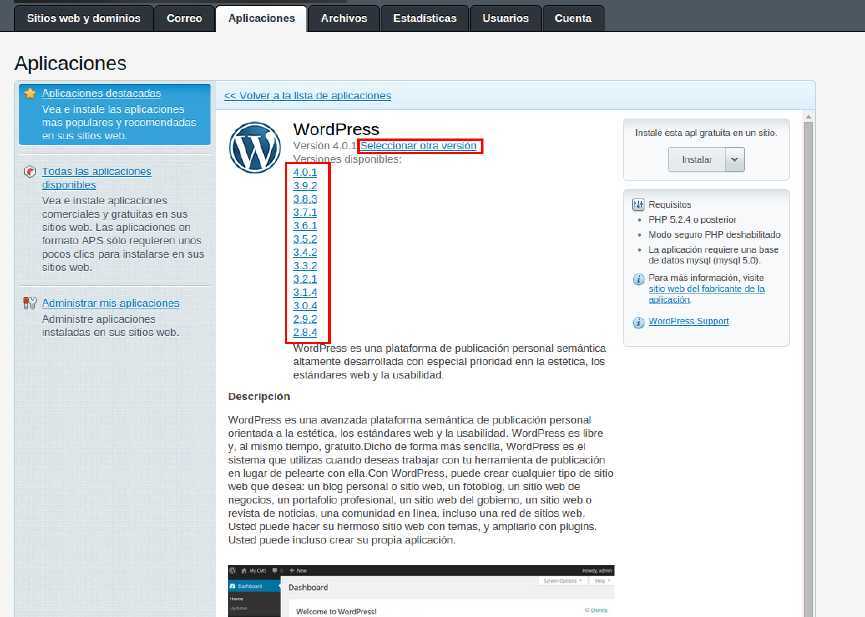
Cómo administrar aplicaciones en Plesk — captura 2

Note: For commercial applications, you need to obtain a license key; click “Buy Now” before starting the installation. For more information on using commercial applications, see the Commercial Application License Management section.

Application Management:.

If an application provides part of its Plesk functionality through services, you have the option to configure them. For example, the SugarCRM application allows you to create user accounts and provides this capability as a service in the control panel. After selecting this service from the available services, you can view all user accounts for the application and create new ones. For some applications, you can associate application accounts with auxiliary user accounts. Learn more about account association in the Linking Applications and Auxiliary User Accounts section.

Note: If the WordPress Toolkit is installed on the server, users are encouraged to use it for centralized management of WordPress installations on the server.

Granting Auxiliary Users Access to Applications:

By default, after installing an app, only users with the owner role can access it. To allow other users in the subscription to access the app:

Grant permission to access the application to a specific group of users under Users >> User Roles. Be sure to add the users of your choice to the group.

Once you allow users to access the app, a link to the app appears on their websites and domains with the name of the corresponding web page. Please note that you can only control app access for user groups, so you must either modify the permissions of an existing group or create a new one, and then assign users to it.

Applications: Linking auxiliary user accounts:.

Some applications allow you to create and manage user accounts without logging out of the application. If an application provides this type of account service, you can link users from a Plesk subscription to accounts in the application. To perform this linking:

Organize users into a specific group(Users >> User Roles).

Grant one of these group permissions:

Public access.
If granted, all users in the group will have access to the app via the link on the Websites and Domains page.
Personal access.
If granted, the app will automatically create accounts for all users in the group. After that, the Websites and Domains page will contain an additional link allowing users to log in to a personal account in the app. Please note that if personal access permission is denied, the application will automatically delete all accounts associated with this group.

Upgrade applications.

Automatic updates.

By default, Plesk installs the latest available application versions and updates as soon as new versions are released. However, updating an application can significantly change its functionality: For example, plug-ins or extensions developed for a specific version of the application may be incompatible with newer versions. Therefore, you may want to disable automatic updates for the application.

To enable or disable automatic updates:

Go to Applications >> Manage My Applications and click the application name.

Example:
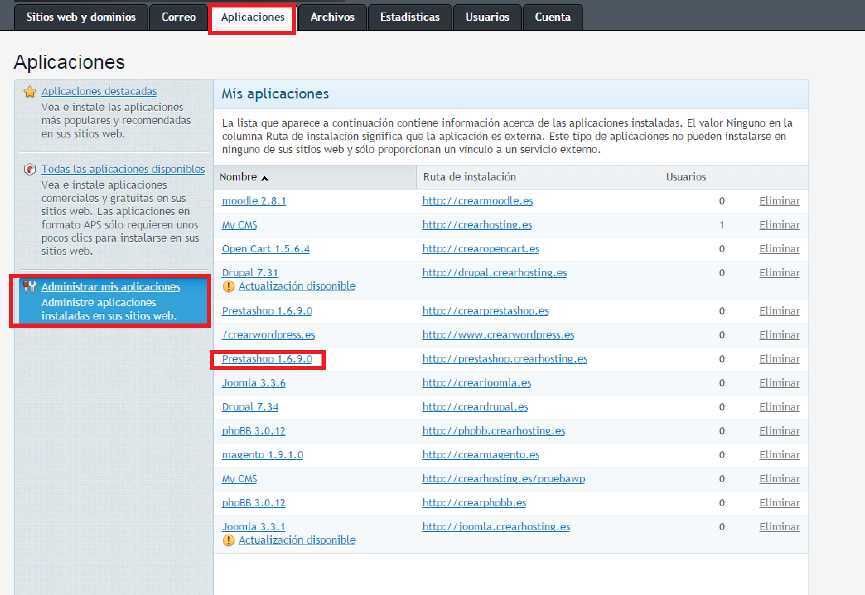
Cómo administrar aplicaciones en Plesk — captura 3

Click on Settings:.

Cómo administrar aplicaciones en Plesk — captura 4

Select or deselect the option "Automatically update this app when updates are available."
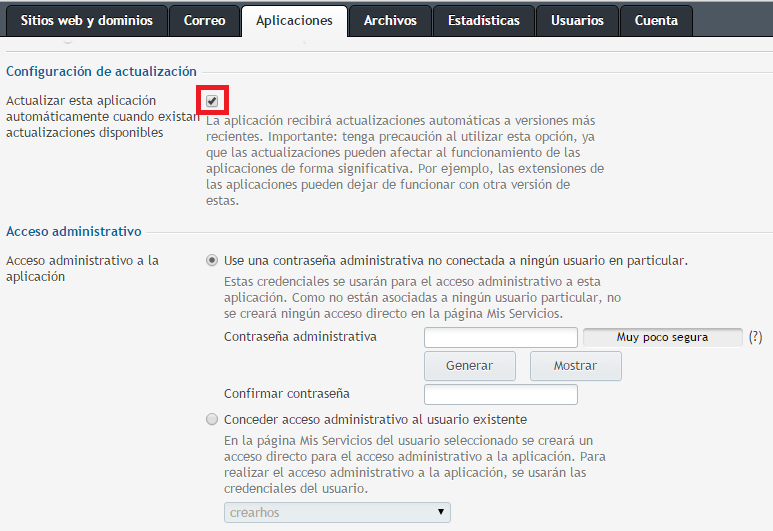
Cómo administrar aplicaciones en Plesk — captura 5

If you disable automatic updates for an app, Plesk will notify you of the availability of newer versions by adding an "Update" link under the app's name in Apps >> Manage My Apps.

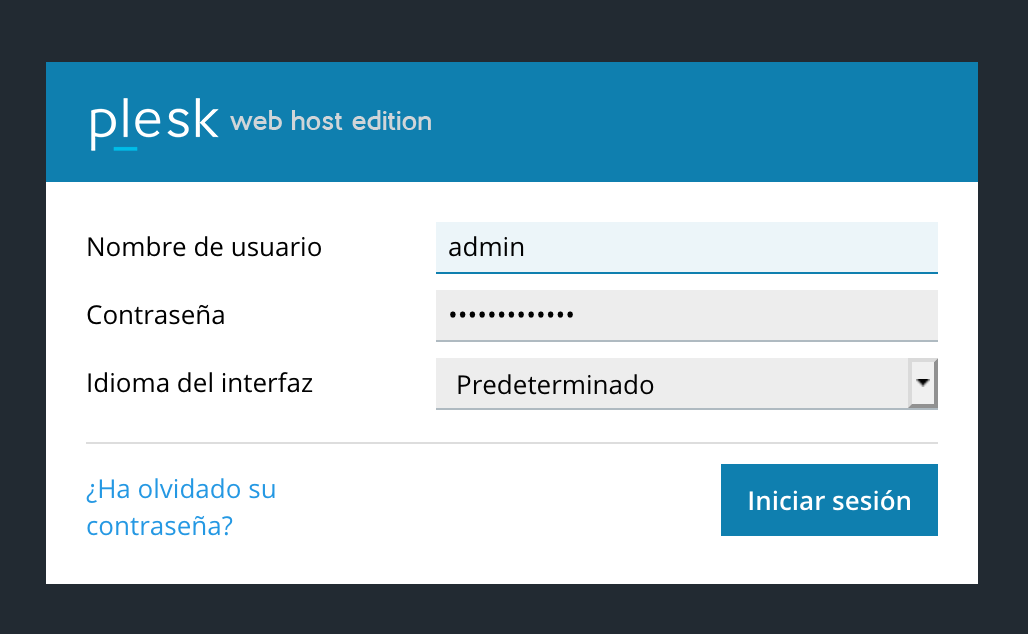
How to Access Drupal Administration in Plesk

To access the administration panel of our Drupal site, follow these steps:

There are two ways to access it: from the Plesk control panel or directly in your browser by entering the URL of the domain where your Drupal site is hosted.
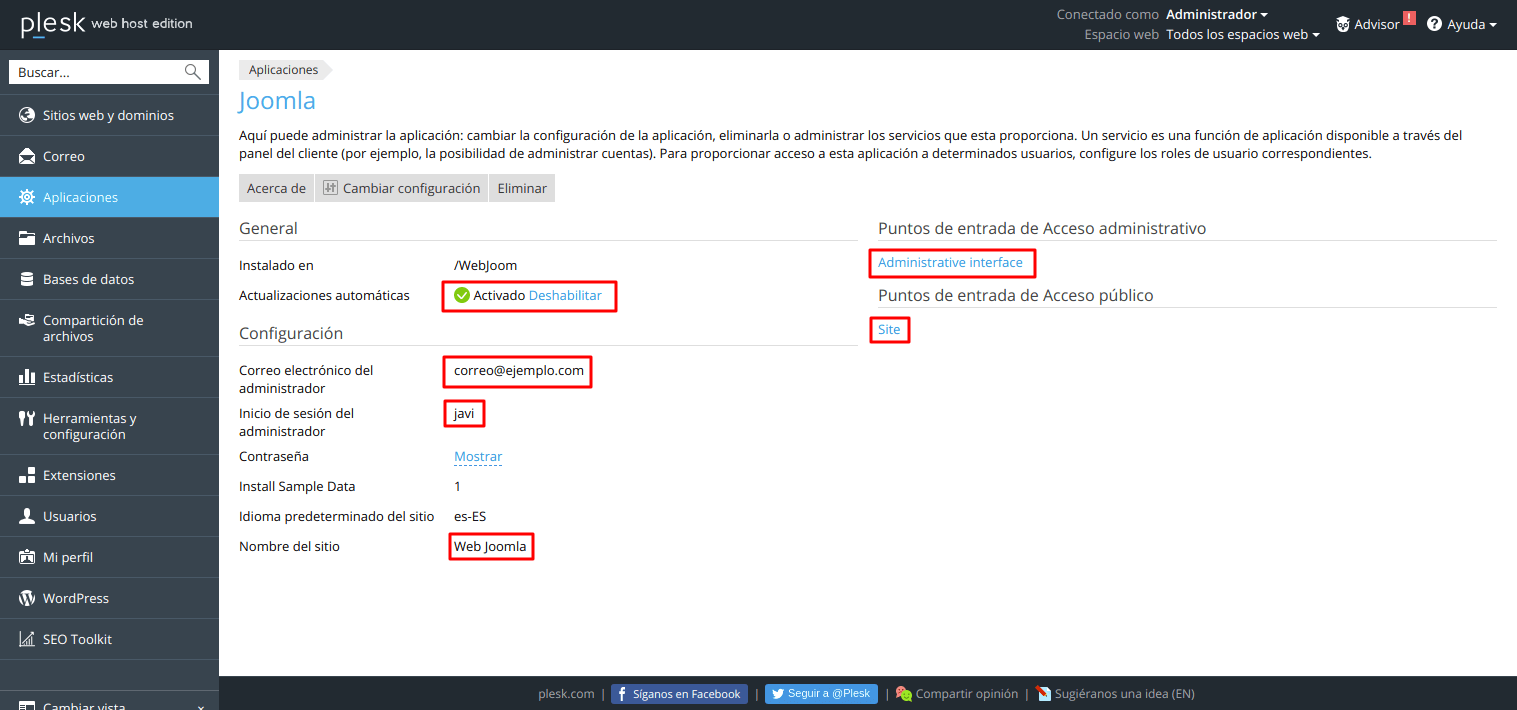
If you want to access it from the Plesk control panel:

Note: This option only appears if you installed Drupal automatically from the Plesk control panel’s applications:

From the main “Websites & Domains” tab in the Plesk control panel, click “Drupal” for the domain that hosts your Drupal site:

Next, click “Administrative Interface”:

Cómo acceder a la administración de Drupal en Plesk — captura 1

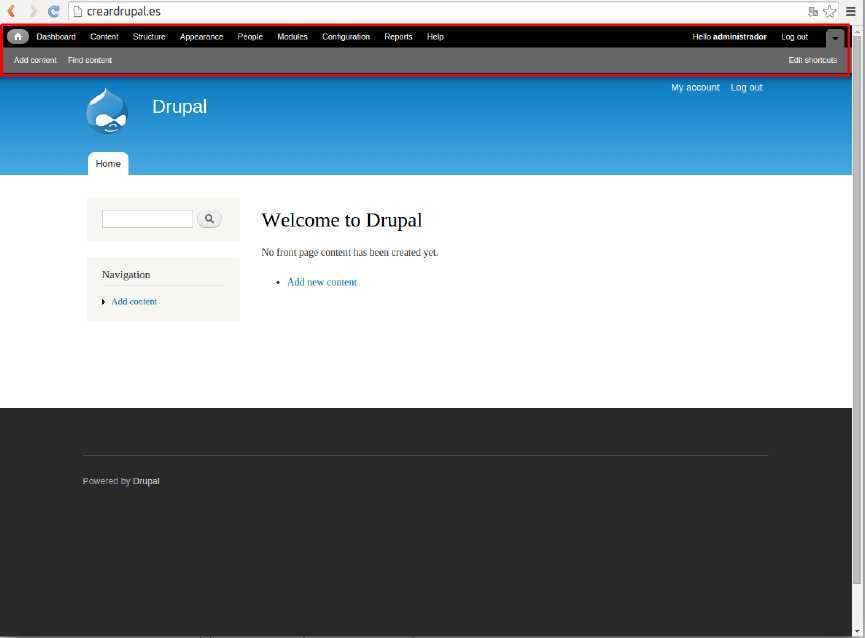
Since the Plesk panel has the administrator’s login credentials saved, we can access the administration interface directly without having to log in.

We can see that an administrative panel appears at the top of the page:

Cómo acceder a la administración de Drupal en Plesk — captura 2

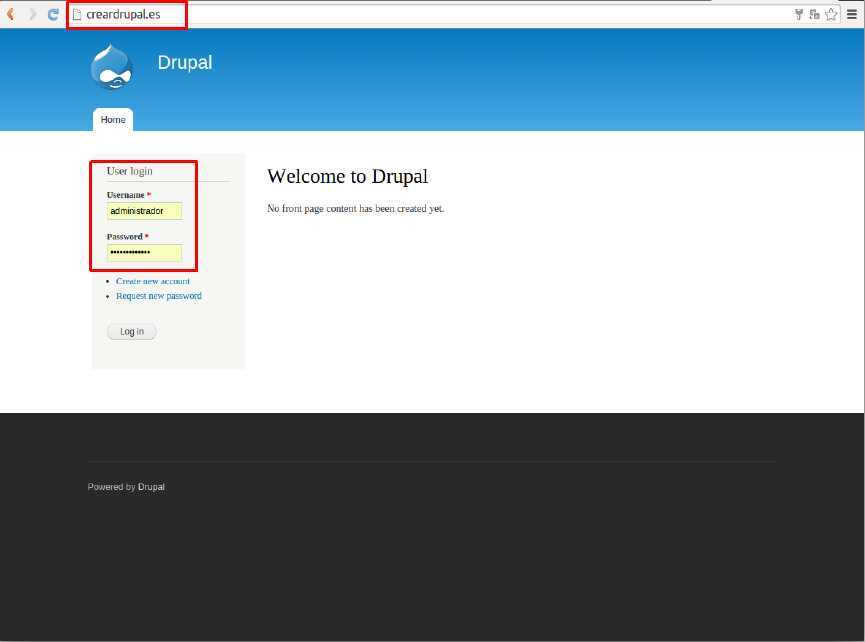
From our domain’s URL:

We log in to our site as usual and then enter the username and password for the Drupal administrator:

Cómo acceder a la administración de Drupal en Plesk — captura 3

We now have access to the administration panel. We can see that the administration panel appears at the top of the page:

Cómo acceder a la administración de Drupal en Plesk — captura 4

How to Access the Joomla Admin Panel in Plesk

To access the administrative panel of our Joomla site, follow these steps:

There are two ways to access it: from the Plesk control panel or directly through your browser by entering the URL of the domain where Joomla is installed.

If you want to access it from the Plesk control panel:

Note: This option only appears if you have installed Joomla automatically from the Plesk control panel’s applications:

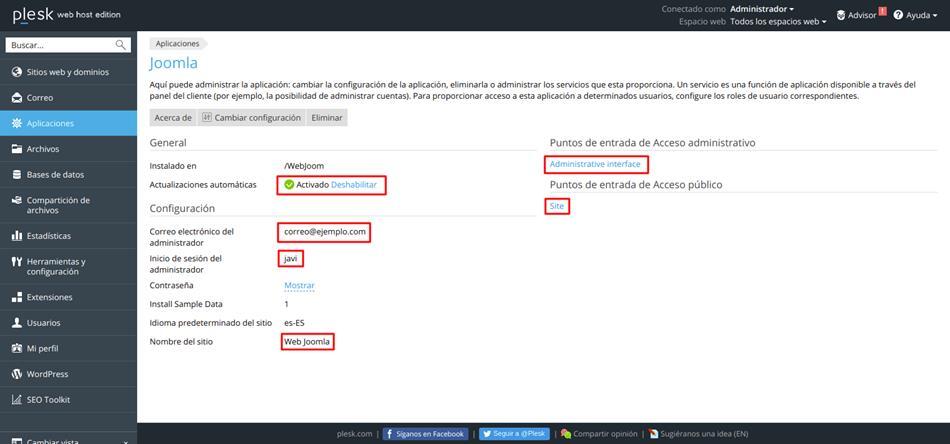
From the main “Websites & Domains” tab in the Plesk control panel, click “Joomla” for the domain that hosts your Joomla installation:

Next, click “Administrative Interface”:

Cómo acceder a la administración de Joomla en Plesk — captura 1

Since the Plesk control panel has the administrator login credentials saved, we can access the Joomla administration directly without having to log in:

We now have access to the Joomla administration panel:

Cómo acceder a la administración de Joomla en Plesk — captura 2

-From our domain’s URL:

We’ll type the following URL into the web browser:

tudominio.com/administrator.

(Replace "yourdomain.com" with your actual domain name.)

Next, we’ll log in using the Joomla administrator’s username and password:

Cómo acceder a la administración de Joomla en Plesk — captura 3

We can see that we have now accessed the Joomla admin panel:

Cómo acceder a la administración de Joomla en Plesk — captura 4

How to Access Moodle Administration in Plesk

To access the administrative panel of our Moodle, follow these steps:

There are two ways to access it: from the Plesk control panel or directly in your browser by entering the URL of the domain where Moodle is installed.

If you want to access it from the Plesk control panel:

Note: This option only appears if you installed Moodle automatically using the Plesk control panel's applications:

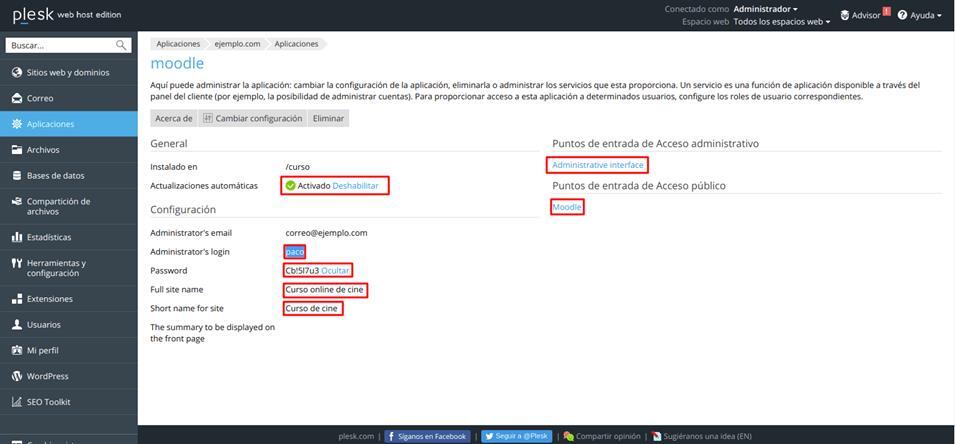
From the main “Websites & Domains” tab in the Plesk control panel, click “Moodle” for the domain that hosts your Moodle:

Next, click “Administrative interface”:

Cómo acceder a la administración de Moodle en Plesk — captura 1

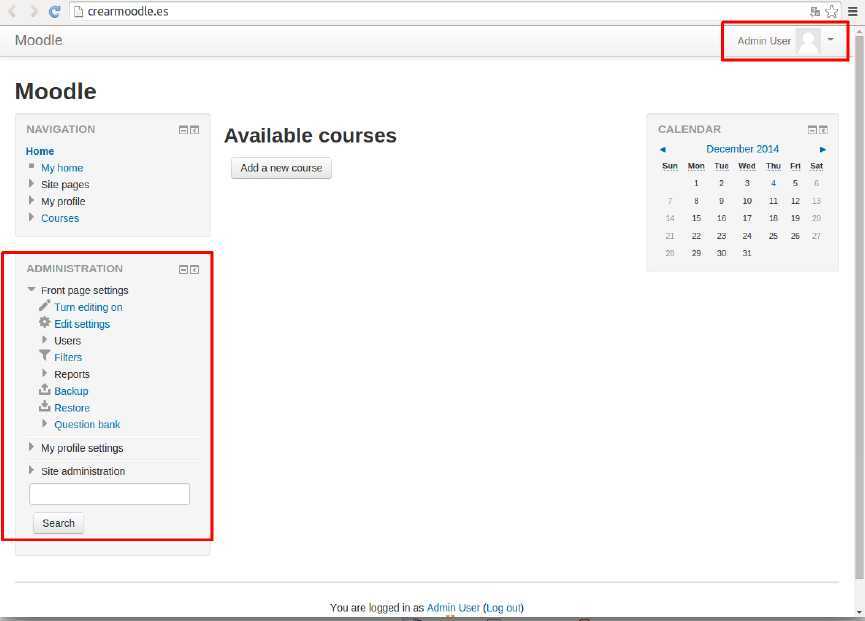
Since the Plesk panel has the administrator login credentials saved, we can access the Moodle administration directly without having to log in:

We can see the administration menu on the left:

Cómo acceder a la administración de Moodle en Plesk — captura 2

-Directly from our domain’s URL:

Cómo acceder a la administración de Moodle en Plesk — captura 3

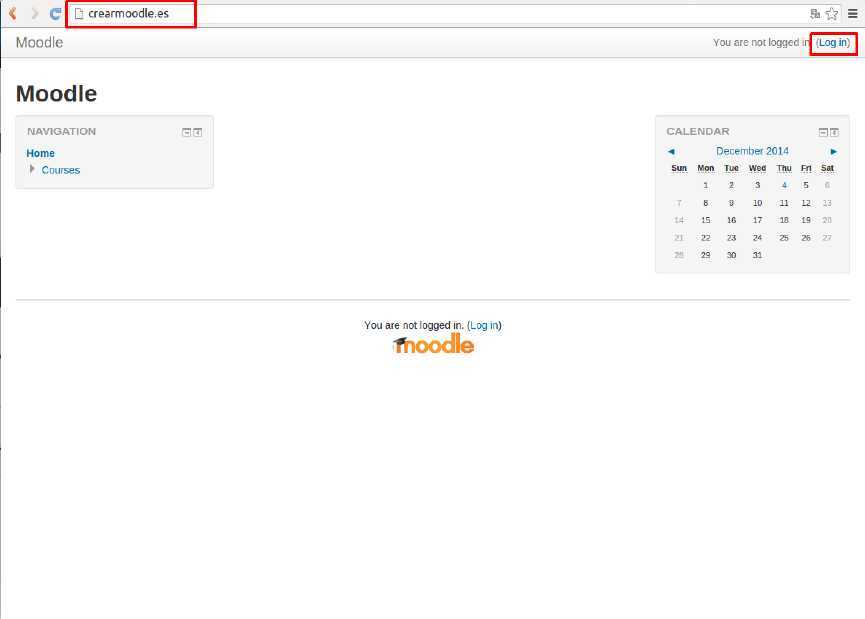
Go to the homepage of our domain

Then click on the “Log in” option :

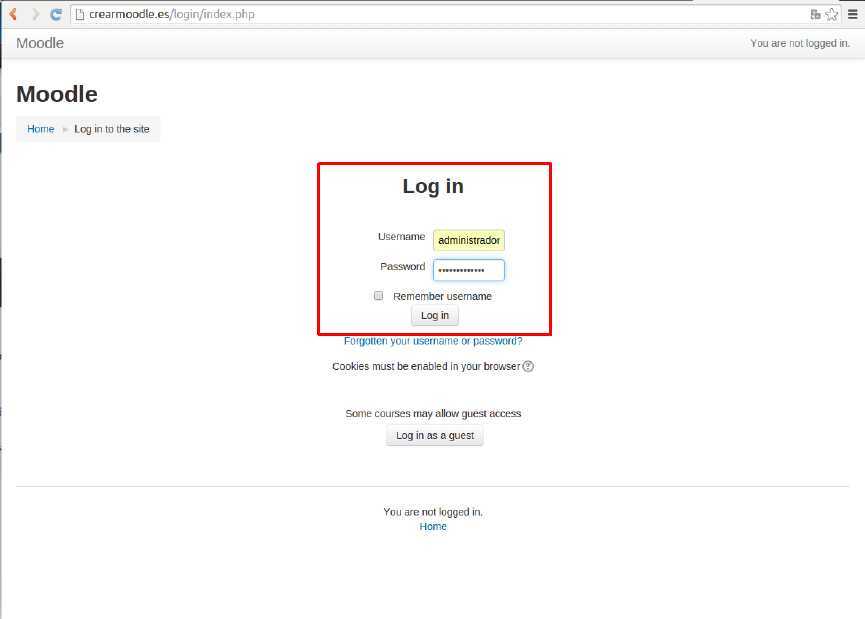
Cómo acceder a la administración de Moodle en Plesk — captura 4

Now we’ll log in using the Moodle administrator’s username and password:

We can see that we’ve logged in as an administrator, and the Moodle administration menu appears on the left:

Cómo acceder a la administración de Moodle en Plesk — captura 5